
User Manual

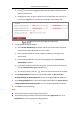
Table Of Contents
- Chapter 1 System Requirement
- Chapter 2 Network Connection
- Chapter 3 Access to the Network Camera
- Chapter 4 Wi-Fi Settings
- Chapter 5 Live View
- Chapter 6 Network Camera Configuration
- Chapter 7 Network Settings
- 7.1 Configuring Basic Settings
- 7.2 Configure Advanced Settings
- 7.2.1 Configuring SNMP Settings
- 7.2.2 Configuring FTP Settings
- 7.2.3 Configuring Email Settings
- 7.2.4 Platform Access
- 7.2.5 Wireless Dial
- 7.2.6 HTTPS Settings
- 7.2.7 Configuring QoS Settings
- 7.2.8 Configuring 802.1X Settings
- 7.2.9 Integration Protocol
- 7.2.10 Bandwidth Adaptation
- 7.2.11 Network Service
- 7.2.12 Smooth Streaming
- 7.2.13 HTTP Listening
- Chapter 8 Video/Audio Settings
- Chapter 9 Image Settings
- Chapter 10 Event Settings
- 10.1 Basic Events
- 10.2 Smart Events
- 10.2.1 Configuring Audio Exception Detection
- 10.2.2 Configuring Defocus Detection
- 10.2.3 Configuring Scene Change Detection
- 10.2.4 Configuring Face Detection
- 10.2.5 Configuring Intrusion Detection
- 10.2.6 Configuring Line Crossing Detection
- 10.2.7 Configuring Region Entrance Detection
- 10.2.8 Configuring Region Exiting Detection
- 10.2.9 Configuring Unattended Baggage Detection
- 10.2.10 Configuring Object Removal Detection
- 10.3 VCA Configuration
- Chapter 11 Storage Settings
- Chapter 12 Playback
- Chapter 13 Picture
- Chapter 14 Application
- Chapter 15 Open Platform
- Chapter 16 Smart Display
- Appendix

Network Camera User Manual
154
target is in the detection area. The camera makes the capture when it
reaches the max. interval even if the face grading does not reach the set
threshold.
Quick Setup Mode: Custom, Face Attendance, and Face Recognition are
selectable. Select according to actual using scenarios. In custom mode, you
can set Comparison Timeout and Comparison Times.
5. Select a face picture library.
6. Set arming schedule for face comparison.
7. Set linkage action for face comparison.
Note:
To see the comparison results, go to Application page.
Face Modeling
Purpose:
Face Modeling is a must-step before face comparison.
Steps:
1. Enter configuration page, and select Face Modeling.
Configuration > Comparison and Modeling > Face Comparison and Modeling
2. Check Enable Face Modeling.
3. Set modeling rules.
Enable Quick Capture: with this function enabled, the device starts face
modeling as soon as it detects a face which scores higher than the set Face
Grading Threshold for Capture.
Face Grading Threshold for Capture: the face grading threshold for the
device to judge whether to capture and upload the face or not.
Max. Capture Interval: the max. interval between two captures when the
target is in the detection area. The camera makes the capture when it
reaches the max. interval even if the face grading does not reach the set
threshold.
4. Set arming schedule for face modeling.