
User Manual
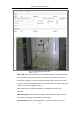
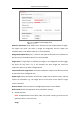
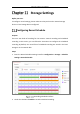


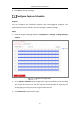


Table Of Contents
- Chapter 1 System Requirement
- Chapter 2 Network Connection
- Chapter 3 Access to the Network Camera
- Chapter 4 Wi-Fi Settings
- Chapter 5 Live View
- Chapter 6 Network Camera Configuration
- Chapter 7 Network Settings
- 7.1 Configuring Basic Settings
- 7.2 Configure Advanced Settings
- 7.2.1 Configuring SNMP Settings
- 7.2.2 Configuring FTP Settings
- 7.2.3 Configuring Email Settings
- 7.2.4 Platform Access
- 7.2.5 Wireless Dial
- 7.2.6 HTTPS Settings
- 7.2.7 Configuring QoS Settings
- 7.2.8 Configuring 802.1X Settings
- 7.2.9 Integration Protocol
- 7.2.10 Bandwidth Adaptation
- 7.2.11 Network Service
- 7.2.12 Smooth Streaming
- 7.2.13 HTTP Listening
- Chapter 8 Video/Audio Settings
- Chapter 9 Image Settings
- Chapter 10 Event Settings
- 10.1 Basic Events
- 10.2 Smart Events
- 10.2.1 Configuring Audio Exception Detection
- 10.2.2 Configuring Defocus Detection
- 10.2.3 Configuring Scene Change Detection
- 10.2.4 Configuring Face Detection
- 10.2.5 Configuring Intrusion Detection
- 10.2.6 Configuring Line Crossing Detection
- 10.2.7 Configuring Region Entrance Detection
- 10.2.8 Configuring Region Exiting Detection
- 10.2.9 Configuring Unattended Baggage Detection
- 10.2.10 Configuring Object Removal Detection
- 10.3 VCA Configuration
- Chapter 11 Storage Settings
- Chapter 12 Playback
- Chapter 13 Picture
- Chapter 14 Application
- Chapter 15 Open Platform
- Chapter 16 Smart Display
- Appendix

Network Camera User Manual
179
Set Capture Parameters
6. Set the time interval between two snapshots.
7. Click Save to save the settings.
Configure HDD Management
Purpose:
HDD management allows you to view the HDD capacity, free space, status,
encryption status, type, formatting type, property and progress, etc. You can format,
encrypted format or verify the selected HDD as required. And you can assign the
quota for different file types.
Steps:
1. Enter the HDD management interface, Configuration > Storage > Storage
Management > HDD Management.
HDD Management
2. Select the desired disk and operate as required.
(1) The status of the disk includes Uninitialized and Normal.
If the status of the disk is Uninitialized, you can click Format to initialize
the disk. When the initialization completed, the status of disk will
become Normal. Then the disk can be used normally.