
User Manual


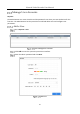


Table Of Contents
- Product Key Features
- Chapter 1 Introduction
- 1.1 Front Panel
- 1.2 IR Remote Control Operations
- 1.3 USB Mouse Operation
- 1.4 Rear Panel
- 1.4.1 DS-7100HQHI-K1, DS-7200HUHI-K (/P), iDS-7200HUHI-K/4S, DS-7200HTHI-K, DS-7200HQHI-K(/P), and iDS-7200HQHI-K/S
- 1.4.2 iDS-7200HQHI-K/S(B), iDS-7200HQHI-M/S and iDS-7200HQHI-M1/FA
- 1.4.3 iDS-7200HUHI-K/4S(B) and iDS-7200HUHI-M2/S
- 1.4.4 DS-7300HQHI-K
- 1.4.5 DS-7300HUHI/HTHI-K4, iDS-7316HUHI-K4/16S and DS-9000HUHI-K8
- 1.4.6 DS-7300HQHI/HUHI-K4, DS-8100HQHI/HUHI-K8, DS-9000HUHI-K8, and iDS-9016HUHI-K8/16S
- 1.4.7 DS-7200HGHI-K1
- 1.4.8 DS-7200HGHI-K2
- 1.4.9 DS-8100HTHI-K8
- 1.4.10 DS-9000HTHI-K8
- Chapter 2 Getting Started
- Chapter 3 Camera Management
- Chapter 4 Camera Settings
- Chapter 5 Live View
- Chapter 6 PTZ Control
- Chapter 7 Storage
- 7.1 Storage Device Management
- 7.2 Storage Mode
- 7.3 Recording Parameters
- 7.4 Configure Recording Schedule
- 7.5 Configure Continuous Recording
- 7.6 Configure Motion Detection Triggered Recording
- 7.7 Configure Event Triggered Recording
- 7.8 Configure Alarm Triggered Recording
- 7.9 Configure Picture Capture
- 7.10 Configure Holiday Recording and Capture
- 7.11 Configure Redundant Recording and Capture
- 7.12 Configure 1080p Lite
- Chapter 8 Disk Array
- Chapter 9 File Management
- Chapter 10 Playback
- Chapter 11 Event and Alarm Settings
- Chapter 12 POS Configuration
- Chapter 13 VCA Event Alarm
- 13.1 Human Body Detection
- 13.2 Face Detection
- 13.3 Vehicle Detection
- 13.4 Line Crossing Detection
- 13.5 Intrusion Detection
- 13.6 Region Entrance Detection
- 13.7 Region Exiting Detection
- 13.8 Unattended Baggage Detection
- 13.9 Object Removal Detection
- 13.10 Audio Exception Detection
- 13.11 Sudden Scene Change Detection
- 13.12 Defocus Detection
- 13.13 PIR Alarm
- Chapter 14 Smart Analysis
- Chapter 15 Human Body Detection
- Chapter 16 Face Picture Comparison
- Chapter 17 Network Settings
- Chapter 18 System Maintenance
- Chapter 19 General System Settings
- Chapter 20 Appendix

Network Video Recorder User Manual
211
Configure DST Settings
Purpose:
The DST (daylight saving time) refers to the period of the year when clocks are moved one period
ahead. In some areas worldwide, this has the effect of creating more sunlit hours in the evening
during months when the weather is the warmest.
We advance our clocks ahead a certain period (depends on the DST bias you set) at the beginning
of DST, and move them back the same period when we return to standard time (ST).
Go to System > General.
Check Enable DST.
DST Settings Interface
Select the DST mode to Auto or Manual.
Auto: Automatically enable the default DST period according to the local DST rules.
Manual: Manually set the start time and end time of the DST period, and the DST bias.
DST Bias: Set the time (30/60/90/120 minutes) offset from the standard time.
Example: The DST begins at 2:00 a.m. on the second Sunday of March and ends at 2:00
a.m. on the first Sunday of November, with 60 minutes ahead.
Click the Apply button to save the settings.
Configure Enhanced IP Mode
Check Enhanced IP Mode.
Enabling Enhanced IP Mode will allow you to connect to the maximum number of cameras and
make Smart Event unavailable in analog channel.
This function is only available for iDS-7200HQHI-K/S and iDS-7200HUHI-K/S series.