
User Manual
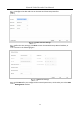

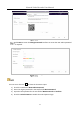

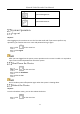

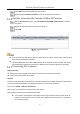

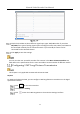
Table Of Contents
- Product Key Features
- Chapter 1 Introduction
- 1.1 Front Panel
- 1.2 IR Remote Control Operations
- 1.3 USB Mouse Operation
- 1.4 Rear Panel
- 1.4.1 DS-7100HQHI-K1, DS-7200HUHI-K (/P), iDS-7200HUHI-K/4S, DS-7200HTHI-K, DS-7200HQHI-K(/P), and iDS-7200HQHI-K/S
- 1.4.2 iDS-7200HQHI-K/S(B), iDS-7200HQHI-M/S and iDS-7200HQHI-M1/FA
- 1.4.3 iDS-7200HUHI-K/4S(B) and iDS-7200HUHI-M2/S
- 1.4.4 DS-7300HQHI-K
- 1.4.5 DS-7300HUHI/HTHI-K4, iDS-7316HUHI-K4/16S and DS-9000HUHI-K8
- 1.4.6 DS-7300HQHI/HUHI-K4, DS-8100HQHI/HUHI-K8, DS-9000HUHI-K8, and iDS-9016HUHI-K8/16S
- 1.4.7 DS-7200HGHI-K1
- 1.4.8 DS-7200HGHI-K2
- 1.4.9 DS-8100HTHI-K8
- 1.4.10 DS-9000HTHI-K8
- Chapter 2 Getting Started
- Chapter 3 Camera Management
- Chapter 4 Camera Settings
- Chapter 5 Live View
- Chapter 6 PTZ Control
- Chapter 7 Storage
- 7.1 Storage Device Management
- 7.2 Storage Mode
- 7.3 Recording Parameters
- 7.4 Configure Recording Schedule
- 7.5 Configure Continuous Recording
- 7.6 Configure Motion Detection Triggered Recording
- 7.7 Configure Event Triggered Recording
- 7.8 Configure Alarm Triggered Recording
- 7.9 Configure Picture Capture
- 7.10 Configure Holiday Recording and Capture
- 7.11 Configure Redundant Recording and Capture
- 7.12 Configure 1080p Lite
- Chapter 8 Disk Array
- Chapter 9 File Management
- Chapter 10 Playback
- Chapter 11 Event and Alarm Settings
- Chapter 12 POS Configuration
- Chapter 13 VCA Event Alarm
- 13.1 Human Body Detection
- 13.2 Face Detection
- 13.3 Vehicle Detection
- 13.4 Line Crossing Detection
- 13.5 Intrusion Detection
- 13.6 Region Entrance Detection
- 13.7 Region Exiting Detection
- 13.8 Unattended Baggage Detection
- 13.9 Object Removal Detection
- 13.10 Audio Exception Detection
- 13.11 Sudden Scene Change Detection
- 13.12 Defocus Detection
- 13.13 PIR Alarm
- Chapter 14 Smart Analysis
- Chapter 15 Human Body Detection
- Chapter 16 Face Picture Comparison
- Chapter 17 Network Settings
- Chapter 18 System Maintenance
- Chapter 19 General System Settings
- Chapter 20 Appendix

Network Video Recorder User Manual
68
If the power consumption of the DVR is higher than that of the AF camera and lower
than that of the AT camera, when AF camera is connected, it is powered on normally;
when AT camera is connected, it is powered on and then powered off, and there is no
video and “Insufficient Power for PoC” is overlaid on the live view image.
If the power consumption of the DVR is higher than that of the AT camera, when AF or
AT camera is connected, it is powered on normally.
Step 4 Check the connected AF or AT camera number and the connectable camera number.
PoC Status
Only Hikvision PoC camera is supported.
The maximum connectable AT/AF camera number varies with different models.
Please turn off the PoC function if the camera does not support PoC, or the camera is not
produced by Hikvision. Otherwise, it may result in permanent damage to the camera or DVR.
Configure Signal Input Channel
Purpose
You can configure the analog and IP signal input types.
Click on the main menu bar.
Click Camera > Analog.