
Quick Start Guide
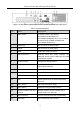
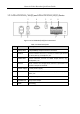
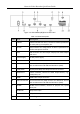
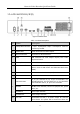
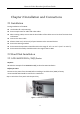

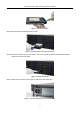
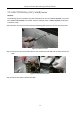
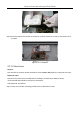
Table Of Contents
- Chapter 1 Panels Description
- 1.1 Front Panel
- 1.1.1 iDS-96000NXI-I16(B) Series
- 1.1.2 iDS-96000NXI-I24(B) Series
- 1.1.3 iDS-9600NXI-I8/8F(B), iDS-9600NXI-I8/X(B) and iDS-9600NXI-I8/16S(B) Series
- 1.1.4 iDS-9600NXI-I16/8F(B), iDS-9600NXI-I16/X(B) and iDS-9600NXI-I16/16S(B) Series
- 1.1.5 iDS-7700NXI-I4(/16P)/16S(B) and iDS-7700NXI-I4(/16P)/X(B) Series
- 1.1.6 iDS-6700NXI-I/8F(B) and iDS-6700NXI-I/16S(B) Series
- 1.1.7 iDS-9600NXI-I8/4F(B)
- 1.2 Rear Panel
- 1.2.1 iDS-96000NXI-I16(B) and iDS-96000NXI-I24(B) Series
- 1.2.2 iDS-9600NXI-I8/8F(B), iDS-9600NXI-I8/X(B) and iDS-9600NXI-I8/16S(B) Series
- 1.2.3 iDS-9600NXI-I16/8F(B), iDS-9600NXI-I16/X(B) and iDS-9600NXI-I16/16S(B) Series
- 1.2.4 iDS-7700NXI-I4(/16P)/16S(B) and iDS-7700NXI-I4(/16P)/X(B) Series
- 1.2.5 iDS-6700NXI-I/16S(B) and iDS-6700NXI-I/8F(B) Series
- 1.2.6 iDS-9600NXI-I8/4F(B)
- 1.1 Front Panel
- Chapter 2 Installation and Connections
- Chapter 3 Menu Operation
- Chapter 4 Face Picture Comparison
- Chapter 5 Access by Web Browser

Network Video Recorder Quick Start Guide
28
2.2.2 iDS-7700NXI-I4/(16P)/16S(B) Series
Purpose:
The following section introduces the HDD installation for the iDS-7700NXI-I4/16S(B) series and
iDS-7700NXI-I4/16P/16S(B) series NVR. Take the example of iDS-7700NXI-I4/16S(B) to describe
installation steps.
Step 1 Remove the cover from the NVR by unfastening the screws on the rear and side panel.
Figure 2-8 Remove Cover
Step 2 Connect one end of the data cable to the motherboard of NVR and the other end to the
HDD.
Figure 2-9 Connect Data Cable
Step 3 Connect the power cable to the HDD.