
Quick Start Guide
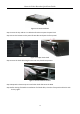
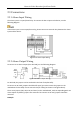
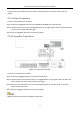
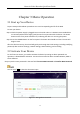

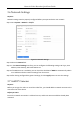

Table Of Contents
- Chapter 1 Panels Description
- 1.1 Front Panel
- 1.1.1 iDS-96000NXI-I16(B) Series
- 1.1.2 iDS-96000NXI-I24(B) Series
- 1.1.3 iDS-9600NXI-I8/8F(B), iDS-9600NXI-I8/X(B) and iDS-9600NXI-I8/16S(B) Series
- 1.1.4 iDS-9600NXI-I16/8F(B), iDS-9600NXI-I16/X(B) and iDS-9600NXI-I16/16S(B) Series
- 1.1.5 iDS-7700NXI-I4(/16P)/16S(B) and iDS-7700NXI-I4(/16P)/X(B) Series
- 1.1.6 iDS-6700NXI-I/8F(B) and iDS-6700NXI-I/16S(B) Series
- 1.1.7 iDS-9600NXI-I8/4F(B)
- 1.2 Rear Panel
- 1.2.1 iDS-96000NXI-I16(B) and iDS-96000NXI-I24(B) Series
- 1.2.2 iDS-9600NXI-I8/8F(B), iDS-9600NXI-I8/X(B) and iDS-9600NXI-I8/16S(B) Series
- 1.2.3 iDS-9600NXI-I16/8F(B), iDS-9600NXI-I16/X(B) and iDS-9600NXI-I16/16S(B) Series
- 1.2.4 iDS-7700NXI-I4(/16P)/16S(B) and iDS-7700NXI-I4(/16P)/X(B) Series
- 1.2.5 iDS-6700NXI-I/16S(B) and iDS-6700NXI-I/8F(B) Series
- 1.2.6 iDS-9600NXI-I8/4F(B)
- 1.1 Front Panel
- Chapter 2 Installation and Connections
- Chapter 3 Menu Operation
- Chapter 4 Face Picture Comparison
- Chapter 5 Access by Web Browser

Network Video Recorder Quick Start Guide
39
Step 1 Click on the main menu bar to enter the Camera Management.
Step 2 Click the Custom Add tab on the title bar to enter the Add IP Camera interface.
Figure 3-7 Add IP Camera
Step 3 Enter IP address, protocol, management port, and other information of the IP camera to add.
Step 4 Enter the login user name and password of the IP camera.
Step 5 Click Add to finish the adding of the IP camera.
Step 6 (Optional) Click Continue to Add to continue to add other IP cameras.
3.8 Start Live View
Step 1 The system automatically enters the live view interface when starts up, or you can click the
on the main menu bar to enter the live view interface.
Step 2 Click to select a window for live view.
Step 3 Double click the IP camera on the left list to start playing the live video.