Network Traffic Camera Quick Start Guide
Network Traffic Camera·Quick Start Guide Quick Start Guide © 2018 Hangzhou Hikvision Digital Technology Co., Ltd. This manual is intended for users of 91xx Series Network Traffic Camera. It includes instructions on how to use the Product. The software embodied in the Product is governed by the user license agreement covering that Product. About this Manual This Manual is subject to domestic and international copyright protection. Hangzhou Hikvision Digital Technology Co.,S Ltd.
Network Traffic Camera·Quick Start Guide USE OF THE MANUAL, OR THE CORRECTNESS, ACCURACY, OR RELIABILITY OF INFORMATION CONTAINED HEREIN. YOUR USE OF THIS MANUAL AND ANY RELIANCE ON THIS MANUAL SHALL BE WHOLLY AT YOUR OWN RISK AND RESPONSIBILITY.
Network Traffic Camera·Quick Start Guide FCC Information FCC compliance: This equipment has been tested and found to comply with the limits for a Class B digital device, pursuant to part 15 of the FCC Rules. These limits are designed to provide reasonable protection against harmful interference in a residential installation.
Network Traffic Camera·Quick Start Guide This product and - if applicable - the supplied accessories too are marked with "CE" and comply therefore with the applicable harmonized European standards listed under the EMC Directive 2014/30/EU, the RoHS Directive 2011/65/EU. 2012/19/EU (WEEE directive): Products marked with this symbol cannot be disposed of as unsorted municipal waste in the European Union.
Network Traffic Camera·Quick Start Guide Safety Instruction These instructions are intended to ensure that user can use the product correctly to avoid danger or property loss. The precaution measure is divided into “Warnings” and “Cautions” Warnings: Serious injury or death may occur if any of the warnings are neglected. Cautions: Injury or equipment damage may occur if any of the cautions are neglected. Warnings Follow these safeguards to prevent serious injury or death.
Network Traffic Camera·Quick Start Guide ● Do not connect several devices to one power adapter as adapter overload may cause over-heating or a fire hazard. ● Please make sure that the plug is firmly connected to the power socket. When the product is mounted on wall or ceiling, the device shall be firmly fixed. ● If smoke, odor or noise rise from the device, turn off the power at once and unplug the power cable, and then please contact the service center.
Network Traffic Camera·Quick Start Guide ● Do not place the camera in extremely hot, cold (the operating temperature shall be between -30°C ~ 70°C), dusty or damp locations, and do not expose it to high electromagnetic radiation. ● To avoid heat accumulation, good ventilation is required for operating environment. ● Keep the camera away from liquid while in use. ● While in delivery, the camera shall be packed in its original packing, or packing of the same texture.
Network Traffic Camera·Quick Start Guide Table of Contents 1 Appearance Description ................................................................. 9 1.1 Type I Camera Overview .................................................. 9 1.1.1 Side Panel Overview ............................................. 9 1.1.2 Rear Panel Overview .......................................... 11 1.2 Type II Camera Overview ............................................... 15 2 Installation .......................................
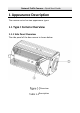
Network Traffic Camera·Quick Start Guide 1 Appearance Description The camera series has two appearance types: 1.1 Type I Camera Overview 1.1.
Network Traffic Camera·Quick Start Guide No. Description No. Description 1 Auto-iris Lens Socket 2 Lens Interface The type of auto-iris lens socket interface is shown below: Auto-iris Interface Pins No. DC-driven 1 Damp- 2 Damp+ 3 Drive+ 4 Drive- Damp+, Damp-, Drive+ and Drive- pins are used when the auto-iris is driven by DC.
Network Traffic Camera·Quick Start Guide 1.1.2 Rear Panel Overview Overview of Type I Rear Panel Description of Type I Rear Panel No.
Network Traffic Camera·Quick Start Guide No. Description 2 Reset 3 SD Card Slot 4 USB 2.
Network Traffic Camera·Quick Start Guide Figure 1-3 Overview of Type II Rear Panel Description of Type II Rear Panel No. Description 1 10M/100M/1000M Self-adaptive Ethernet Interface 2 RESET: (Reserved) 3 USB 2.0 4 USB 2.
Network Traffic Camera·Quick Start Guide No. Description 7 System Indicator 8 12V DC Interface 9 PWR: Power Indicator 10 D1: RS-485, RS232, Audio Input and Output 11 D2, D3, D4, D5: RS-485 T1, T2, T3, T4, T5, T6, T7: Trigger interface/SYNC Input F1+, F1-, F2+, F2-, F3+, F3-, F4+, F4-, F5+, F5-, F6+, F6-, F7+, F7-: Flashlight Trigger Output 1A, 1B\2A, 2B: Alarm Output 12 GND ● For some camera models do not support the SD card, and it supports fiber interface to meet the different demands.
Network Traffic Camera·Quick Start Guide 1.2 Type II Camera Overview 11 1 10 2 4 5 3 9 Overview of Camera Description No.
Network Traffic Camera·Quick Start Guide No.
Network Traffic Camera·Quick Start Guide 2 Installation Before you start: Make sure the device in the package is in good condition and all the assembly parts are included. Make sure all the related equipment is power-off during the installation. Check the specification of the products for the installation environment. Make sure the power supply is matched with your required voltage to avoid damage.
Network Traffic Camera·Quick Start Guide The housings need to be purchased separately. Type I Housing Figure 2-2 Type II Housing 2. Align the camera to the baseplate, and fit the camera to the baseplate with supplied screws.
Network Traffic Camera·Quick Start Guide Fix the Camera to the Baseplate 3. Place the baseplate with the camera back to the housing.
Network Traffic Camera·Quick Start Guide Place the Baseplate back to the housing 4. Install the pole mounting hoop to the cross-bar. Install the Pole Mounting Hoop 5. Install the housing with the camera inside to the hoop.
Network Traffic Camera·Quick Start Guide Install the Housing 6. Adjust the camera to the desired position, connect the video out to the debug camera, and adjust the zoom and focus of the camera.
Network Traffic Camera·Quick Start Guide 7. Adjust the pan angle and tilt angle of the camera, place the lid back to the housing, and buckle the lock catch to finish the installation. Installation Completed 2.2 Type II Camera Installation 2.2.1 Memory Card Installation Steps: 1. Find memory card cover on camera body.
Network Traffic Camera·Quick Start Guide 1 Find Memory Card Cover 2. Remove four screws, and move screws and memory card cover. Remove screws 3. Insert memory card into slot.
Network Traffic Camera·Quick Start Guide Insert Memory Card 4. Install screws and memory card cover. Install Screws and Cover 5. Fix memory card cover with four screws.
Network Traffic Camera·Quick Start Guide Fix Screws 2.2.2 Wall/Ceiling Mounting Steps: 1. Hook the two ends of the safety rope to the hole on the camera body and the wall (or the ceiling). Note: If there is no proper place to secure the safety rope, you can hook the other end of safety rope to the hole at the end of the plate. But you have to make sure that the plate is firm enough to bear/support the weight of the camera. 2.
Network Traffic Camera·Quick Start Guide 4. Drill screw holes in the wall or ceiling according to the installation screw hole on the template. 5. Secure the plate to the wall (or the ceiling) with expansion screws. 6. Fix two waterproof screw jackets on the template with supplied screws. 7. Connect cables through the wall or side outlet. 8. Fix the camera to the plate with the supplied screws.
Network Traffic Camera·Quick Start Guide 9. Adjust surveillance angel. 1) Loosen screw 1 to adjust panning position [0° to 360°]. Tighten the screw. 2) Loosen screw 2 to adjust tilting position [0° to 90°]. Tighten the screw. 3) Loosen screw 3 to adjust rotating position [0° to 360°]. Tighten the screw. Pan Range [0° to 360°] Screw 1 Screw 2 Rotation Range [0° to 360°] Tilt Range [0° to 90°] Screw 3 3-aixs Adjustment 2.2.3 Pole Mounting Horizontal Pole Mounting Steps: 1.
Network Traffic Camera·Quick Start Guide Install the Pole Mounting Hoop 3. Install the bottom part of PT-joint to the pole mounting hoop. Install the Bottom Part of PT-Joint 4. Install the upper part of the PT-joint to the base of camera body. Install the Upper Part of PT-Joint 5. Connect two parts of PT-joint.
Network Traffic Camera·Quick Start Guide Connect Two Parts of PT-Joint 6. Unscrew the plate of the camera and connect cables in the cross-bar and junction box. Connect Cables 7. Install the plate of the camera.
Network Traffic Camera·Quick Start Guide Install the Plate 8. Adjust the camera to the desired position, connect the video out to the debug camera, and adjust the zoom and focus of the camera. Pole Mounting Steps: 1. Route the cables through the cross-bar. 2. Install the plate to wall and fix waterproof screw jacket to the plate.
Network Traffic Camera·Quick Start Guide Route the cable 3. Connect cables. Connect cables 4. Secure the bullet camera to the plate with screws.
Network Traffic Camera·Quick Start Guide Secure the bullet camera 5. Adjust the camera to the desired position, connect the video out to the debug camera, and adjust the zoom and focus of the camera.
Network Traffic Camera·Quick Start Guide 3 Setting the Network Camera over the LAN You are required to activate the camera first by setting a strong password for it before you can use the camera. Activation via Web Browser, Activation via SADP, and Activation via Client Software are all supported. We will take activation via SADP software and Activation via Web Browser as examples to introduce the camera activation. Please refer to the User Manual of Network Camera for Activation via Client Software. 3.
Network Traffic Camera·Quick Start Guide Activation Interface(Web) 3. Create a password and input the password into the password field. STRONG PASSWORD RECOMMENDED– We highly recommend you create a strong password of your own choosing (using a minimum of 8 characters, including upper case letters, lower case letters, numbers, and special characters) in order to increase the security of your product.
Network Traffic Camera·Quick Start Guide Activation via SADP Software SADP software is used for detecting the online device, activating the camera, and resetting the password. Get the SADP software from the supplied disk or the official website, and install the SADP according to the prompts. Follow the steps to activate the camera, please refer to the User Manual of Network Camera for other two activation methods. Steps: 1. Run the SADP software to search the online devices. 2.
Network Traffic Camera·Quick Start Guide The SADP software supports activating the camera in batch. Please refer to the user manual of SADP software for details. 3. Create a password and input the password in the password field, and confirm the password.
Network Traffic Camera·Quick Start Guide 1. Run the SADP software. 2. Select an active device. Note: Please refer to Chapter 3.2 to activate the camera if the camera is inactive. 3. Change the device IP address to the same subnet with your computer by either modifying the IP address manually or checking the checkbox of Enable DHCP. Modify the IP Address 4. Input the password to activate your IP address modification.
Network Traffic Camera·Quick Start Guide 4 Accessing via Web Browser System Requirement: Operating System: Microsoft Windows XP SP1 and above version CPU: 2.0 GHz or higher RAM: 1G or higher Display: 1024×768 resolution or higher Web Browser: Internet Explorer 8.0 and above version, Apple Safari 5.0.2 and above version, Mozilla Firefox 5.0 and above version and Google Chrome 18 and above version Steps: 1. Open the web browser. 2.
Network Traffic Camera·Quick Start Guide 4. Click Login. Login Interface 5. Install the plug-in before viewing the live video and managing the camera. Please follow the installation prompts to install the plug-in.
Network Traffic Camera·Quick Start Guide Download and Install Plug-in You may have to close the web browser to finish the installation of the plug-in. 6. Reopen the web browser after the installation of the plug-in and repeat steps 2~4 to login. For detailed instructions of further configuration, please refer to the user manual of network camera.
UD09691B