
User's Manual
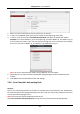


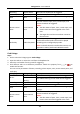
Table Of Contents
- Chapter 1 Overview
- Chapter 2 Installation
- Chapter 3 Disassembling before Maintenance
- Chapter 4 Wiring
- 4.1 Components Introduction
- 4.2 Wiring Electric Supply
- 4.3 Wiring Interconnecting Cable
- 4.4 Terminal Description
- 4.4.3 Master Control Board Terminal Description
- 4.4.4 Slave Control Board Terminal Description
- 4.4.5 Main Control Board Terminal Description
- 4.4.6 Main Control Board Serial Port ID Description
- 4.4.7 RS-485 Wiring
- 4.4.8 RS-232 Wiring
- 4.4.9 Wiegand Wiring
- 4.4.10 Barrier Control Wiring
- 4.4.11 Alarm Output Wiring
- 4.5 Wiring Lithium Battery (Optional)
- Chapter 5 Device Settings
- Chapter 6 Device Activation
- Chapter 7 Client Operation
- 7.1 Function Module
- 7.2 Access Control Management
- 7.2.1 Adding Access Control Device
- 7.2.2 Viewing Device Status
- 7.2.3 Editing Basic Information
- 7.2.4 RS-485 Settings
- 7.2.5 Authenticating M1 Card Encryption
- 7.2.6 Remote Configuration
- Checking Device Information
- Editing Device Name
- Editing Time
- Setting System Maintenance
- Setting RS-485 Parameters
- Managing Network User
- Managing Remote Control User
- Setting Security
- Configuring Passing Parameters
- Configuring Screen Parameters
- Configuring People Counting Parameters
- Configuring Network Parameters
- Configuring Advanced Network
- Configuring Relay Parameters
- Configuring Audio File
- Operating Relay
- Viewing Relay Status
- 7.3 Organization Management
- 7.4 Person Management
- 7.5 Permission Configuration
- 7.6 Advanced Functions
- 7.7 Searching Access Control Event
- 7.8 Access Control Event Configuration
- 7.9 Door Status Management
- 7.10 Arming Control
- 7.11 Time and Attendance
- Appendix A Tips for Scanning Fingerprint
- Appendix B DIP Switch Description
- Appendix C Table of Audio Index Related Content

Swing Barrier·User Manual
94
Based on Network
Note: Authenticate the anti-passing back according to the entrance and exit information
on the card reader.
1) Select Based on Network as the anti-passing back mode in the drop-down list.
2) Select Route Anti-passing Back as the rule.
3) Select a server in the drop-down list for judging the anti-passing back.
4) (Optional) You can click Delete Record and select the card in the pop-up window to
delete the card swiping information in all devices.
The user should be start swiping card again from the first card reader.
5) Click Select Access Controller to select a device in the pop-up window.
6) In the Card Reader area, click the icon on the left of the card reader column to select
the first card reader. The icon will turn to .
7) Click the card reader afterward input field to select the card readers afterward in the
pop-up window.
8) Check the checkbox in the Enable Anti-passing Back column to enable the anti-passing
back function.
Notes:
The displayed card readers in the card reader afterward input field should be in
authentication order.
Up to 64 devices with anti-passing back function can be added.
Up to 16 card readers afterward can be added for each card reader.
Up to 5000 cards’ swiping records can be stored in the selected server.
Setting Entrance/Exit Anti-passing Back
Purpose:
You can set the entrance card reader and the exit card reader only for entering and exiting, without
setting the first card reader and the card readers afterwards.
Steps:
1. In the Cross-Controller Anti-passing Back tab, check the Enable Cross-Controller Anti-passing
Back checkbox to enable the function.
2. Set the anti-passing back parameters.
Based on Card
Note: The system will judge the anti-passing back according to the entrance and exit
records on the card.
1) Select Based on Card as the anti-passing back mode in the drop-down list.
2) Select Entrance/Exit Anti-passing Back as the rule.
3) Set the sector ID.
4) Click Select Access Controller to select a device in the pop-up window.
5) In the Card Reader area, check the checkboxes in the Enable Anti-passing Back column
to select the entrance card reader and the exit card reader.
6) Click Save to save the settings.
Notes: