
Instructions / Assembly

Examine all packaging material for small parts that may have come loose during shipment. Periodic checks are recommended to insure that all
components are in proper position, tight and free from damage. Keep this assembly instruction for future reference. Adult assembly is required.
The product of Hillsdale Furniture, LLC is designed for residential use only. Customer Service Phone Number: 502-562-0000
Date: 10-31-2016
Page 1 of 1
HAMILTON PARK SCROLL BACK WOOD SWIVEL STOOL
Model #5388-826 Counter Stool
Model #5388-830 Barstool
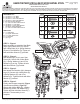
STEP 1 - Figure 1
Begin assembly by attaching Seat Back
(K) to Upper Seat Frame (L). Secure
with 4 Allen Bolts (A), 4 Spring Washers
(E) and 4 Flat Washers (D). Tighten all
bolts with Allen Wrench (F) provided.
STEP 2 - Figure 2
Next attach Legs (O) to Lower Seat
Frame (M). Secure with 2 Allen Bolts
(G), 2 Spring Washers (I) and 2 Flat
Washers (H) per leg. Tighten all bolts
with Allen Wrench (J) provided.
STEP 3 - Figure 2
Next attach the Stretcher (N) in between
Legs (O). Secure with 4 Allen Bolts (B),
4 Spring Washers (E) and 4 Flat
Washers (D). Tighten all bolts with Allen
Wrench (F) provided.
STEP 4 - Figure 3
Finally, attach upper assembly (Figure
1) and lower assembly (Figure 2).
Secure with 4 Allen Bolts (B), 4 Spring
Washers (E) and 4 Flat Washers (D).
Tighten all bolts with Allen Wrench (F)
provided. The assembly is now
complete.
HARDWARE LIST
A (4) Ø1/4” x 1-1/2” Bolts
B (8) Ø1/4” x 1-1/4” Bolts
C (4) Ø1/4” x 13mm Flat Washers
D (8) Ø1/4” x 19mm Flat Washers
E (12) Ø1/4” Spring Washers
F (1) 100 x 30 x 4mm Allen Wrench
G (8) Ø5/16” x 1-3/4” Bolts
H (8) Ø5/16” x 16mm Flat Washers
I (8) Ø5/16” Spring Washers
J (1) 100 x 30 x 5mm Allen Wrench
PARTS LIST
K (1) Seat Back
L (1) Upper Seat Frame
M (1) Lower Seat Frame
N (1) Stretcher
O (4) Legs
QTYPART
8G
8I
HARDWARE QTYPART HARDWARE
8
1
H
J
12E 1F
4C 8D
4A 8B
CARE & MAINTENANCE
:
The touch of a soft cloth is all the maintenance the finish will ever need. Please do not use harsh or abrasive cleaners for polishing,
as they may cause damage to the finish. Periodic checks are recommended to make sure that all hardware is securely tightened.
FIGURE 2
FIGURE 1
FIGURE 3
AA
B
B
B
B
B
B
C
C
C
C
D
D
D
D
E
E
E
E
E
E
E
E
B
B
C
C
E
E
B
B
C
C
E
E
G
G
H
H
I
I
G
G
H
H
I
I
K
L
M
N
O