
Operating Instruction DD-WMS 100 (01)
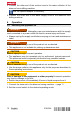
Table Of Contents
- Original operating instructions
- Mode d'emploi original
- 1 Indications relatives à la documentation
- 2 Sécurité
- 3 Description
- 3.1 Vue d'ensemble du produit
- 3.2 Utilisation conforme à l'usage prévu
- 3.3 Équipement livré
- 3.4 Touches de commande
- 3.5 États de la LED Bluetooth (en option)
- 3.6 Indicateurs de maintenance
- 3.7 Symboles d'affichage et explication sur l'écran multifonctions de la carotteuse diamant (en option avec Bluetooth)
- 3.8 Bluetooth®
- 4 Caractéristiques techniques
- 5 Mise en service
- 6 Utilisation
- 7 Nettoyage et entretien
- 8 Transport et stockage
- 9 Aide au dépannage
- 10 Recyclage
- 11 Garantie constructeur
- Manual de instrucciones original
- 1 Información sobre la documentación
- 2 Seguridad
- 3 Descripción
- 3.1 Vista general del producto
- 3.2 Uso conforme a las prescripciones
- 3.3 Suministro
- 3.4 Teclas de control
- 3.5 Estados del LED Bluetooth (opcional)
- 3.6 Indicadores de funcionamiento
- 3.7 Símbolos en el indicador y aclaraciones en la pantalla multifunción de la perforadora de diamante (opcional en caso de Bluetooth)
- 3.8 Bluetooth®
- 4 Datos técnicos
- 5 Puesta en servicio
- 6 Manejo
- 7 Cuidado y mantenimiento
- 8 Transporte y almacenamiento
- 9 Ayuda en caso de averías
- 10 Reciclaje
- 11 Garantía del fabricante
- Manual de instruções original
- 1 Indicações sobre a documentação
- 2 Segurança
- 3 Descrição
- 3.1 Vista geral do produto
- 3.2 Utilização conforme a finalidade projectada
- 3.3 Incluído no fornecimento
- 3.4 Teclas de comando
- 3.5 Estados do LED do Bluetooth (opcional)
- 3.6 Indicadores de manutenção
- 3.7 Símbolos apresentados e explicações do visor multifunções do perfurador diamantado (opcionalmente com Bluetooth)
- 3.8 Bluetooth®
- 4 Características técnicas
- 5 Antes de iniciar a utilização
- 6 Utilização
- 7 Conservação e manutenção
- 8 Transporte e armazenamento
- 9 Ajuda em caso de avarias
- 10 Reciclagem
- 11 Garantia do fabricante

6 English 2154324
*2154324*
2.7 Use and care of the appliance
▶ Never leave the appliance unattended.
▶ Protect the appliance from frost.
▶ Clean the water level limiting device regularly with a brush, in accordance
with the instructions, and check it for signs of damage.
▶ When fitting the top section of the appliance, take care to avoid pinching
your fingers or damaging the supply cord. This presents a risk of injury or
damage.
▶ Check the appliance and its accessories for any damage. Guards, safety
devices and any slightly damaged parts must be checked carefully to
ensure that they function faultlessly and as intended. Check that moving
parts function faultlessly, without sticking, and that no parts are damaged.
In order to ensure faultless operation of the appliance, all parts must be
fitted correctly and must meet the necessary requirements.
▶ Have the appliance serviced by a qualified repair person using only
genuine Hilti spare parts. The safety of the appliance can thus be
maintained.
▶ Always unplug the supply cord from the power outlet when the appliance
is not in use (during breaks), before cleaning and maintenance and before
changing the filter or accessories. This preventive safety measure reduces
the risk of starting the appliance accidentally.
▶ Never use the power supply cord to pull the tool into a different working
position. Do not run over the power supply cord with the tool.
▶ Do not transport the appliance by crane.
3 Description
3.1 Product overview 1
@
Toolbox retaining bar
;
Handlebar
=
Ratchet strap
%
Gripping areas
&
Water and waste material con-
tainer
(
Hook for the ratchet strap
)
Suction hose inlet fitting
+
Water supply hose outlet fit-
ting
§
“Water level too low” warning
lamp
/
“Water level too high” warning
lamp
:
“No filter” warning lamp
∙
"Bluetooth" button and LED
(optional)
$
“Water supply” mode
£
“Vacuum cleaner” mode
|
“Off” mode
¡
“Recycling” mode
Q
Power outlet on the appliance
(optional)
W
Control switch
E
Top section
R
Catch
T
Supply cord hook
Z
Grip