DD-WMS 100 English Printed: 19.07.
Printed: 19.07.
1 Information about the documentation 1.1 About this documentation • • • Read this documentation before initial operation or use. This is a prerequisite for safe, trouble-free handling and use of the product. Observe the safety instructions and warnings in this documentation and on the product. Always keep the operating instructions with the product and make sure that the operating instructions are with the product when it is given to other persons. 1.2 Explanation of signs used 1.2.
▶ Write down the serial number in the table below. You will be required to state the product details when contacting Hilti Service or your local Hilti organization to inquire about the product. Product information Water management system Generation Serial no. DD-WMS 100 01 1.5 Declaration of conformity We declare, on our sole responsibility, that the product described here complies with the applicable directives and standards.
▶ ▶ ▶ ▶ ▶ ▶ The electric supply cord may be replaced only with a cord of the type specified in the operating instructions. Do not abuse the cord. Never use the cord for carrying, pulling or unplugging the appliance. Keep the cord away from heat, oil, sharp edges or moving parts. Damaged or entangled cords increase the risk of electric shock. When operating an electric appliance outdoors, use only extension cords of a type suitable for outdoor use.
▶ ▶ ▶ ▶ ▶ ▶ ▶ 4 When fitting the top section of the appliance, take care to avoid pinching your fingers or damaging the supply cord. This presents a risk of injury or damage. Check the appliance and its accessories for any damage. Guards, safety devices and any slightly damaged parts must be checked carefully to ensure that they function faultlessly and as intended. Check that moving parts function faultlessly, without sticking, and that no parts are damaged.
3 Description 3.1 Overview of the product @ ; = % Toolbox retaining bar Handlebar Ratchet strap Gripping areas & ( ) + Water and waste material container Hook for the ratchet strap Suction hose inlet fitting Water supply hose outlet fitting English Printed: 19.07.
“Water level too low” warning lamp “Water level too high” warning lamp “No filter” warning lamp “Water supply” mode “Vacuum cleaner” mode “Off” mode § / : ∙ $ £ | ¡ Q W E R “Recycling” mode Control switch Grip Top section Catch Supply cord hook 3.2 Intended use The DD-WMS 100 electrically-powered water management system is designed for use with water-cooled diamond coring machines.
LED Meaning No filter Fit the filter bag fitted correctly. 4 Technical data 4.1 Technical data Note For details of the rated voltage, current, frequency and/or input power, please refer to the power tool’s country-specific type identification plate. When powered by a generator or transformer, the generator or transformer’s power output must be at least twice the rated input power shown on the rating plate of the power tool.
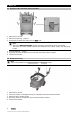
5 Before use 5.1 Filling the water and waste material container 1. Open the two catches. 2. Remove the filter bag. → page 10 3. Fill the water container with water up to the MAX mark. Note When the “Water level too high” warning lamp lights, the appliance cannot be operated. The water and waste material container must be filled for the “Water supply” and “Recycling” modes. 4. Insert the filter bag. → page 8 5. Fit the top section of the appliance onto the water and waste material container. 6.
5.3 Connecting the hose set to the diamond coring machine 1. Connect the suction hose to the suction hose inlet fitting. 2. Connect the water supply hose to the water supply hose outlet fitting. 3. Connect the other end of the suction hose to the water collector of the diamond core drilling machine. Note Use the tapered adapter if necessary. 4. Connect the other end of the water supply hose to the diamond core drilling machine. 6 Operation 6.
3. If the following equipment exists, also take this action: Option: Vacuum cleaner mode ▶ Set the control switch to Vacuum mode. Note The water management system is designed to be used only for small vacuum cleaning jobs such as cleaning up the working area. Do not use this appliance in vacuum cleaner mode for system applications in combination with electric tools. 4. If the following equipment exists, also take this action: Option: Water supply Set the control switch to the Water supply position.
5. 6. 7. 8. Clean the water and waste material container. Insert the filter bag. → page 8 Fit the top section of the appliance onto the waste material container. Close the two catches. 7 Care and maintenance 7.1 Checking the prefilter 1. Remove the filter bag holder. 2. Check whether the prefilter is clogged. 3. If the prefilter is clogged, clean it with fresh water. Note Alternatively, a brush or compressed air can be used to clean the prefilter. 7.
7.3 Checking the seal on the filter support 1. Check that the seal on the filter support is clean. 2. If the seal on the top section is dirty, clean it with a cloth. 3. Grease the seal. 8 Transport and storage 8.1 Stacking toolboxes for transport 1. Raise the toolbox retaining bar. 2. Stack the toolboxes with their grips placed over the toolbox retaining bar. Note The toolbox retaining bar must project beyond topmost toolbox. The maximum permissible additional load is 25 kg. 3.
9.1 Troubleshooting Trouble or fault The MIN indicator lights and a warning tone is emitted. The MAX indicator lights. The No filter indicator lights. The connection between the water hose and the appliance is stiff to operate. The filter bag holder is pulled up when the top section of the appliance is lifted No water or too little water flows although there is adequate water in the container. No suction or reduced suction performance. The flow indicator sight glass is dirty.
14 English Printed: 19.07.
Printed: 19.07.
Hilti = registered trademark of Hilti Corp., Schaan Printed: 19.07.