TE 6-A36 English Printed: 28.08.
Printed: 28.08.
1 Information about the documentation 1.1 About this documentation • Read this documentation before initial operation or use. This is a prerequisite for safe, trouble-free handling and use of the product. • Observe the safety instructions and warnings in this documentation and on the product. • Always keep the operating instructions with the product and make sure that the operating instructions are with the product when it is given to other persons. 1.2 Explanation of signs used 1.2.
Chisel positioning Forward / reverse Rated speed under no load 1.4 Product information Hilti products are designed for professional use and may be operated, serviced and maintained only by trained, authorized personnel. This personnel must be informed of any particular hazards that may be encountered. The product and its ancillary equipment can present hazards if used incorrectly by untrained personnel or if used not in accordance with the intended use.
▶ Avoid body contact with earthed or grounded surfaces, such as pipes, radiators, ranges and refrigerators. There is an increased risk of electric shock if your body is earthed or grounded. ▶ Do not expose power tools to rain or wet conditions. Water entering a power tool will increase the risk of electric shock. ▶ Do not abuse the cord. Never use the cord for carrying, pulling or unplugging the power tool. Keep cord away from heat, oil, sharp edges or moving parts.
▶ Keep cutting tools sharp and clean. Properly maintained cutting tools with sharp cutting edges are less likely to bind and are easier to control. ▶ Use the power tool, accessories and tool bits etc. in accordance with these instructions, taking into account the working conditions and the work to be performed. Use of the power tool for operations different from those intended could result in a hazardous situation. Battery tool use and care ▶ Recharge only with the charger specified by the manufacturer.
▶ Wear protective gloves also when changing the accessory tool. Touching the accessory tool presents a risk of injury (cuts or burns). ▶ Wear eye protection. Flying fragments present a risk of injury to the body and eyes. ▶ Before starting work, check the hazard class of the dust that will be produced when working. Use an industrial vacuum cleaner with an officially approved protection class in compliance with the locally applicable dust protection regulations.
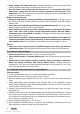
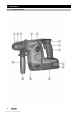
3 Description 3.1 Product overview 6 English Printed: 28.08.
@ ; = % & ( ) Dust cap Chuck Accessory tool release Depth gauge Function selector switch Forward/reverse switch with safety lock Control switch + § / : ∙ $ £ Grip Battery release buttons Charge-status and fault indicator (Li-ion battery) Battery Connection for the TE DRS-6-A(02) dust removal module Side handle Work-area light 3.2 Intended use The product described is a cordless rotary hammer drill.
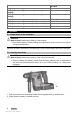
TE 6A36 2.5 J Single impact energy Drilling diameter range in concrete/masonry (hammer 1/8 in …3/4 in drilling) Drilling diameter range in concrete/masonry (hammer 5 mm …20 mm drilling) 1/8 in …3/4 in Drilling diameter range in wood (solid) 3 mm …20 mm Drilling diameter range in wood (solid) 1/8 in …1/2 in Drilling diameter range in metal (solid-head drill bit) 3 mm …13 mm Drilling diameter range in metal (solid-head drill bit) 5 Operation 5.
5.3 Removing the battery 1. Press the release buttons on the battery. 2. Pull the battery out toward the rear. 5.4 Fitting the side handle CAUTION Risk of injury! Loss of control over the rotary hammer drill. ▶ Check that the side handle is fitted correctly and tightened securely. Check that the clamping band is engaged in the groove in the tool. 1. Release the side handle clamping band by turning the handle grip. 2. From the front, slide the depth gauge into the 2 guide holes. 3.
5.5 Fitting and adjusting the depth gauge ▶ Fit the depth gauge, if necessary, and adjust it correctly. 5.6 Fitting / removing the chuck CAUTION Risk of injury! The depth gauge, if fitted but not used, might hinder the operator. ▶ Remove the depth gauge from the tool. ▶ Fit / remove the chuck. 10 English Printed: 28.08.
5.7 Inserting the tool 1. Lightly grease the connection end of the accessory tool. ◁ Use only genuine Hilti grease. Using the wrong grease can result in damage to the tool. 2. Push the accessory tool into the chuck as far as it will go (until it engages). 3. After fitting the accessory tool, grip it and pull it in order to check that it is securely engaged. ◁ The product is ready for use. 5.8 Removing the accessory tool ▶ Pull the chuck back as far as it will go and remove the accessory tool.
5.9 Overhead work ▶ Fit the DCD dust control ring for overhead work. 5.10 Chisel positioning ▶ Set the function selector switch to the 12 English Printed: 28.08.2017 | Doc-Nr: PUB / 5265030 / 000 / 01 position.
6 Types of work 6.1 Function selector switch ▶ Set the function selector switch to the desired working position. ◁ Do not operate the function selector switch while the motor is running. Risk of damage! 6.2 Forward/reverse ▶ Set the forward/reverse switch to the desired direction of rotation. 6.3 Drilling without hammer action ▶ Set the function selector switch to the position. 6.4 Drilling with hammer action ▶ Set the function selector switch to the position. 6.
7 Care and maintenance 7.1 Care and maintenance of cordless tools WARNING Risk of electric shock! Attempting care and maintenance with the battery fitted in the tool can lead to severe injury and burns. ▶ Always remove the battery before carrying out care and maintenance tasks! Care and maintenance of the tool • Carefully remove stubborn dirt from the tool. • Clean the air vents carefully with a dry brush. • Use only a slightly damp cloth to clean the casing.
Storage CAUTION Inadvertent damage caused by defective battery. A leaking battery may damage the tool. ▶ Always remove the battery before storing the tool. ▶ Store the tool and batteries in a place that is as cool and dry as possible. ▶ Never store batteries in direct sunlight, on heating units or behind a window pane. ▶ Store the tool and batteries in a place where they cannot be accessed by children or unauthorized persons.
Trouble or fault No hammering action. The control switch can’t be pressed, i.e. the switch is locked. The drive spindle does not rotate. The rotary hammer switches itself off automatically. Possible cause The function selector switch is set to “Drilling without hammering” . The forward / reverse switch is in the middle position. Action to be taken ▶ Set the function selector switch to “Hammer drilling” . ▶ Push the forward / reverse switch to the right or left.
10 Optional accessories 10.1 DCD dust control ring The DCD dust control ring is an accessory for Hilti rotary hammer drills. It collects a high percentage of the dust produced by overhead work and it attaches quickly and easily to the rotary hammer drill. 10.2 TE DRS-6-A / TE DRS-6-A OSHA dust removal module The TE DRS6A dust removal module is an accessory for the Hilti TE 6A36 rotary hammer drill. It collects a high percentage of the dust and it attaches quickly and easily to the rotary hammer drill.
2. Hold down the control button until full suction power is reached. 3. Position the suction head with the edge seated flat against the work surface. 4. Drill the hole and ease the product slowly out of the drilled hole in order to catch as much dust as possible. 10.2.3 Emptying the dust box Note Regular cleaning and emptying are necessary because a full dust box or a clogged filter can lead to excessive dust formation. Empty the dust box after drilling 8-10 holes (16 mm x 50 mm) (5/8 in x 2 in).
▶ When suction power diminishes, slide the cleaning mechanism 5 times forward and back until it audibly clicks on each slide. 10.2.5 Removing the module 1. Move the forward / reverse selector switch on the rotary hammer to the middle position. 2. Press the DRS release button and hold it in this position. 3. Pull the dust removal module forwards away from the power tool. 11 Disposal WARNING Risk of injury. Hazards presented by improper disposal.
Most of the materials from which Hilti tools and appliances are manufactured can be recycled. The materials must be correctly separated before they can be recycled. In many countries, your old tools, machines or appliances can be returned to Hilti for recycling. Ask Hilti Service or your Hilti representative for further information. ▶ Disposal of electric tools or appliances together with household waste is not permissible.
Printed: 28.08.
Hilti = registered trademark of Hilti Corp., Schaan Printed: 28.08.