DX 76 Printed: 17.04.
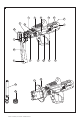
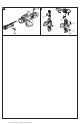
1 3 17 4 5 6 7 8 18 9 1 432 DX 7 6 16 15 MX 76 2 14 1 13 19 21 22 Printed: 17.04.
2 1 4 3 2 1 MX 76 DX 76 3 X-ENP 20 red 15 4 black 4 3 3 4 3 4 3 6 S 235, S275 E 36, ST 37, 340-470 N/mm2 5 S 355, S275 E 42, ST 52, 490-630 N/mm2 3 1 4 3 2 1 DX 76 4 3 2 1 MX 76 MX 76 DX 76 Printed: 17.04.
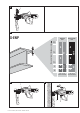
6 3 2 DX 76 MX 76 1 432 1 432 6 DX 7 max. min. max. min. 1/4 7 a) X-ENP2K-20 b) h h X-ENP-19 c) d) h h h 8 9 1 3 1 2 DX 76 10 11 3 1 1 1 432 MX 76 MX 76 MX 76 2 MX 76 DX 76 4 MX 76 MX 76 2 MX 76 2 5 4 4321 DX 76 Printed: 17.04.
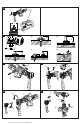
12 13 3 1 2 2 1 15 DX 76 14 3 1 DX 76 4 3 2 1 1 2 3 4 5 2 16 6 4 17 34 2 5 1 1 3 4 2 18 19 5 MX 76 4 1 1 432 3 2 7 4321 DX 76 4321 DX 76 Printed: 17.04.
20 21 MX 76 9 43 21 DX 76 12 10 11 14 4321 8 4321 DX 76 DX 76 Printed: 17.04.
ORIGINAL OPERATING INSTRUCTIONS DX 76 powder-actuated fastening tool It is essential that the operating instructions are read before the tool is operated for the first time. Always keep these operating instructions together with the tool. Ensure that the operating instructions are with the tool when it is given to other persons.
en b) Avoid unfavorable body positions. Make sure you work from a safe stance and stay in balance at all times. c) Never point the tool toward yourself or other persons. d) Never press the nosepiece of the tool against your hand or against any other part of your body (or other person’s hand or part of their body). e) Keep other persons, especially children, away from the area in which the work is being carried out. f) Keep the arms slightly bent while operating the tool (do not straighten the arms). 1.1.
1.1.6 Thermal safety precautions If the tool has overheated, allow it to cool down. Do not exceed the recommended fastener driving rate. b) Always wear gloves if the tool has to be dismantled for cleaning or maintenance before it has been allowed to cool down. c) The tool must be allowed to cool down if the plastic cartridge strip begins to melt. a) 1.1.7 Danger of explosion a) b) Remove the cartridge strip from the tool carefully.
3 Description 3.1 Use of the product as directed en The tool is intended for use in the construction industry and associated trades for driving fasteners into steel. The tool is for hand-held use only. Modification of the tool is not permissible. The tool may not be used in an explosive or flammable atmosphere unless it has been approved for use under these conditions. To avoid the risk of injury use only genuine Hilti fasteners, cartridges, accessories and spare parts or those of equivalent quality.
Fastening profile metal sheet to steel, steel thickness 3 to 6 mm Items required Ordering designation Comments Fasteners ENP2K‑20 L15 MX 10 fasteners per magazine strip Fastener magazine MX 76 Piston X‑76‑P‑ENP2K en Items required Ordering designation Comments Fasteners ENP2K‑20 L15 Single fastener Single fastener guide X‑76‑F‑15‑P Fastening shear connectors Items required Ordering designation Comments Fasteners X‑ENP‑21 HVB Shear connector Fastener guide X‑HVB 50/ 80/ 95/ 110/ 125/
en Items required Ordering designation Piston X‑76‑P‑10 Comments 4 Accessories, consumables Designation Item number, description Hilti toolbox DX 76 KD, large, with lockable cartridge compartment Toolbox for magazine tool DX 76 MX Cleaning set DX 76 / 860‑ENP, Flat brush, 25 mm dia. round brush, 8 mm dia.
6 Before use 6.1 Check the tool NOTE Read the operating instructions before the tool is operated for the first time. Check that no cartridge strip is loaded in the tool. If a cartridge strip is present in the tool, use the cycling grip to cycle the tool several times until the cartridge strip projects from the tool at the cartridge strip exit and it can be pulled out and removed from the tool. Check all external parts of the tool for damage and check that all controls operate faultlessly.
7.2.3 Inserting the cartridge strip 4 Push the cartridge strip into the cartridge strip guideway on the side of the tool, as far as it will go. 7.2.4 Driving fasteners with the magazine tool 5 en 1. 2. 3. Press the tool against the working surface at right angles. Drive the fastener by pulling the trigger. Prepare the tool for driving the next fastener by pushing the cycling grip back toward the rear of the tool and then forward to its original position. 7.2.
7.5.3 Inserting the cartridge strip 4 Push the cartridge strip into the cartridge strip guideway on the side of the tool, as far as it will go. 7.5.4 Driving fasteners with the single-fastener tool 1. 2. 3. Press the tool against the working surface at right angles. Drive the fastener by pulling the trigger. Prepare the tool for driving the next fastener by pushing the cycling grip back toward the rear of the tool and then forward to its original position. 7.5.
7.7.3 Driving fasteners using the grating fastener guide 16 1. en 2. 3. 4. 5. Press the tool against the working surface at right angles. Drive the fastener by pulling the trigger. If possible, check the depth of penetration by checking fastener stand-off. If using a flange, screw the retaining flange on with torque of 5 to 8 Nm. Prepare the tool for driving the next fastener by pushing the cycling grip back toward the rear of the tool and then forward to its original position. 7.7.
NOTE Do not use a spray or steam/water jet system for cleaning! Never operate the tool when the ventilation slots are blocked. Do not permit foreign objects to enter the interior of the tool. 1. 2. 3. 8.2 Maintenance Check all external parts of the tool for damage at regular intervals and check that all controls operate faultlessly. Do not operate the tool if parts are damaged or when the controls do not function faultlessly. If necessary, the tool should be repaired by Hilti Service.
8. 9. en 10. 11. 12. 13. Use the small round brush to clean the bore for the regulating pin and use the tapered brush to clean the cartridge chamber. Spray the slider and the collar of the piston guide with Hilti lubricant spray. Spray the steel parts inside the tool with Hilti lubricant spray. NOTE Use of lubricants other than Hilti spray may cause damage to rubber parts. Check that the tool cycling grip is in its starting position. Insert the piston guide into the tool.
Fault Possible cause Remedy Fastener penetrates too deeply (inadequate fastener stand-off). The fastener missed the steel beam. Mark the position of the beam. Drive another fastener into the beam. Check to ensure that the sheet rests tightly against the supporting material. The wrong piston has been fitted. Check that the right piston / fastener combination is used. The piston is worn. Change the piston and piston stopper. Fastener driven into the rib of the beam.
en Fault Possible cause Remedy The tool remains compressed (doesn’t extend when pressure is released). The cartridge strip has jammed, the tool has overheated. The tool can’t be fired. The tool wasn’t cycled correctly, the cycling grip is not in the starting position. The trigger is pulled before the tool is pressed fully against the working surface. Fastener transport malfunctions Please refer to the fault: “Cartridge strip can’t be removed”.
Fault Possible cause Remedy The piston can’t be fitted. Pull the pusher forward until it engages. The piston guide can’t be fitted. The tip of the pusher is projecting into the piston guide, preventing movement of the piston. The lever is in the closed position. Stiff cycling action. The piston guide is incorrectly positioned. The tool needs to be cleaned. Insert the piston guide in the correct position. Clean the tool. See section: 8.2.2 Cleaning the piston guide 18 19 20 21 Open the lever.
12 EC declaration of conformity (original) Designation: Type: en Powder-actuated fastening tool DX 76 Generation: Year of design: Hilti Corporation, Feldkircherstrasse 100, FL‑9494 Schaan 01 2004 We declare, on our sole responsibility, that this product complies with the following directives and standards: 2006/42/EC, 2011/65/EU.
NOTE The noise emissions measured and the associated measurement uncertainty represent the upper limit for the noise values to be expected during the measurements. Variations in operating conditions may cause deviations from these emission values. 14.2 Vibration Total vibration in accordance with 2006/42/EC does not exceed 2.5 m/s². Further information about user health and safety can be found at www.hilti.com/hse. 17 Printed: 17.04.
Hilti Corporation Printed: 17.04.2014 | Doc-Nr: PUB / 5126040 / 000 / 02 202947 / A4 202947 Hilti = registered trademark of Hilti Corp., Schaan W 2974 | 0414 | 00-Pos. 5_USA | 1 Printed in Liechtenstein © 2014 Right of technical and programme changes reserved S. E. & O. *202947* LI-9494 Schaan Tel.: +423 / 234 21 11 Fax:+423 / 234 29 65 www.hilti.