GX 3 Printed: 07.06.
Printed: 07.06.
Contents 1 1.1 1.2 Information about the documentation . . . . . . . . . . . . . . . . . . . . . . . . . . . . . . . . . . . . 2 1.2.1 Warnings . . . . . . . . . . . . . . . . . . . . . . . . . . . . . . . . . . . . . . . . . . . . . . . . . . 2 1.2.3 Symbols in the illustrations . . . . . . . . . . . . . . . . . . . . . . . . . . . . . . . . . . . . . . . Explanation of symbols used . . . . . . . . . . . . . . . . . . . . . . . . . . . . . . . . . . . . . . . . . . . 1.2.2 1.3 1.4 1.5 1.
8.4 Removing the fastener guide . . . . . . . . . . . . . . . . . . . . . . . . . . . . . . . . . . . . . . . . . . 13 8.6 Removing the support leg . . . . . . . . . . . . . . . . . . . . . . . . . . . . . . . . . . . . . . . . . . . . 13 8.5 Inserting the fastener guide . . . . . . . . . . . . . . . . . . . . . . . . . . . . . . . . . . . . . . . . . . . 8.7 Fitting the support leg . . . . . . . . . . . . . . . . . . . . . . . . . . . . . . . . . . . . . . . . . . . . . . 8.
Dealing with recyclable materials Do not dispose of electric equipment and batteries as household waste 1.2.
1.6 Declaration of conformity We declare, on our sole responsibility, that the product described here complies with the applicable directives and standards. A copy of the declaration issued by the certification department can be found at the end of this documentation. The technical documentation is filed here: Hilti Entwicklungsgesellschaft mbH | Tool Certification | Hiltistrasse 6 | 86916 Kaufering, Germany 2 Safety 2.
▶ ▶ ▶ ▶ ▶ ▶ ▶ ▶ ▶ ▶ ▶ Alway remove the gas can and ( → page 12) empty the magazine ( → page 12) before changing the magazine, before cleaning, servicing or maintenance work on the tool, before storage or transport and before leaving the setting tool unattended. After use, lay the tool flat on the floor. A tool that is mounted on a pole tool extension and left leaning against a wall presents a risk of injury as it may fall over.
6 English Printed: 07.06.
English Printed: 07.06.
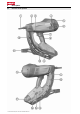
3 Description 3.1 Overview of the product 8 English Printed: 07.06.
@ ; = % & ( ) + Fastener guide Slider for fastener driving depth adjustment and for releasing the fastener guide RESET button Inlet/outlet valve Cooling air slots Belt hook Trigger Grip 3.2 § / : ∙ $ £ | ¡ Q Nail pusher Magazine lockbutton Support leg Magazine Type identification plate Gas can status indicator GAS button Gas can compartment Gas can compartment cover Intended use The product described is a gas-actuated fastening tool (“fastening tool”).
3.9 Belt hook The belt hook can be extended in two stages. Status Meaning Second position • First position 3.10 • Position for attaching to a waist belt Position for attaching to ladders, scaffolds, platforms, etc. Gas can Observe the safety instructions provided with the gas can! In order to operate the fastening tool, the gas can must be inserted in the gas can compartment. The gas can status can be read from the LED display after pressing the GAS button.
5 Loading the setting tool 5.1 Loading for driving nails 5.1.1 Equipment required for driving nails Nails are fed through the magazine in strip form (ready-to-use strips of nails). When driving nails there must be no single-fastener adapter present in the tool . 5.1.2 Loading the magazine 1. Pull the nail pusher back until it engages. 2. Slide the nail strips into the magazine as far as they will go. Strips of short nails could be inadvertently inserted the wrong way round.
1. 2. 3. 4. 5. Check the fastener driving depth setting. Bring the nosepiece of the setting tool and the support leg into contact with the working surface. Using the fastener guide, press the setting tool as far as it will go against the base material. Check that the fastener guide is perpendicular to the working surface. Pull the trigger to drive a fastener. It is not possible to drive a fastener if the fastener guide is not pressed fully against the working surface. 6.
7.3 ▶ Removing the single-fastener adapter After driving the fasteners, remove the single-fastener adapter ( → page 14) from the fastening tool. 8 Optional operating steps 8.1 Checking the status of the gas can 1. Without pressing the fastening tool against the working surface, press the GAS button. 2. Read the gas can status from the display. → page 10 8.2 Removing the magazine 1. Pull the nail pusher back until it engages. 2. Remove the loose nail strips from the magazine.
8.8 1. 2. 3. 4. Inserting the single-fastener adapter Remove the gas can. → page 12 Remove the magazine. → page 13 Insert the single-fastener adapter. Fit the magazine. → page 13 8.9 1. 2. 3. 4. Removing the single-fastener adapter Remove the gas can. → page 12 Remove the magazine. → page 13 Remove the single-fastener adapter. Fit the magazine. → page 13 9 Remedying possible malfunctions 9.1 Remedying an incorrect piston position Check the position of the RESET → page 9 button.
11 Transport and storage 11.1 ▶ ▶ ▶ ▶ 11.2 ▶ 12 Maintenance To help ensure safe and reliable operation, use only genuine Hilti spare parts and consumables. Spare parts, consumables and accessories approved by Hilti for use with the product can be found at your local Hilti Center or online at: www.hilti.group. Check all external parts of the fastening tool for signs of damage at regular intervals and make sure that all the controls function correctly.
Malfunction Fasteners bend. Fasteners do not hold in steel base material. The content of the gas can is inadequate for the number of fasteners in the package. The tool remains compressed (nose does not extend when pressure is released). Possible cause Driving power is too low. ▶ Move the fastener driving depth adjustment slider to the + position. The fasteners are too long. ▶ Use shorter fasteners. The fastener guide is not held perpendicular to the working surface.
Malfunction No fastener is driven. The fastening tool is hot and doesn’t work even after a break. No fastener is driven (or driven only intermittently). A fastener cannot be removed from the fastener guide. 13 Possible cause Foreign object in the area of the fastener guide Action to be taken ▶ Remove foreign objects and nails from the area around the fastener guide. → page 14 The fastening tool is too hot. ▶ Electronic fault. ▶ The fastener driving rate was well above 1,200 fastenings per hour.
18 English Printed: 07.06.
Printed: 07.06.
Printed: 07.06.
Printed: 07.06.
Hilti = registered trademark of Hilti Corp., Schaan Printed: 07.06.