
Operating Instruction GX 3 (01)

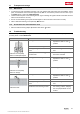

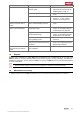

Table Of Contents
- Original operating instructions
- Contents
- 1 Information about the documentation
- 2 Safety
- 3 Description
- 4 Technical data
- 5 Loading the setting tool
- 6 Driving fasteners
- 7 Unloading the setting tool
- 8 Optional operating steps
- 9 Remedying possible malfunctions
- 10 Care and maintenance
- 11 Transport and storage
- 12 Troubleshooting
- 13 Disposal
- 14 Manufacturer’s warranty

12 English
1. Check the fastener driving depth setting.
2. Bring the nosepiece of the setting tool and the support leg into contact with the working surface.
3. Using the fastener guide, press the setting tool as far as it will go against the base material.
4. Check that the fastener guide is perpendicular to the working surface.
5. Pull the trigger to drive a fastener.
It is not possible to drive a fastener if the fastener guide is not pressed fully against the working
surface.
6. Lift the fastening tool completely away from the working surface after driving a fastener.
7. Remove the gas can ( → page 12) and empty the magazine ( → page 12) when work with the setting tool
is finished or before leaving the tool unattended.
6.2 Driving threaded studs
WARNING
Risk of injury! Pressing the nosepiece of the setting tool against a part of the body may lead to serious
injury due to inadvertent firing and release of a fastener.
▶ When inserting fasteners, on no occasion press the fastener guide against a hand or any other
part of the body.
▶ Never press the nosepiece of the tool against your hand or any other part of the body.
WARNING
Risk of injury by falling objects! Triggering the tool again on top of a nail or stud that was not optimally driven
may weaken the fastening. The object that was fastened may fall down as a result, causing damage or injury.
▶ Never trigger the tool again in an attempt to improve the hold of a previously driven nail or stud.
1. Check the fastener driving depth setting.
2. Insert a stud in the fastener guide.
3. Bring the nosepiece of the setting tool and the support leg into contact with the working surface.
4. Using the fastener guide, press the setting tool as far as it will go against the base material.
5. Check that the fastener guide is perpendicular to the working surface.
6. Pull the trigger to drive a fastener.
It is not possible to drive a fastener if the fastener guide is not pressed fully against the working
surface.
7. Remove the gas can when work with the setting tool is finished or before leaving the tool unattended
( → page 12).
7 Unloading the setting tool
7.1 Removing the gas can
1. Open the gas can compartment cover.
2. Press the gas can clip to release the gas can.
3. Remove the gas can from the gas can compartment.
4. Fit the cap on the gas can.
5. Close the gas can compartment cover.
7.2 Unloading the magazine
1. Pull the nail pusher back until it engages.
2. Remove all nail strips from the magazine.
WARNING
Risk of finger injury! Fingers could be pinched when the nail pusher is released.
▶ When disengaging the nail pusher, do not release it and allow it to jump forward. Guide it forward slowly
as far as it will go.
3. Release the nail pusher and guide it forward as far as it will go.
Printed: 07.06.2018 | Doc-Nr: PUB / 5261664 / 000 / 02