AG 500-12D Printed: 20.04.
Printed: 20.04.
1 Information about the documentation 1.1 • • • About this documentation Read this documentation before initial operation or use. This is a prerequisite for safe, trouble-free handling and use of the product. Observe the safety instructions and warnings in this documentation and on the product. Always keep the operating instructions with the product and make sure that the operating instructions are with the product when it is given to other persons. 1.2 Explanation of symbols used 1.2.
1.3 Product-dependent symbols 1.3.1 Symbols on the product The following symbols are used on the product: Wear eye protection Revolutions per minute Revolutions per minute Rated speed Diameter Protection class II (double-insulated) 1.4 Product information Hilti products are designed for professional use and may be operated, serviced and maintained only by trained, authorized personnel. This personnel must be informed of any particular hazards that may be encountered.
▶ ▶ ▶ ▶ Do not expose power tools to rain or wet conditions. Water entering a power tool will increase the risk of electric shock. Do not abuse the cord. Never use the cord for carrying, pulling or unplugging the power tool. Keep cord away from heat, oil, sharp edges or moving parts. Damaged or entangled cords increase the risk of electric shock. When operating a power tool outdoors, use an extension cord suitable for outdoor use. Use of a cord suitable for outdoor use reduces the risk of electric shock.
▶ ▶ ▶ ▶ ▶ ▶ ▶ ▶ ▶ ▶ ▶ ▶ ▶ ▶ Do not use accessories which are not specifically designed and recommended by the tool manufacturer. Just because the accessory can be attached to your power tool, it does not assure safe operation. The rated speed of the accessory must be at least equal to the maximum speed marked on the power tool. Accessories running faster than their rated speed can break and fly apart.
▶ ▶ Use special care when working corners, sharp edges etc. Avoid bouncing and snagging the accessory. Corners, sharp edges or bouncing have a tendency to snag the rotating accessory and cause loss of control or kickback. Do not attach a saw chain woodcarving blade or toothed saw blade. Such blades create frequent kickback and loss of control.
▶ ▶ ▶ ▶ Wear suitable protective glasses, a hard hat, ear protection, protective gloves and light respiratory protection while using the power tool. Before beginning the work, check the hazard classification of the dust that will be produced. Use an industrial vacuum cleaner with an officially approved protection class in compliance with the locally applicable dust protection regulations.
English Printed: 20.04.
8 English Printed: 20.04.
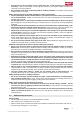
3 Description 3.1 Overview of the product English Printed: 20.04.
@ ; = % & ( ) + 3.2 Spindle lockbutton Air vents Vibration-absorbing side handle Wrench Clamping nut Kwik lock clamping nut (optional) Cutting disc / grinding disc Clamping flange § / : ∙ $ £ | Guard On/off switch Switch-on interlock release button Spindle Quick locking system Guard release button Threaded bushing for handle Intended use The product described is a hand-held electric angle grinder.
3.9 Front cover for the disc guard When grinding with straight grinding discs and cutting with cutting discs in metalworking applications, use the standard guard with front cover. 3.10 DG-EX 125/5" dust hood for grinding (accessory) The grinding system is suitable only for occasional use with diamond cup wheels for grinding mineral materials. CAUTION Use of this hood for working on metal is prohibited. 3.
4 Consumables Only synthetic resin-bonded, fiber-reinforced discs with a maximum diameter of Ø 5" and a maximum disc thickness of 1/4" (grinding discs) or 1/8" (cutting discs) which are approved for use at a rotational speed of at least 11,500/min and a peripheral speed of 80 m/s may be used. WARNING! When cutting or slitting with cutting discs, always use the standard guard with additional cover plate.
5 Technical data For rated voltage, rated current, frequency and/or input power, refer to the country-specific type identification plate. If the device is powered by a generator or transformer, the generator or transformer’s power output must be at least twice the rated input power shown on the rating plate of the device. The operating voltage of the transformer or generator must always be within +5 % and -15 % of the rated voltage of the device.
6.2.2 Adjusting the guard Press the guard release button and then rotate the guard until it engages in the desired position. ▶ 6.2.3 Removing the guard 6.3 Fitting or removing the front cover 1. Press the guard release button and turn the guard until the triangular marks on the guard and on the product are in alignment. 2. Lift off the guard. 1. Position the front cover with the closed side on the standard guard and push it on until it engages. 2.
6.4.1 Fitting the grinding disc 1. Disconnect the mains plug from the power outlet. 2. Clean the clamping flange and the clamping nut. 3. Screw the clamping flange onto the arbor. 4. 5. 6. 7. Fit the grinding disc. Screw on the clamping nut corresponding to the type of grinding disc fitted. Press the arbor lockbutton and hold it in this position. Use the pin wrench to tighten the clamping nut securely, then release the arbor lockbutton and remove the wrench. 6.4.2 Removing the grinding disc 1.
1. Disconnect the mains plug from the power outlet. 2. Clean the clamping flange and the quick-release clamping nut. 3. Fit the clamping flange onto the drive spindle. 4. Fit the grinding disc. 5. Screw on the Kwik lock nut until it is seated against the grinding disc. ◁ The name Kwik lock should be visible when the nut is screwed on. 6. Press the spindle lockbutton and hold it in this position. 7.
6.5 1. 2. 3. 4. 5. 6. 7. 6.6 1. 2. 3. 4. 5. 6. 7 Fitting the wire brush Disconnect the mains plug from the power outlet. Fit the side handle. → page 13 Install the guard. → page 13 Place the wire brush in position and tighten it hand-tight. Press the spindle lockbutton and hold it in this position. Tighten the wire brush with a suitable open-end wrench. Then release the spindle lockbutton and remove the open-end wrench.
7.1 Switching on The on/off switch with built-in safety lock enables the user to check the switch function and prevents inadvertent starting of the product. 1. Plug the supply cord into the power outlet. 2. Slide the safety lock forward to unlock the on/off switch. 3. Fully depress the on/off switch. ◁ The motor runs. 7.2 Grinding CAUTION Risk of injury. The accessory tool may suddenly stick or stall.
• Use only a slightly damp cloth to clean the casing. Do not use cleaning agents containing silicone as they can attack the plastic parts. Maintenance WARNING Danger of electric shock! Improper repairs to electrical components may lead to serious injuries including burns. ▶ Repairs to the electrical section of the tool or appliance may be carried out only by trained electrical specialists.
11 Disposal Most of the materials from which Hilti tools and appliances are manufactured can be recycled. The materials must be correctly separated before they can be recycled. In many countries, your old tools, machines or appliances can be returned to Hilti for recycling. Ask Hilti Service or your Hilti representative for further information.
Printed: 20.04.
Printed: 20.04.
Printed: 20.04.
Hilti = registered trademark of Hilti Corp., Schaan Printed: 20.04.