PM 40-MG English Printed: 07.09.
Printed: 07.09.
1 Information about the documentation 1.1 About this documentation • • • Read this documentation before initial operation or use. This is a prerequisite for safe, trouble-free handling and use of the product. Observe the safety instructions and warnings in this documentation and on the product. Always keep the operating instructions with the product and make sure that the operating instructions are with the product when it is given to other persons. 1.2 Explanation of symbols used 1.2.
▶ Write down the serial number in the table below. You will be required to state the product details when contacting Hilti Service or your local Hilti organization to inquire about the product. Product information Multi-line laser Generation Serial no. PM 40-MG 01 1.5 Declaration of conformity We declare, on our sole responsibility, that the product described here complies with the applicable directives and standards.
2.3 Electromagnetic compatibility Although the device complies with the strict requirements of the applicable directives, Hilti cannot entirely rule out the possibility of interference to the device caused by powerful electromagnetic radiation, possibly leading to incorrect operation. Check the accuracy of the device by taking measurements by other means when working under such conditions, or if you are unsure. Likewise, Hilti cannot rule out the possibility of interference with other devices (e.g.
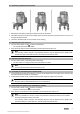
3 Description 3.1 Product overview 4 English Printed: 07.09.
@ ; = % Adjustable foot Liion battery Warning sticker Selector button for line and receiver mode & ( ) + Laser exit window Rotary on/off and pendulum lock switch Fine adjustment for rotation platform Circular bubble level 3.2 Intended use This tool is a self-leveling multi-line laser level that allows a single person to transfer right angles, level horizontally, carry out alignment work and plumb accurately.
Self-leveling time (typical) 3s Line width (distance 5 m) < 2.2 mm Laser class Self-leveling range Operating status indicator Power source Battery life (all lines on) Battery life (horizontal or vertical lines on) Operating temperature Storage temperature Dust and water spray protection (except battery compartment) Class 2, visible, 510-660 nm (EN 60825-1:2008 / IEC 608251:2007); Class II (CFR 21 § 1040 (FDA)) ±3.
5.2 Removing / adjusting the base plate 1. Remove the base plate by pulling it forward and clear of the device. 2. The rubber sleeves of the feet can be pulled down to provide protection if the device has to be set up on an easily damaged surface. 3. The feet of the base plate can be screwed out for leveling. 5.3 Switching the laser beams on 1. Turn the rotary switch to the position (on/unlocked). ◁ The vertical laser beams are visible. 2.
5.7 Setting the laser beams to the “Inclined line” function 1. Turn the rotary switch to the position (on/locked). ◁ Only the horizontal laser beam is then visible. 2. Press the line mode selector button repeatedly until the desired line mode is set. Note When the “Inclined line” function is active, the pendulum is locked and the tool is not leveled. The laser beam(s) blink every 5 seconds.
5.8.3 Vertical alignment of pipes 5.8.4 Aligning heating units English Printed: 07.09.
5.8.5 Aligning door and window frames 5.9 Checking 5.9.1 Checking the plumb point 1. 2. 3. 4. Make a mark on the floor (a cross) in a high room (e.g. in a stairwell or hallway with a height of 5–10 m). Place the tool on an even, level surface. Switch the tool on and unlock the pendulum. Position the tool so that the lower plumb beam coincides with the center of the cross marked on the floor. 5. Mark the top point of intersection of the laser lines on the ceiling.
6. Pivot the tool through 90°. Note The lower red plumb beam must remain on the center of the cross. 7. Mark the top point of intersection of the laser lines on the ceiling. 8. Repeat the procedure after pivoting the tool through 180° and 270°. Note Form a circle on the ceiling from the 4 marked points. Measure the diameter of the circle D in millimeters or inches and the height of the room in meters or feet. 9. Calculate the value R. ◁ The value R should be less than 3 mm (corresponds to 3 mm at 10 m).
7. Calculate the value R. ◁ The value R should be less than 2 mm. ◁ The value R should be less than 1/8". 5.9.3 Checking perpendicularity (horizontal) 1. Position the tool so that the lower plumb beam coincides with the center of a reference cross marked in the middle of a room at a distance of about 5 m from the walls. 2. Mark all 4 points of intersection on the four walls. 3.
5.9.4 Checking the accuracy of the vertical line 1. Position the tool at a height of 2 m (pos.1). 2. Switch the tool on. 3. Position the first target plate T1 (vertical) at a distance of 2.5 meters from the tool at the same height (2 meters), so that the vertical laser beam strikes the plate. Mark this position. 4. Then place the second target plate T2 at a position 2 meters below the first target plate, so that the vertical laser beam strikes the plate. Mark this position. 5.
6.2 Hilti Calibration Service We recommend that the tool is checked by the Hilti Calibration Service at regular intervals in order to verify its reliability in accordance with standards and legal requirements. Use can be made of the Hilti Calibration Service at any time. Calibration at least once a year is recommended. The Hilti Calibration Service provides confirmation that the device is in conformance, on the day it is tested, with the specifications given in the operating instructions.
Trouble or fault The tool can’t be switched on. Individual laser beams don’t function. The tool can be switched on but no laser beam is visible. Automatic leveling doesn’t work. The tool switches off after 1 hour. Possible cause The tool or rotary switch is faulty. The laser source or laser control unit is faulty. The laser source or laser control unit is faulty. The temperature is too high or too low. The tool is standing on an excessively inclined surface.
16 English Printed: 07.09.
Printed: 07.09.
Hilti = registered trademark of Hilti Corp., Schaan Printed: 07.09.