
User's Manual


ORIGINAL OPERATING INSTRUCTIONS
PR 35 rotating laser
It is essential that the operating instructions
are read before the tool is operated for the
first time.
Always keep these operating instructions
together with the tool.
Ensure that the operating instructions are
with the tool when it is given to other
persons.
Contents Page
1. General information 2
2. Description 2
3. Accessories 5
4. Technical data 5
5. Safety instructions 7
6. Before use 9
7. Operation 10
8. Care and maintenance 14
9. Troubleshooting 15
10. Disposal 16
11. Manufacturer’s warranty - tools 17
12. EC declaration of conformity 17
1 These numbers refer to the corresponding illustra-
tions. The illustrations can be found on the fold-out
cover pages. Keep these pages open while studying
the operating instructions.
In these operating instructions, the designation “the
tool” or “the rotating laser” always refers to the
Hilti PR 35. The designation “remote control / laser
receiver” always refers to the Hilti PRA 35.
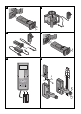
Rotating laser 1
@
Laser beam (plane of rotation)
;
Rotating head
=
Grip
%
Control panel
&
Battery
(
Battery compartment
)
Base plate with 5/8" thread
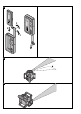
Rotating laser control panel 2
@
On / off button
;
Auto-leveling LED
=
Direction buttons
%
Shock warning deactivation LED
&
Monitoring mode LED
(
Slope LED
)
Line function button
+
Speed of rotation button
§
Battery status
PRA 35 control panel (on the front of the receiver) 3
@
On / off button
;
Special line function
=
Units button
%
Volume button
&
Automatic alignment button
(
Monitoring mode button
)
Receiving area
+
Marking notch
§
Display
PRA 35 control panel (on the rear of the remote
control) 4
@
Sleep mode button
;
Speed of rotation button
=
Line function button
%
Direction buttons (up/down)
&
Direction buttons (left/right)
(
Button lock
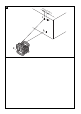
PRA 35 display 5
@
Position of the receiver relative to the height of
the laser plane
;
Battery status
=
Signal tone volume
%
Button lock
&
Distance of receiver from laser plane
en
1