SD 2500 SD 4500 Printed: 22.10.
Printed: 22.10.
1 Indicações sobre a documentação 1.1 • • • Sobre esta documentação Antes da colocação em funcionamento, leia esta documentação. Esta é a condição para um trabalho seguro e um manuseamento sem problemas. Tenha em atenção as instruções de segurança e as advertências nesta documentação e no produto. Guarde o manual de instruções sempre junto do produto e entregue-o a outras pessoas apenas juntamente com este manual. 1.2 Explicação dos símbolos 1.2.
sobre os potenciais perigos que a ferramenta representa. O produto e seu equipamento auxiliar podem representar perigo se usados incorrectamente por pessoas não qualificadas ou se usados para fins diferentes daqueles para os quais foram concebidos. • Registe a designação e o número de série da placa de características na tabela seguinte.
▶ Utilize um disjuntor diferencial se não puder ser evitada a utilização da ferramenta eléctrica em ambiente húmido. A utilização de um disjuntor diferencial reduz o risco de choque eléctrico. Segurança física ▶ Esteja alerta, observe o que está a fazer, e tenha prudência ao trabalhar com uma ferramenta eléctrica. Se estiver cansado ou sob influência de drogas, álcool ou medicamentos não efectue nenhum trabalho com ferramentas eléctricas.
2.1.2 ▶ Normas de segurança para aparafusadoras Segure a ferramenta elétrica pelas áreas isoladas dos punhos quando realizar trabalhos onde o parafuso pode encontrar cabos eléctricos encobertos ou o próprio cabo de ligação. O contacto do parafuso com um cabo sob tensão também pode colocar partes metálicas da ferramenta sob tensão e causar um choque eléctrico. 2.1.3 Normas de segurança adicionais Segurança física ▶ Utilize o produto somente se estiver em perfeitas condições técnicas.
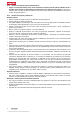
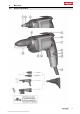
3 Descrição 3.1 Vista geral do produto Português Printed: 22.10.
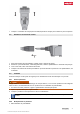
Porta-broca Mandril Interface ferramenta/acessório (ligação de engate) Sistema de acoplamento/engrenagem Gancho de cinto Motor Entrada de ar @ ; = % & ( ) 3.2 + § / : ∙ $ £ Comutador de rotação direita/esquerda Botão de bloqueio para operação continuada Interruptor on/off Cabo de alimentação Placa de características Saída de ar Limitador de profundidade Utilização correcta O produto descrito é uma ferramenta eléctrica manual, destinada ao mercado da instalação/aplicação de placas de gesso cartonado.
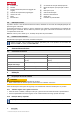
▶ Coloque o comutador de rotação para a direita/esquerda em rotação para a direita ou para a esquerda. 5.2 1. 2. 3. 4. Substituir a ferramenta de encaixe Puxe pelo limitador de profundidade, soltando assim a ligação de engate. Pressione o porta-ferramentas, rodando ligeiramente, contra a aparafusadora e mantenha esta posição. Com a outra mão, retire a ferramenta de encaixe. Coloque a ferramenta de encaixe pretendida no porta-ferramentas e pressione-a na aparafusadora, até ao batente. 5.
2. Ajuste a aparafusadora para rotação à esquerda. 3. Coloque a aparafusadora com o bit sobre o parafuso e regule a rotação com o botão de controlo. 4. Depois de desaparafusar os parafusos, insira novamente o limitador de profundidade. 5.3.3 Ligar o modo "operação continuada" Ligue a operação continuada. ▶ 5.3.4 Desactivar o modo "operação continuada" Pressione o interruptor on/off. ◁ O botão de bloqueio volta para a sua posição inicial. ▶ 5.3.5 Interface ferramenta e limitador de profundidade 1.
• • • Verificar, regularmente, todos os componentes visíveis quanto a danos e os comandos operativos quanto a funcionamento perfeito. Em caso de danos e/ou perturbações de funcionamento, não operar o aparelho. Mandar reparar de imediato pelo Centro de Assistência Técnica Hilti. Após os trabalhos de conservação e manutenção, aplicar todos os dispositivos de protecção e verificar o respectivo funcionamento.
10 Português Printed: 22.10.
Printed: 22.10.
Hilti = registered trademark of Hilti Corp., Schaan Printed: 22.10.