TE 3-M TE 3-C Printed: 20.12.
Printed: 20.12.
TE 3-M TE 3-C Original operating instructions Printed: 20.12.
Printed: 20.12.
1 Information about the documentation 1.1 • • • About this documentation Read this documentation before initial operation or use. This is a prerequisite for safe, trouble-free handling and use of the product. Observe the safety instructions and warnings in this documentation and on the product. Always keep the operating instructions with the product and make sure that the operating instructions are with the product when it is given to other persons. 1.2 Explanation of symbols used 1.2.
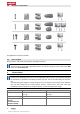
Wireless data transfer Drilling without hammer action Drilling with hammering action (hammer drilling) Forward / reverse Protection class II (double-insulated) Rated speed under no load 1.4 Product information products are designed for professional users and only trained, authorized personnel are permitted to operate, service and maintain the products. This personnel must be specifically informed about the possible hazards.
▶ ▶ ▶ Do not abuse the cord. Never use the cord for carrying, pulling or unplugging the power tool. Keep cord away from heat, oil, sharp edges or moving parts. Damaged or entangled cords increase the risk of electric shock. When operating a power tool outdoors, use an extension cord suitable for outdoor use. Use of a cord suitable for outdoor use reduces the risk of electric shock. If operating a power tool in a damp location is unavoidable, use a residual current device (RCD) protected supply.
▶ ▶ ▶ ▶ ▶ ▶ ▶ ▶ ▶ Check that the side handle is fitted correctly and tightened securely. Always hold the tool securely with both hands on the grips provided. Wear a dust mask if the tool is operated without a dust removal system. Improve the blood circulation in your fingers by relaxing your hands and exercising your fingers during breaks between working. The tool is not intended for use by debilitated persons who have received no special training. Keep the tool out of reach of children.
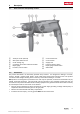
3 Description 3.1 Parts of the tool and operating controls @ ; = % & ( 3.2 Three-jaw chuck (TE 3-M) SDS quick-release chuck Chuck locking ring Connection for the dust collection module Depth gauge Forward / reverse switch ) + § / : ∙ Control switch lock Control switch Supply cord Function selector switch Depth gauge release button Side handle Intended use The product described is an electrically powered rotary hammer.
3.3 Examples of applications The applications shown are possible. 3.4 Items supplied Rotary hammer, side handle, depth gauge, operating instructions. For safe, reliable operation, use only genuine Hilti spare parts and accessories. Spare parts, accessories and consumables approved by Hilti for use with this product can be found at your Hilti Center or at www.hilti.group.
TE 3M TE 3C Drilling diameter range in wood (solid) 1/16 in …3/4 in 1/16 in …3/4 in Drilling diameter range in wood (solid) 1.5 mm …20 mm 1.5 mm …20 mm Drilling diameter range in metal (solid-head drill bit) 1/16 in …1/2 in 1/16 in …1/2 in Drilling diameter range in metal (solid-head drill bit) 1.5 mm …13 mm 1.
Fit the side handle. ▶ 5.3 Fitting/removing the drill bit or other accessory: SDS quick-release chuck Use of unsuitable grease may cause damage to the product. Use only the recommended grease supplied by Hilti. Fit the drill bit or other accessory in the quick-release chuck or, respectively, remove the drill bit or other accessory from the quick-release chuck. ▶ 5.
5.5 ▶ 5.6 ▶ 5.7 ▶ Drilling without hammering Set the function selector switch to the “Drilling without hammering action” position . Screwdriving Set the function selector switch to the “Drilling without hammering action” position . Drilling with hammering action (hammer drilling) Set the function selector switch to the “Drilling with hammering action” (hammer drilling) position English Printed: 20.12.2018 | Doc-Nr: PUB / 5245522 / 000 / 04 .
5.8 Setting the chiseling function Set the function selector switch to the “Chiseling” position ▶ 5.9 . Chisel positioning CAUTION Risk of injury Loss of control over the chisel direction. ▶ Do not operate the tool when the selector switch is set to “Chisel positioning”. Turn the function selector switch until it engages in the “Chiseling” position. Set the function selector switch to the “Chisel positioning” position ▶ 5.10 .
5.11 ▶ Adjust the depth gauge. 5.12 ▶ Fitting the dust collection module for overhead work Fit the DCD dust collection module for overhead work. 5.13 ▶ Adjusting the depth gauge Pressing/locking the control switch Press and lock the control switch. English Printed: 20.12.
5.14 Replacing the dust shield Replace the dust shield. ▶ 6 Care of the product Keep the product, especially its grip surfaces, clean and free from oil and grease. Do not use cleaning agents containing silicone. Never operate the product when the air vents are blocked. Clean the air vents carefully using a dry brush. Do not allow foreign objects to enter the interior of the product. Clean the outside of the product at regular intervals with a slightly damp cloth.
9 ▶ Manufacturer’s warranty Please contact your local Hilti representative if you have questions about the warranty conditions. English Printed: 20.12.
Printed: 20.12.
Printed: 20.12.
Hilti = registered trademark of Hilti Corp., Schaan Printed: 20.12.