
Operating Instruction DX 5 (01)


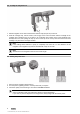
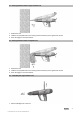
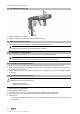
Table Of Contents
- Original operating instructions
- 1 Information about the documentation
- 2 Safety
- 3 Description
- 4 Technical data
- 5 Operation
- 5.1 Safety devices
- 5.2 Loading the single-fastener tool
- 5.3 Loading the magazine tool
- 5.4 Setting the power level
- 5.5 Driving fasteners with the single-fastener tool
- 5.6 Driving fasteners with the magazine tool
- 5.7 Unloading the single-fastener tool
- 5.8 Unloading the magazine tool
- 5.9 Switching Bluetooth on and off
- 5.10 Resetting the cleaning indicator
- 5.11 Procedure if a cartridge fails to fire
- 5.12 Tool misfires (cartridge doesn't fire)
- 6 Care and maintenance
- 6.1 Care of the tool
- 6.2 Maintenance
- 6.3 Servicing the tool
- 6.4 Dismantling the single-fastener tool
- 6.5 Dismantling the magazine tool
- 6.6 Checking the piston and buffer for wear
- 6.7 Checking the fastener guide for wear
- 6.8 Cleaning and lubricating the single-fastener tool
- 6.9 Cleaning and lubricating the magazine tool
- 6.10 Assembling the single-fastener tool
- 6.11 Assembling the magazine tool
- 6.12 Final check of the tool
- 7 Troubleshooting
- 8 Disposal
- 9 Manufacturer’s warranty
- 10 Confirmation of C.I.P. testing

6 English
5.3 Loading the magazine tool
1. Pull the magazine cover down and insert the fastener strip (strip of ten) in the tool.
2. Push the cartridge strip, narrow end first, into the grip of the tool from below until the full length of the
cartridge strip is inside the tool. If you wish to use a cartridge strip in which some of the cartridges have
already been used, start pulling the strip up and out the top of the tool by hand until the first unused
cartridge is in place in the cartridge chamber.
Note
If the loading status indicator is partly or completely red, there are 3 or less fasteners in the
magazine. The magazine may then be reloaded with a strip of ten nails.
Note
All fasteners in the magazine must be of the same length.
5.4 Setting the power level
1. Press the power regulator release button.
2. Turn the power regulating wheel to set the power level you require.
3. Check the quality of the fastening in accordance with Hilti standards.
Note
Select a cartridge power level and power setting to suit the application.
If you have no previous experience of using the tool, always begin with the lowest power.
Printed: 29.09.2017 | Doc-Nr: PUB / 5292580 / 000 / 01