
Operating Instruction AG 500-12D (04)
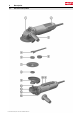
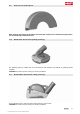
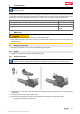
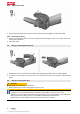

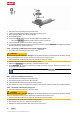
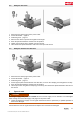
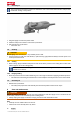
Table Of Contents
- Original operating instructions
- 1 Information about the documentation
- 2 Safety
- 3 Description
- 3.1 Overview of the product
- 3.2 Intended use
- 3.3 Items supplied
- 3.4 Starting current limiter
- 3.5 Constant-speed electronics
- 3.6 Active Torque Control (ATC)
- 3.7 Restart interlock
- 3.8 Temperature-dependent motor protection
- 3.9 Front cover for the disc guard
- 3.10 DG-EX 125/5 dust hood for grinding (accessory)
- 3.11 DC-EX 125/5C dust hood for cutting (accessory)
- 4 Consumables
- 5 Technical data
- 6 Before use
- 7 Types of work
- 8 Care and maintenance
- 9 Transport and storage
- 10 Troubleshooting
- 11 Disposal
- 12 Manufacturer’s warranty

16 English
1. Disconnect the mains plug from the power outlet.
2. Clean the clamping flange and the quick-release clamping nut.
3. Fit the clamping flange onto the drive spindle.
4. Fit the grinding disc.
5.
Screw on the Kwik lock nut until it is seated against the grinding disc.
◁
The name Kwik lock should be visible when the nut is screwed on.
6. Press the spindle lockbutton and hold it in this position.
7.
Turn the grinding disc firmly by hand in a clockwise direction until the Kwik lock nut is tightened securely
and then release the spindle lockbutton.
6.4.4 Removing a grinding disc secured with a Kwik lock nut
1. Disconnect the mains plug from the power outlet.
CAUTION
Risk of breakage and irreparable damage. If the spindle lockbutton is pressed while the spindle is rotating,
this may cause the accessory tool to work loose or detach from the power tool.
▶ Press the spindle lockbutton only when the spindle has stopped rotating.
2. Press the spindle lockbutton and hold it in this position.
3.
Release the Kwik lock nut by turning it counterclockwise by hand.
4.
If the Kwik lock nut cannot be released by turning it by hand, use a pin wrench to turn the nut in a
counterclockwise direction.
Never use a pipe wrench! A pipe wrench could damage the Kwik lock nut.
5. Release the spindle lockbutton and remove the grinding disc.
6.4.5 Fitting a threaded accessory tool
1. Disconnect the mains plug from the power outlet.
2. Screw the accessory tool onto the drive spindle.
3. Press the spindle lockbutton and hold it in this position.
4. Use an open-end wrench to tighten the accessory tool securely and then release the spindle lockbutton.
6.4.6 Removing a threaded accessory tool
1. Disconnect the mains plug from the power outlet.
CAUTION
Risk of breakage and irreparable damage. If the spindle lockbutton is pressed while the spindle is rotating,
this may cause the accessory tool to work loose or detach from the power tool.
▶ Press the spindle lockbutton only when the spindle has stopped rotating.
2. Press the spindle lockbutton and hold it in this position.
3. Use an open-end wrench to release the accessory tool.
4. Release the spindle lockbutton and remove the accessory tool.
Printed: 20.04.2018 | Doc-Nr: PUB / 5300555 / 000 / 01