
Operating Instruction DX 9-ENP
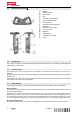

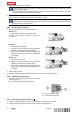
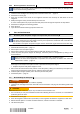

Table Of Contents
- Original operating instructions
- Mode d'emploi original
- 1 Indications relatives à la documentation
- 2 Sécurité
- 3 Description
- 4 Caractéristiques techniques
- 5 Utilisation
- 6 Nettoyage et entretien
- 7 Guide de dépannage
- 8 Recyclage
- 9 Garantie constructeur
- 10 Déclaration FCC (valable aux États-Unis) / Déclaration IC (valable au Canada)
- Manual de instrucciones original

8 English 2194400
*2194400*
▶ Each time you lay a metal sheet in position on the steel beams, use a water-resistant pen to mark the
area in which fasteners can be driven.
Do this each time, for each individual metal sheet. It is not sufficient to simply mark the ends of
the beam and then draw a straight line between these points as the supporting beams may be
distorted, i.e. curved.
5.1.2 Checking that the tool is ready for use
This check should always be carried out immediately before use of the fastening tool and after
reassembling the tool after cleaning or after a routine check of the condition of the piston and piston
stopper.
1. Make sure that there are no cartridge strips and no nail strips in the tool.
@
Catch
;
Pressure pin
=
Slider
%
Nosepiece
2. Check the fastening tool for visible signs of damage,
especially to the components shown in the illustra-
tion.
Result
Visible signs of damage are found
▶ Have the tool repaired by Hilti Service.
3. Press the tool against the working surface until a definite resistance is felt and then check the position of
the pressure pin.
Result 1 / 2
The pressure pin is not pressed down – the spring on the pressure pin is not compressed.
The tool has detected no nail and thus cannot be pressed against the working surface. The tool is
working correctly.
Result 2 / 2
The pressure pin is pressed all the way down, the spring on the pressure pin is compressed and a click
is heard when the trigger is pressed.
The slider may be jammed. The tool should be cleaned again and the test repeated. If the problem
persists, the tool must be repaired by Hilti Service.
4. Release any pressure on the tool.
5. Load the nail strips → page 9, but do not load any cartridge strips.
6. Press the tool against the working surface again and check whether a click can be heard when the trigger
is pulled.
Result 1 / 3
The tool cannot be pressed fully against the working surface – triggering is not possible.
▶ Check that the rotating sleeve is closed. If necessary, turn the rotating sleeve to the left as far as it
will go.
▶ Check the position of the slider. If the slider has not clearly moved to the left, have the tool repaired
by Hilti Service.