
Operating Instruction DX 9-ENP
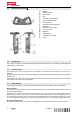

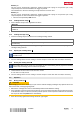
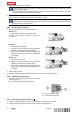
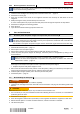

Table Of Contents
- Original operating instructions
- Mode d'emploi original
- 1 Indications relatives à la documentation
- 2 Sécurité
- 3 Description
- 4 Caractéristiques techniques
- 5 Utilisation
- 6 Nettoyage et entretien
- 7 Guide de dépannage
- 8 Recyclage
- 9 Garantie constructeur
- 10 Déclaration FCC (valable aux États-Unis) / Déclaration IC (valable au Canada)
- Manual de instrucciones original

10 English 2194400
*2194400*
2. Press the trigger buttons on the grip.
If the tool does not fire, check that a cartridge strip has been loaded and that there are enough
fasteners in the magazine.
The fasteners are not transported when the magazine contains less than 15 fasteners. You must
first insert additional nail strips in the magazine.
3. Position the tool at the point where the next fastener is to be driven and repeat the steps described. In
doing so, observe the information shown in the display. → page 5
Nail stand-off should be checked immediately after driving the first fasteners and subsequently at
regular intervals so that the driving power of the tool can be set to the right value in order to ensure
that fasteners are driven correctly.
5.2.2 Checking the nail stand-off
1. Use the test gauge to check the nail stand-off.
Result 1 / 3
• Nail stand-off is within the required range.
The tool power setting is incorrect. The test is
complete.
Result 2 / 3
• Nail stand-off is too high.
▶ Increase the power setting by turning the power
regulation wheel to the next higher setting.
▶ If the power regulation wheel is already set to the
highest value, use a more powerful cartridge type
– if available.
Result 3 / 3
• Nail stand-off is too low.
▶ Reduce the power setting by turning the power
regulation wheel to the next lower setting.
▶ If the power regulation wheel is already set to the
lowest value, use a less powerful cartridge type –
if available.
2. Drive another fastener.
3. Repeat the previously described steps until the correct nail stand-off is achieved.
5.2.3 Adjusting the power setting
@
Power regulation wheel
;
Power setting indicator
▶ Turn the power regulation wheel to set the desired
nail driving power.
➥ The current power setting is indicated.
5.2.4 Removing cartridges from the tool 7
1. Press the cartridge strips forward, as far as possible, in the direction of advance.
2. Pull the cartridge strips out of the tool at the cartridge strip exit aperture.