
Operating Instruction DX 9-ENP
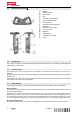

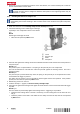
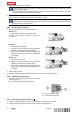
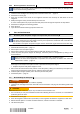

Table Of Contents
- Original operating instructions
- Mode d'emploi original
- 1 Indications relatives à la documentation
- 2 Sécurité
- 3 Description
- 4 Caractéristiques techniques
- 5 Utilisation
- 6 Nettoyage et entretien
- 7 Guide de dépannage
- 8 Recyclage
- 9 Garantie constructeur
- 10 Déclaration FCC (valable aux États-Unis) / Déclaration IC (valable au Canada)
- Manual de instrucciones original

*2194400*
2194400 English 11
5.2.5 Removing fasteners from the tool 8
The fasteners can normally remain in the tool. It is not necessary to remove them, for example, when
you are finished working with the tool.
1. Check that the cartridges have already been removed from the tool. → page 10
2. Stand the tool on its grip.
3. Press the red latch at the mouth of the magazine and allow the nail strips to slide back out of the
magazine.
4. While pressing the catch, pull the nail strip out of the tool.
➥ If the nail strip does not project from the base plate, work through the sequence of steps below.
5. Stand the tool upright in the working position.
6. Press the stop.
7. Cycle the tool until the nail strip projects from the tool.
6 Care and maintenance
6.1 Check the piston and piston stopper and replace the parts if necessary 9
If a fastener is driven incorrectly, the piston may become jammed in the piston stopper. If the piston
and piston stopper become fully seized in this way, these parts have reached the end of their life. The
tool cannot be cycled when in this state.
The condition of the piston and piston stopper must be checked at regular intervals and at least daily.
1. Disassemble the base plate. → page 11
2. Pull the piston out of the piston guide.
3. Pull the piston stopper out of the base plate (possibly with the aid of the piston).
4. Check the piston and piston stopper for damage. Check the piston for straightness by rolling it on a
smooth surface.
Never use a worn or damaged piston and do not tamper with or modify the piston.
Observe the wear criteria applicable to important tool components, as listed in the “Care and
maintenance” section. → page 12
Result
If damage is found and/or if the piston is bent or jammed with the piston stopper
▶ Replace the piston and piston stopper as a set.
5. Pull out the catch and hold it in this position. Insert the piston, pushing it in until the tip of the piston no
longer projects beyond the end of the tool, and then release the catch.
6. Insert the piston stopper (rubber part to the front) into the base plate.
7. Fit the base plate. → page 12
6.2 Disassembling the base plate 10
WARNING
Risk of injury! Cartridges in the tool could fire (explode).
▶ Check that all cartridges have been removed from the tool before carrying out the following tasks with
the tool.
CAUTION
Risk of burns! Parts of the tool may be very hot after the tool has been in use.
▶ If it is necessary to carry out maintenance without first allowing the tool to cool down, it is essential that
protective gloves are worn.
1. Stand the tool on its grip.
2. Press the magazine release button (red button) on the magazine and allow the magazine to slide down.
3. Rotate the base plate in a counter clockwise direction, until the connection is released.
4. Lift off the base plate.