
Operating Instruction DX 9-ENP
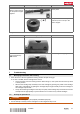
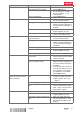


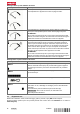
Table Of Contents
- Original operating instructions
- Mode d'emploi original
- 1 Indications relatives à la documentation
- 2 Sécurité
- 3 Description
- 4 Caractéristiques techniques
- 5 Utilisation
- 6 Nettoyage et entretien
- 7 Guide de dépannage
- 8 Recyclage
- 9 Garantie constructeur
- 10 Déclaration FCC (valable aux États-Unis) / Déclaration IC (valable au Canada)
- Manual de instrucciones original

14 English 2194400
*2194400*
1. Press the tool vertically down on to a solid surface, pull the triggers and listen to the resulting noise.
Result 1 / 2
A cartridge is triggered or a clicking noise is clearly audible.
▶ There is now no triggerable cartridge in the cartridge magazine of the tool.
▶ Proceed to the next step in the troubleshooting routine.
Result 2 / 2
No cartridge is triggered and no clicking noise is audible. There might be a triggerable cartridge in the
tool, but it did not trigger on account of a fault.
▶ ATTENTION! Make sure that the tool's nail discharge muzzle is not pointing toward anyone.
▶ Avoid hard impacts on the tool.
▶ Proceed to the next step in the troubleshooting routine.
2. Press the nose of the tool in a few millimeters and open the rotating sleeve → page 9.
➥ The catch should then be accessible, making it possible to release the tool.
3. Pull the catch out and hold it in this position. If the tool does not open up by itself try pulling it open,
without applying more than ordinary muscle power.
➥ ATTENTION! Make sure that the tool's nail discharge muzzle is not pointing toward anyone.
Result 1 / 2
The tool can be pulled open.
▶ Proceed to the next step in the troubleshooting routine.
Result 2 / 2
The tool cannot be pulled open.
▶ Cease work and lay the tool down at a safe place.
▶ Make sure that the tool cannot be accessed by other persons.
▶ Notify Hilti Service immediately.
4. Remove the cartridges from the tool. → page 10
5. Disassemble the base plate. → page 11
6. Check the piston and piston brake and replace these parts if necessary. → page 11
7. Clean the fastening tool. → page 12
8. Close the rotating sleeve. → page 9
7.3 Troubleshooting
If the trouble you are experiencing is not listed in this table or you are unable to remedy the problem by
yourself, please contact Hilti Service.
Trouble or fault Possible cause Action to be taken
The cartridges are not trans-
ported.
The cartridge strip is damaged. ▶ Change the cartridge strip. Do
not attempt to forcibly remove
cartridges or the cartridge strip.
The tool is damaged. ▶ Contact Hilti Service.
The cartridge strip cannot be
removed.
The tool is damaged. ▶ Contact Hilti Service.
The tool doesn’t fire. Misfire ▶ Remedy the malfunction.
→ page 13
The cartridge strip is used up. ▶ Remove the cartridge strip from
the tool.
▶ Insert a new cartridge strip.
There are less than 15 fasteners in
the tool.
▶ Load new fastener strips.
The tool is not adequately com-
pressed.
▶ Press the nose of the tool
against the working surface
again and pull the trigger.
Fastener transport malfunction. ▶ Check that the fastener strips
are free to move.
▶ Remove any damaged or
defective cartridge strips or
strips containing damaged or
defective fasteners.