
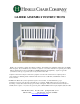
Instructions / Assembly


STEP 3:__________________________________________________________________ ______________________
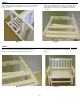
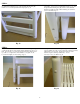
Raise the Glider Upper and insert the ¼” x 2” Bolt (E) through the Repeat this for all four Glider Bearing Straps (H) on all four corners
pre-drilled hole in the Glider Upper. Align the Glider Bearing Strap (H) of the Glider. If at any point it is impossible to get the ¼” x 2” bolt
with the ¼” x 2” bolt and place the nut on finger tight. Fig. 13 through the Glider Bearing Strap (H), check to ensure all Glider
Bearings are installed correctly with them flaring out towards the
bottom of the Glider. Fig. 14
Fig. 13 Fig. 14
STEP 3:__________________________________________________________________ ______________________
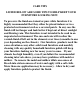
Once all four sides of the Glider are secured on the Glider Strap Bearings (H) At this point Glider assembly is complete. Begin to identify all
go back through all steps and re-tighten all Hex Head Bolts (F) and ¼” x 2” of the pre-drilled holes and cover all of the heads of the Hex screws(F)
bolts. Note: On the ¼” x 2” bolts securing the Glider Strap Bearings (H) it with the buttons (D) provided.. Gently tap the button in with a
is possible to over tighten these. If the Glider does not glide smooth, hammer. Repeat for all 20 pre-drilled holes. You are
loosen the nuts slightly on all of bearings. Fig. 15 now ready to enjoy your Glider. Fig. 16
Fig. 15 Fig. 16
6