
Installation Sheet


start here
commencez ici
empezar aquí
Assembly Instructions
Item No: 1161LV
Les Instructions D’assemblage
Numéro d’article: 1161LV
Instrucciones De Montaje
Número del artículo: 1161LV
English Spanish
French
1. Find a clear area in which you can work.
2. Unpack fixture and glass from carton.
3. Carefully review instructions prior to assembly.
1. Encontrar un área clara en la que se puede trabajar.
2. Desembale xture fi y el vidrio de la caja.
3. Revise cuidadosamente las instrucciones antes del montaje.
1. Trouvez un endroit clair dans lequel vous pouvez travailler.
2. Déballez fi xture et de verre du carton.
3. Examinez attentivement les instructions avant l'assemblage.
1. To mount fixture to installed post, follow instruction sheet PMSS-1
provided.
.
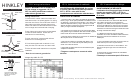
DRAWING 1 - ROOF ASSEMBLY
GLASS INSTALLATION:
DRAWING 2 - GLASS INSTALLATION
INSTALACION DE VIDRIO:
INSTALLATION EN VERRE:
1
2
1. To begin glass installation it will be necessary to remove the roof (2).
This is accomplished by removing the four screws (1) from under the
roof lip, and then lifting off the roof. Set screws aside in a safe place for
use later- see Drawing 1.
2. To install glass (3) align notches (N) in bottom of glass lip with offset in
glass fitter (G), and slip glass down into fitter. Then turn glassn clockwise
to lock glass in place - see Drawing 2.
NOTE: fixture should be lamped prior to installing the glass.
1. Para comenzar la instalación del vidrio será necesario quitar el
techo (2). Esto se logra retirando los cuatro tornillos (1) de debajo
del labio del techo, y luego levantando el techo. Fije los tornillos a
un lado en un lugar seguro para usarlos más adelante - vea Dibujo
2.
2. Para instalar el cristal (3), alinee las muescas (N) en la parte
inferior del labio de vidrio con el offset en el ajustador de vidrio (G)
y deslice el vidrio hacia abajo en el ajustador. A continuación, gire
glassn en el sentido de las agujas del reloj para bloquear el vidrio
en su lugar - vea Dibujo 3.
1. Pour commencer l'installation du verre, il faudra enlever le toit
(2). Ceci s'effectue en enlevant les quatre vis (1) sous la lèvre du
toit, puis en soulevant le toit. Placez les vis à part dans un endroit
sûr pour une utilisation plus tard - voir Dessin 2.
2. Pour installer du verre (3) aligner les encoches (N) au fond de la
lèvre en verre avec décalage dans l'ajusteur de verre (G), et glisser
le verre dans l'ajusteur. Tournez ensuite glassn dans le sens des
aiguilles d'une montre pour verrouiller le verre en place - voir
Dessin 3.
REMARQUE: le luminaire doit être allumé avant d'installer le verre.
G
N
3
1. Para montar la luminaria en el poste instalado, siga la hoja de
instrucciones PMSS-1
previsto.
1. Pour monter le luminaire sur le poste installé, suivez la feuille
d'instructions PMSS-1
HH
II
NN
KK
LL
EE
YY
HINKLEY 33000 Pin Oak Parkway, Avon Lake, OH 44012 800.446.5539 / 440.653.5500 hinkley.com