
Installation Sheet


start here
commencez ici
empezar aquí
Assembly Instructions
Item No. 1321
Les Instructions D’assemblage
Numéro d’article: 1321
Instrucciones De Montaje
Número del artículo: 1321
L I G H T I N G
HINKLEY
English Spanish
French
H I N K L E Y L I G H T I N G 3 30 00 Pi n Oak P ar kway, Avon Lak e, OH 4 4012 800.446 .5 539 / 4 40.65 3. 5500 hinkle yl ighti ng .com
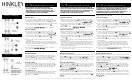
Drawing 1 - Glass Installation
1
2
4
3
TS
PF
grip here
grip here
1. Find a clear area in which you can work.
2. Unpack fixture and glass from carton.
3. Carefully review instructions prior to assembly.
1. Busque un lugar claro en el que se puede trabajar.
2. Desempaque la luminaria y el vidrio de la caja.
3. Revise cuidadosamente las instrucciones antes de asamblea.
Une. Allez dans un endroit dans lequel vous pouvez travailler.
2. Déballez luminaire et le verre de boîte.
3. Examinez attentivement les instructions avant le montage.
*** La construcción de este dispositivo se llevará a cabo mediante
la instalación de la primera copa, hacer todas las conexiones
eléctricas necesarias, y después de montar el aparato en el polo.
SAFETY WARNING: READ WIRING AND GROUNDING INSTRUCTIONS
(I.S. 18) AND ANY ADDITIONAL DIRECTIONS. TURN POWER SUPPLY
OFF DURING INSTALLATION. IF NEW WIRING IS REQUIRED,
CONSULT A QUALIFIED ELECTRICIAN OR LOCAL AUTHORITIES
FOR CODE REQUIREMENTS.
ADVERTENCIA DE SEGURIDAD: LEA LAS INSTRUCCIONES DE
HACER LAS CONEXIONES ELECTRICA Y CONEXION A TIERRA
(IS 18) Y INSTRUCCIONES ADICIONALES. APAGUE
ALIMENTACION DE CORRIENTE DURANTE INSTALACION. SI SE
REQUIERE CABLEADO NUEVO, CONSULTE CON ELECTRICISTA
CALIFICADO O LAS AUTORIDADES LOCALES PARA
REQUERIMIENTOS DEL CODIGO.
AVERTISSEMENT DE SÉCURITÉ: LIRE RACCORDEMENT ET MISE
À LA TERRE (I.S. 18) ET TOUTE AUTRE INSTRUCTION. COUPER
L'ALIMENTATION ÉLECTRIQUE EN COURS D'INSTALLATION. SI
DE NOUVELLES CÂBLAGE N'EST NÉCESSAIRE, CONSULTEZ
UN ÉLECTRICIEN QUALIFIÉ OU LES AUTORITÉS LOCALES
POUR LES EXIGENCES DE CODE.
*** The construction of this fixture will be accomplished by first installing
the glass, making all necessary electrical connections, and then mounting
the fixture to the pole.
*** La construction de cet appareil sera accompli en installant d'abord
le verre, tous les branchements électriques nécessaires, puis le
montage de la fixation de la perche.
Make electrical connections from supply wire to fixture lead wires.
Refer to instruction sheet (I.S. 18) and follow all instructions to make
all necessary wiring connections. Then refer back to this sheet to
continue installatio of this fixture.
Haga las conexiones eléctricas del cable de alimentación los
cables conductores del luminario. Consulte la hoja de instrucciones
(IS 18) y siga todas las instrucciones para hacer todas las
conexiones necesarias. Entonces referirse a esta hoja para
continuar instalacion de este luminario.
Effectuer les connexions électriques du câble d'alimentation au
montage des fils conducteurs. Reportez-vous à la feuille d'instruction
(IS 18) et suivez les instructions pour faire toutes les connexions
nécessaires. Ensuite, se reporter à la fiche de continuer installatio
de ce luminaire.
NOTA : Se recomienda accesorio de la lámpara antes de instalar
el vidrio.
1 . Para instalar , sustituir o lámpara del accesorio , es necesario quitar el
mástil (1) .Esto se identifica por el tornillo Phillips (2) que se conecta la
posición vertical a la parte superior de la luminaria - véase el dibujo 1 .
2 . Usando un desarmador de tornillo tornillo conductor remove (2) de la
parte superior del mástil (1) . Ahora tire suavemente de pie (1) fuera del
aparato. NOTA : no retuerza , tire vertical en ambos extremos y tire
uniformemente.
3 . Después vertical (1) se retira , de vidrio (3) puede ser deslizado en su
lugar. Para lograr esto , deslizar la parte superior del cristal (2) en el techo
cilíndrica (CR) del dispositivo de fijación y suavemente comprimir el resorte
de tensión (TS) situado en el interior del techo cilíndrica (CR) .
4 . Comprimir el resorte de tracción (TS ) hasta la parte inferior del vidrio ( 3 )
se puede deslizar sobre el eje central ( 4 ) situado en la parte superior del
puesto más en forma (PF ) . Vidrio de deslizamiento pasa cubo ( 4 ) y en su
posición en la parte superior de los tres montantes restantes .
5 . Slip eliminado previamente en posición vertical (1) de nuevo en los
soportes (SB) , lo que hace agujero del tornillo seguro que está en la parte
superior.
6 . Vuelva a colocar el tornillo (2) para fijar en posición vertical.
TENGA EN CUENTA : ADICIONALES GROMMETS PLÁSTICO
TRANSPARENTE ( CPG ) SE HAN SUMINISTRADO CON ESTE
APARATO . ELLOS SE PUEDE DESLIZAR SOBRE EL BORDE
INFERIOR DE LA COPA DONDE HACE CONTACTO CON LOS
RECTOS .
NOTE : Il est recommandé de lampe luminaire avant d'installer le verre .
Une . Pour installer , remplacer ou lampe du projecteur , il est nécessaire
de retirer le montant (1) .Ceci est identifié par la vis cruciforme ( 2 ) qui fixe le
montant de la partie supérieure de l'appareil - voir dessin 1 .
2 . L'utilisation d'un tournevis cruciforme de retirer la vis ( 2 ) du haut de la
verticale (1) . Maintenant tirez doucement debout ( 1 ) hors de l'appareil .
REMARQUE : ne pas tordre , tirer debout aux deux extrémités et tirez
uniformément.
3 . Après verticale (1) est retiré , le verre ( 3) peut être glissé en place . Pour
ce faire, glisser le haut de la vitre (2) dans le toit cylindrique (CR) de
l'appareil et doucement comprimer le ressort de traction (TS) situé à l'intérieur
du toit cylindrique (CR) .
4 . Comprimer le ressort de traction (TS ) jusqu'à fond de verre (3) peut être
glissé sur le moyeu central (4) situé sur le dessus du poste monteur (PF) .
Verre de glissement passé moyeu (4) et en position au-dessus des trois
montants restants
5 . Glissez préalablement retiré verticale (1) retour sur supports (SB) , en
veillant trou de vis est au sommet.
6 . Remplacer la vis (2) pour fixer en position verticale.
S'IL VOUS PLAÎT NOTE : AUTRES GROMMETS DE PLASTIQUE
TRANSPARENT (CPG) A ÉTÉ LIVRÉ L 'APPAREIL . ILS PEUT ÊTRE GLISSÉ
SUR LE BORD FOND DU VERRE OÙ ELLE CONTACTE LE MONTANT .
NOTE: It is recommended to lamp fixture prior to installing the glass.
1. To install, replace, or lamp the fixture, it is necessary to remove the
upright (1). This is identified by the phillips screw (2) that attaches the
upright to the top of the fixture - see drawing 1.
2. Using a phillips screw driver remove screw (2) from the top of upright (1).
Now gently pull upright (1) off of the fixture. NOTE: do not twist, pull upright
at both ends and pull evenly.
3. After upright (1) is removed, glass (3) can be slipped into place.
To accomplish this, slip the top of the glass (2) into the cylindrical roof (CR)
of the fixture and gently compress the tension spring (TS) located inside the
cylindrical roof (CR).
4. Compress the tension spring (TS) until bottom of glass (3) can be
slipped over the center hub (4) located on top of the post fitter (PF). Slip
glass passed hub (4) and into position on top of the three remaining
uprights.
5. Slip previously removed upright (1) back over support brackets (SB),
making sure screw hole is at the top.
6. Replace screw (2) to secure upright.
PLEASE NOTE: ADDITIONAL CLEAR PLASTIC GROMMETS (CPG)
HAVE BEEN SUPPLIED WITH THIS FIXTURE. THEY CAN BE SLIPPED
OVER THE BOTTOM EDGE OF THE GLASS WHERE IT CONTACTS
THE UPRIGHT.
1. To mount fixture to installed post follow post mounting
instructoin sheet (PMSS-1) provided.
1. Para montar accesorio la hoja de instrucciones de montaje
instalado instrucción seguimiento salen post hoja (PMSS-1),
siempre.
1. Pour monter lampadaire pour installer notice de montage suivi de
l'enregistrement Le post (PMSS-1) fourni.
CR
CPG