
Installation Sheet


start here
commencez ici
empezar aquí
Post mounting Instructions PMSS-1
Instructions de montage post PMSS-1
Instrucciones de montaje Pon PMSS-1
LIGHTING
HINKLEY
English Spanish
French
HINKLEY LIGHTING 33000 Pin Oak Parkway, Avon Lake, OH 44012 800.446.5539 / 440.653.5500 hinkleylighting.com
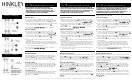
Drawing 1 - Post Mounting
mark
hole
location
drill
5/32”
(4mm) dia.
hole
1
2
3
installed
post
4
4
1. Find a clear area in which you can work.
2. Unpack fixture and glass from carton.
3. Carefully review instructions prior to assembly.
1. Encontrar un área clara en la que se puede trabajar.
2. Desembale luminaria y el vidrio de la caja.
3. Revise cuidadosamente las instrucciones antes del montaje.
1. Trouvez une zone claire dans laquelle vous pouvez travailler.
2. Décompressez luminaire et le verre de carton.
3. Examinez attentivement les instructions avant l'assemblage.
*** The installation of this luminaire will be accomplished by first
making all necessary electrical connections, mounting luminaire
body to installed post, and then completing assembly.
*** La instalación de esta luminaria se llevará a cabo por
primera hacer todas las conexiones eléctricas necesarias,
montaje cuerpo de la luminaria al poste instalado, y luego de
completar el montaje.
*** L'installation de ce luminaire sera accompli en faisant
d'abord toutes les connexions électriques nécessaires, de
montage corps de luminaire à la post installé, puis le montage
terminé.
NOTE: it is recommended that steps 1 and 2 be done prior to installation
of the glass or before any assembly is done on the fixture body.
NOTA: se recomienda que los pasos 1 y 2 se hará antes de la
instalación del vidrio o ante cualquier montaje se realiza en el
cuerpo de la luminaria.
REMARQUE: il est recommandé que les étapes 1 et 2 avant de
faire l'installation du verre ou devant tout le montage est effectué sur
le corps du luminaire.
1. To begin installation it will be necessary to drill 3 pilot holes in the
installed post in order to mount the fixture body. This is accomplished by
sliding the post fitter (1), of the fixture body (2), over the installed post.
Using the holes (3), in the side of the post fitter, mark the mounting hole
locations - see DRAWING 1.
NOTE: MAKE SURE FIXTURE BODY IS ORIENTED IN THE POSITION
YOU WANT, BEFORE MARKING THE HOLE LOCATIONS.
2. Now remove fixture body from installed post and drill a 5/32” (4mm)
dia. hole at the marked locations.
1. Para comenzar la instalación, será necesario taladrar 3 agujeros
piloto en el puesto instalado con el fin de montar el cuerpo de la
luminaria. Esto se logra deslizando el más en forma de correos (1),
del cuerpo de la luminaria (2), sobre el poste instalado. Usando los
orificios (3), en el lado del poste en forma, marque las ubicaciones
de los orificios de montaje - vea el dibujo 1.
NOTA: ASEGÚRESE DE CUERPO DE LA LUMINARIA ESTÁ
ORIENTADO EN LA POSICIÓN QUE DESEE, ANTES DE
MARCAR LOS LUGARES AGUJERO.
2. Ahora quite cuerpo de la luminaria de poste instalado y perfore
un 4 mm (5/32”) de diámetro agujero en los lugares marcados.
1. Pour commencer l'installation, il sera nécessaire de percer 3 trous
pilotes dans le poste installé afin de monter le corps du luminaire.
Ceci est réalisé en faisant coulisser le poste ajusteur (1), du corps
de luminaire (2), installé sur le poste. En utilisant les trous (3), dans
le côté du poteau ajusteur, marquer les emplacements des trous de
montage - voir dessin 1.
REMARQUE: ASSUREZ-TÊTE DU LUMINAIRE EST ORIENTÉ
DANS LA POSITION QUE VOUS VOULEZ, AVANT DE MARQUER
LES EMPLACEMENTS DES TROUS.
2. Maintenant, enlevez corps de luminaire de poste installé et percer
un "(4mm) de diamètre 5/32. trou sur les emplacements marqués.
SAFETY WARNING: READ WIRING AND GROUNDING INSTRUC-
TIONS (I.S. 18) AND ANY ADDITIONAL DIRECTIONS. TURN POWER
SUPPLY OFF DURING INSTALLATION. IF NEW WIRING IS
REQUIRED, CONSULT A QUALIFIED ELECTRICIAN OR LOCAL
AUTHORITIES FOR CODE REQUIREMENTS.
NOTE: MAKE SURE ALL WIRE CONNECTORS USED ON
ELECTRICAL CONNECTIONS ARE SILICONE FILLED.
ADVERTENCIA DE SEGURIDAD: CABLEADO LEA Y INSTRUC-
CIONES DE CONEXIÓN A TIERRA (SI 18), E INSTRUCCIONES
ADICIONALES. VUELTA DE ALIMENTACIÓN DURANTE LA
INSTALACIÓN. SI NUEVO CABLEADO SE REQUIERE,
CONSULTE A UN ELECTRICISTA CALIFICADO O AUTORI-
DADES LOCALES PARA REQUISITOS DEL CÓDIGO.
NOTA: ASEGÚRESE DE QUE TODOS LOS CONECTORES DEL
CABLE UTILIZADO EN LAS CONEXIONES ELÉCTRICAS SON
SILICONA RELLENA.
AVERTISSEMENT DE SÉCURITÉ: CÂBLAGE LIRE ET MISE À LA
TERRE (IS 18) ET TOUTE AUTRE INSTRUCTION. COUPER
L'ALIMENTATION ÉLECTRIQUE PENDANT L'INSTALLATION. SI
NOUVEAU CÂBLAGE EST NÉCESSAIRE, CONSULTER UN
ÉLECTRICIEN QUALIFIÉ OU LES AUTORITÉS LOCALES LES
EXIGENCES DES CODES.
REMARQUE: VÉRIFIEZ QUE TOUS LES CONNECTEURS DE FIL
UTILISÉ SUR LES CONNEXIONS ÉLECTRIQUES SONT
SILICONE REMPLIE.
1. Now follow instruction sheet (IS-18) make all necessary wiring
connections.
2. After wiring is complete slip post fitter (1) of fixture body (2) over
installed post and align holes in post fitter (1) with previously drilled holes
in the installed post. Now thread in the
three sheet metal screws (4) provided, to secure fixture body to the post.
1. Ahora siguen hoja de instrucciones (IS-18) hacer todas las
conexiones necesarias.
2. Después de que el cableado se ha completado en forma
posterior deslizamiento (1) del cuerpo de la luminaria (2) sobre el
poste instalado y alinee los agujeros en la post más en forma (1)
con agujeros en el puesto instalado previamente perforado. Ahora
enrosque en los tres tornillos de metal (4) proporcionado, para
asegurar cuerpo de la luminaria al poste.
1. Maintenant, suivez feuille d'instructions (IS-18) font toutes les
connexions nécessaires.
2. Après le câblage est terminé glissement poste installateur (1) du
corps de l'appareil (2) au cours de post installé et aligner les trous
en post installateur (1) avec des trous forés précédemment dans le
poste installé. Maintenant fil dans les trois vis à tôle (4) prévu, pour
garantir corps du luminaire au poste.