
Instructions / Assembly


start here
commencez ici
empezar aquí
Assembly Instructions
Item No: 1002
Les Instructions D’assemblage
Numéro d’article: 1002
Instrucciones De Montaje
Número del artículo: 1002
English Spanish
French
1. Find a clear area in which you can work.
2. Unpack fixture and glass from carton.
3. Carefully review instructions prior to assembly.
1. Encontrar un área clara en la que se puede trabajar.
2. Desembale luminaira y el vidrio de la caja.
3. Revise cuidadosamente las instrucciones antes del montaje.
1. Trouvez un endroit clair dans lequel vous pouvez travailler.
2. Déballez luminaire et de verre du carton.
3. Examinez attentivement les instructions avant l'assemblage.
ADVERTENCIA DE SEGURIDAD: CABLEADO DE LEER Y
INSTRUCCIONES DE CONEXIÓN A TIERRA (SI 18), E
INSTRUCCIONES ADICIONALES. VUELTA DE ALIMENTACIÓN
DURANTE LA INSTALACIÓN. SI SE REQUIERE UN NUEVO
CABLEADO, CONSULTE A UN ELECTRICISTA O AUTORI-
DADES LOCALES PARA REQUISITOS DEL CÓDIGO.
AVERTISSEMENT DE SÉCURITÉ: CÂBLAGE LIRE ET MISE A LA
TERRE (IS 18) ET TOUTE AUTRE INSTRUCTION. COUPER
L'ALIMENTATION PENDANT L'INSTALLATION. SI DE
NOUVELLES CÂBLAGE NE EST NÉCESSAIRE, CONSULTER UN
ÉLECTRICIEN QUALIFIÉ OU LES AUTORITÉS LOCALES LES
EXIGENCES DES CODES.
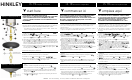
DRAWING 1 - GLASS INSTALLATION
DRAWING 2 - GLASS INSTALLATION
2. To install the glass in inner cage (A), first take a glass panel (1) and slip
it inside the cage (A), making sure to slip glass behind the corner tab (T)
at the bottom of the cage. Now take glass clip (2) from parts bag and slide
the flat tab on the clip into the slot (S) in the top inner cage. Repeat
process for the remaining panels - see Drawing 2.
Note: fixture can be lamped prior to installing the inner cage with glass.
3. After the glass panels are installed, slip inner cage back inside the
fixture body, making sure notch (N) in back of inner cage is facing the
wall. Attach inner cage with screws (C) that were removed earlier.
Note: fixture can be lamped prior to installing the inner cage with glass.
4. To hang fixture from the ceiling please follow instruction sheet (IS-19)
provided.
A
C
A
S
B
1
2
T
1. Para comenzar la instalación del cristal es necesario quitar la
jaula interna (A) del cuerpo del accesorio (B). Esto se logra
retirando los tornillos (C), situados debajo del reborde del techo -
vea Dibujo 1. Coloque los tornillos en un lugar seguro para su uso
posterior.
2. Para instalar el vidrio en la jaula interior (A), primero tome un
panel de vidrio (1) y deslícelo dentro de la jaula (A), asegurán-
dose de deslizar el vidrio detrás de la lengüeta de esquina (T) en
el fondo de la jaula. Ahora tome el clip de vidrio (2) de la bolsa de
piezas y deslice la lengüeta plana en el clip en la ranura (S) en la
jaula interior superior. Repetir proceso para los paneles restantes
- vea Dibujo 2.
Nota: la luminaria se puede encender antes de instalar la jaula
interna con vidrio.
3. Después de instalar los paneles de vidrio, vuelva a colocar la
jaula interior cuerpo del aparato, asegurándose de que la
muesca (N) en la parte posterior de la jaula pared. Fije la jaula
interna con los tornillos (C) que se retiraron antes.
Nota: la luminaria se puede encender antes de instalar la jaula
interna con vidrio.
2. Pour installer le verre dans la cage intérieure (A), prenez d'abord
un panneau de verre (1) et glissez-le à l'intérieur de la cage (A),
en vous assurant de glisser le verre derrière l'onglet d'angle (T) au
le fond de la cage. Maintenant, prenez le clip en verre (2) à partir
du sac de pièces et de la glissière la languette plate du clip dans
la fente (S) dans la cage interne supérieure. Répéter processus
pour les panneaux restants - voir Dessin 2.
Remarque: le luminaire peut être allumé avant d'installer la cage
intérieure avec du verre.
3. Une fois que les panneaux de verre sont installés, glissez la
cage interne à l'intérieur du corps de fixation, en s'assurant que
l'encoche (N) à l'arrière de la cage intérieure est tournée vers le
mur. Fixez la cage interne avec les vis (C) qui ont été enlevées
plus tôt.
Remarque: le luminaire peut être allumé avant d'installer la cage
intérieure avec du verre.
1. To begin glass installation it is necessary to remove the inner cage
(A) from the fixture body (B). This is accomplished by removing the
screws (C), located under the lip of the roof - see Drawing 1. Place
screws in a safe place for use later.
SAFETY WARNING: READ WIRING AND GROUNDING INSTRUC-
TIONS (I.S. 18) AND ANY ADDITIONAL DIRECTIONS. TURN
POWER SUPPLY OFF DURING INSTALLATION. IF NEW WIRING IS
REQUIRED, CONSULT A QUALIFIED ELECTRICIAN OR LOCAL
AUTHORITIES FOR CODE REQUIREMENTS.
4. Para colgar la luminaria del techo, siga la hoja de instrucciones
(IS-19)
previsto.
4. Pour suspendre le luminaire du plafond, suivez les instructions
(IS-19) à condition de.
1. Pour commencer l'installation en verre, il est nécessaire
d'enlever la cage intérieure (A) du corps de l'appareil (B). Ceci est
réalisé en enlevant les vis (C), situées sous la lèvre du toit - voir
Dessin 1. Placez les vis dans un endroit sûr pour une utilisation
HH
II
NN
KK
LL
EE
YY
HINKLEY 33000 Pin Oak Parkway, Avon Lake, OH 44012 800.446.5539 / 440.653.5500 hinkley.com