
Instructions / Assembly


start here
commencez ici
empezar aquí
Mounting Instructions
Item No: 2802
Instructions de montage
Numéro d’article: 2802
Instrucciones De Montaje
Número del artículo: 2802
English Spanish
French
1. Find a clear area in which you can work.
2. Unpack fixture and glass from carton.
3. Carefully review instructions prior to assembly.
1. Encontrar un área clara en la que se puede trabajar.
2. Desembale xture fi y el vidrio de la caja.
3. Revise cuidadosamente las instrucciones antes del montaje.
1. Trouvez un endroit clair dans lequel vous pouvez travailler.
2. Déballez fi xture et de verre du carton.
3. Examinez attentivement les instructions avant l'assemblage.
SAFETY WARNING: READ WIRING AND GROUNDING INSTRUC-
TIONS (I.S. 18) AND ANY ADDITIONAL DIRECTIONS. TURN
POWER SUPPLY OFF DURING INSTALLATION. IF NEW WIRING IS
REQUIRED, CONSULT A QUALIFIED ELECTRICIAN OR LOCAL
AUTHORITIES FOR CODE REQUIREMENTS.
Make electrical connections from supply wire to fixture lead wires.
Refer to instruction sheet (I.S. 18) and follow all instructions to make
all necessary wiring connections. Then refer back to this sheet to
complete installation of this fixture.
ADVERTENCIA DE SEGURIDAD: CABLEADO DE LEER Y
INSTRUCCIONES DE CONEXIÓN A TIERRA (SI 18), E
INSTRUCCIONES ADICIONALES. VUELTA DE ALIMENTACIÓN
DURANTE LA INSTALACIÓN. SI SE REQUIERE UN NUEVO
CABLEADO, CONSULTE A UN ELECTRICISTA O AUTORI-
DADES LOCALES PARA REQUISITOS DEL CÓDIGO.
AVERTISSEMENT DE SÉCURITÉ: CÂBLAGE LIRE ET MISE A LA
TERRE (IS 18) ET TOUTE AUTRE INSTRUCTION. COUPER
L'ALIMENTATION PENDANT L'INSTALLATION. SI DE
NOUVELLES CÂBLAGE NE EST NÉCESSAIRE, CONSULTER UN
ÉLECTRICIEN QUALIFIÉ OU LES AUTORITÉS LOCALES LES
EXIGENCES DES CODES.
Haga las conexiones eléctricas del cable para suministrar cables
conductores de luz. Consulte la hoja de instrucciones (IS 18) y siga
todas las instrucciones para hacer todas las conexiones necesar-
ias. Luego vuelva a esta hoja para completar la instalación de este
accesorio.
Faire les raccordements électriques des fils fils conducteurs
d'alimentation du luminaire. Reportez-vous à la fiche d'instruction (IS
18) et suivez toutes les instructions de faire tous les raccordements
nécessaires. Puis revenez consulter cette fiche pour terminer
l'installation de este luminaire.
.
4
3
1
2
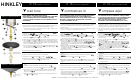
1. To install glass panels (2), slip them up through the open bottom of
the cage (1) - see Drawing 2.
2. Slip bottom of glass panels (2) into channel (3) in bottom of cage (1)
tip top of panel into position, and bend over clips (4) to secure glass in
cage. Repeat procedure for remaining panels of glass.
3. Bulb can now be installed.
Drawing 1 - Glass installation
1. Para instalar los paneles de vidrio (2), deslícelos a través del
fondo abierto de la jaula (1) - vea el Dibujo 2.
2. Deslice la parte inferior de los paneles de vidrio (2) en el canal
(3) en la parte inferior de la jaula (1), ponga la parte superior del
panel en posición y doble los clips (4) para asegurar el vidrio en
la jaula. Repita el procedimiento para los restantes paneles de
vidrio.
3. Ahora se puede instalar la bombilla.
1. Pour installer les panneaux de verre (2), glissez-les à travers le
fond ouvert de la cage (1) - voir Dessin 2.
2. Glissez le fond des panneaux de verre (2) dans le canal (3)
dans le bas de la cage (1), mettez le dessus du panneau en
position et pliez les clips (4) pour fixer le verre dans la cage.
Répéter la procédure pour les autres panneaux de verre.
3. L'ampoule peut maintenant être installée.
To hang your fixture from the ceiling follow instruction sheet IS-19
provided. Glass installation instructions are below.
Para colgar el aparato del techo, siga la hoja de instrucciones
IS-19. Las instrucciones de instalación de vidrio se encuentran a
continuación.
Pour suspendre votre appareil au plafond, suivez la notice IS-19
fournie. Les instructions d'installation en verre sont ci-dessous.
HH
II
NN
KK
LL
EE
YY
HINKLEY 33000 Pin Oak Parkway, Avon Lake, OH 44012 800.446.5539 / 440.653.5500 hinkley.com