MP3 VIDEO PLAYER User Manual -1-
Content 1.! Important safety instruction .............................................................................................................. 3! 2.! Package contents ............................................................................................................................... 4! 3.! Minimum system requirements......................................................................................................... 4! 4.! Description ..........................................
Introduction Thank you for your purchase of this MP3 digital video player. Please read this user manual carefully before operation and retain all the operating instructions. !" The contents of this user manual are subject to change based on newer developments. !" The display screen pictures contained in this user manual are used for indication purposes and may vary. 1. Important safety instruction Please read the following instructions carefully for your safety and prevention of property damage.
2. Package contents 1. MP3 Player 2. USB data cable 3. Earphones with audio cable 4. CD-ROM with software driver 5. Manual 6. Warranty Card / Help Card 3. Minimum system requirements 1. PC IBM® or 100% compatible with CPU Intel® Pentium® II at 233 MHz or more. 2. One USB port. 3. 64 MByte of RAM. 4. 30 MB of free Hard Disk space. 5. CD-ROM or DVD-ROM drive. 6. Operating System Windows® 98 SE, Windows® ME, Windows® 2000 or Windows® XP, Windows® Vista.
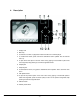
4. Description 1- Display LCD 2- Menu key 3- To execute, to confirm, to play/pause. Press and hold to turn on/off the player. 4- To increase the volume, press and hold to activate the built-in speaker. Also to scroll the menu up. 5- To pass at the next option in the main menu. During playing of music/video to pass at the next song/video, keep pressing to scroll the song/video forward. 6- Strap Eyelet 7- Earphone jack 8- To decrease the volume, long press to disable the built-in speaker.
5. Use 5.1 Power ON/OFF The MP3 player has built-in a rechargeable lithium battery. Before first use, recharge the battery for 4 hours. To recharge the battery please connect the MP3 player to USB computer port with the cable provided. !" Computers when powered off, do not not supply power to USB ports. In order to charge the battery you must to power on the computer. !" Before powering on the unit, make sure that the unit if fully charged IMPORTANT Powering On: 1.
6. Main Menu After powering on the MP3 player, you can see the main menu screen which will allow you to select different functions and options. By using the or buttons, you can select the desired function / option. Press the PLAY [!"] button to confirm the selection. To return at the main menu while you are inside any of these submenus, press and hold the M key. The available options are: Music: Select this option to play music. Video: Select this option to play video.
6.1 Explorer: Select this option to explore folders. Settings: Select this option to access the system setup options. Music Mode To activate this option please follow the below steps. 1. Power ON the MP3 Player, the screen will display the main menu. 2. By using the or buttons, select the MUSIC option, then press the PLAY [!"] button. 3. Choose the song and press the PLAY [!"] button to start playing. 6.1.
6.1.3 Lyric Display The Player supports Lyrics Display, in which the lyrics would be shown in sync with the actually lyrics of the song. The file format must be in “.Irc” format, have the exact same name with the song’s file name and placed within the same folder with the song. You will see the lyrics automatically display on the screen if the proper lyrics file is present. 6.2 VIDEO Mode The VIDEO mode allows to play videos in AVI Format (320x240). To activate this option please follow the below steps.
1. From the driver CD, select Video Converter / setup.exe and double click it to start installing the AVI CONVERTER 2. Follow the instructions to install the programm. 3. Once installed, select and run the AVI Converter program. 4.
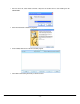
5. You will then see the CONVERSION SETTING. 6. Choose 320 x 240 in the “RESOLUTION” drop down menu. 7. Browse and choose the source file in “SOURCE FILE”. 8. Choose the output destination folder in the “TARGET FILE PATH”. (You can change the file name in “TARGET FILE NAME” if you want to.) 9. You can also customize the quality and aspect ratio. The higher quality produces larger AVI file size, better video quality and vice versa.
6.3 Radio (FM Radio) When the FM Radio mode is activated you can listen to radio programs. To activate this option please follow the below steps. 1. Power ON the MP3 Player, the screen will display the main menu. 2. By using the or buttons, select the RADIO option, then press the PLAY [!"] button to confirm. 3. The player will start broadcasting the last preset radio channel. or 4. Use the Use [ ] or [ buttons to choose the previous or the next preset channel. ] to increase/decrease the volume.
6.3.3 Delete Channels To delete a channel, please follow the below steps: When the FM Mode is activated, press the MENU [M] button and use Press the M button. Use or or to highlight “Del” option. to select the channel to delete, then press the M key. Use or buttons to select “Yes” (to delete) or “No” (not to delete) and press the [!"] button to confirm. 6.4 PHOTO (Photo Viewer) The Photo option allows viewing photos (JPEG files, example .jpg or .jpeg file format).
2. Use or buttons to choose the bookmark position to load. 3. Press the PLAY [!"] button to load the bookmark. When a text file is deleted from the Player’s memory the associated bookmark will also be deleted. If the 3 bookmark positions are all full, simply save the new bookmark on an old position and the old bookmark will be deleted and the new bookmark will be saved. 6.6 Record (Voice messages recorder) This option allows to record voice messages by using the built-in microphone.
3. Use the or buttons to select the system setup option to change and press the PLAY [!"] button. To return to main menu press and hold M button. The options available in the setup system are: Music: This option allows setting the music playing parameters. Radio: This option allows setting the FM mode parameters. Record: This option allows setting the recording parameters. Display: This option allows setting the display parameters.
6.8.4 DISPLAY Set The Display submenu allows setting of the below parameters: #" BLight Time: You can choose the amount of time the Back Light will remain on from 5 to 30 seconds. You can also set the Back Light to remain ALWAYS ON. Please consider that the Back Light time will affect the battery life. The longer the Back Light remains on, the less battery life you will have. #" Lum: You can alter the brightness of the display screen. Higher brightness means a lower battery life.
7. Computer installation This chapter describes how to install the Player in your computer system in order to transfer files to the memory device. The following instructions are intended for a PC which the CD-ROM drive is assigned as “D:”. If in your computer’s CD-ROM drive is assigned a different letter please replace “D:” with the correct one (for example E: or F:). To know the letter assigned to your CD-ROM drive please open “My Computer” or “Windows Explorer”. 7.
7.2 Windows® ME, Windows® 2000, Windows® XP, Windows® VISTA !" Under Windows® 2000 and Windows® XP, it may necessary to logon the system as “Administrator” or user with administrator rights to install the new hardware. For more information about user accounts, please refer to Windows® documentation or to you network administrator. NOTE To install the Player in a computer with Windows® ME, Windows® 2000 or Windows® XP please follow the below steps. 1.
Windows® XP – Windows Explorer !" Windows® offers different ways to copy files. For more information please refer Windows® documentation or help on-line. NOTE If you encounter any difficulties, our representatives are ready to help you with any questions about your new product. We can guide you through connections, firsttime use, or any of the features. Just give us a call or send us an email.
LECTEUR MP3 VIDÉO Guide d’utilisation 1 - -
Table des matières 1. Instructions importantes relatives à la sécurité 3 2. Contenu de l’emballage 4 3. Exigences minimums du système 4 4. Description 5 5. Utilisation 6 5.1 Mise EN/HORS FONCTION (“POWER ON/OFF”) 6 5.2 Recharger le lecteur 6 6. Menu principal 7 Mode de musique (“Music”) 8 6.1.1 Fonctions principales en mode de MUSIQUE 8 6.1.2 Fonction de répétition A-B (“A-B REPEAT”) 9 6.1.3 Affichage des paroles de chansons 9 Mode VIDÉO (“VIDEO”) 9 6.2.
Introduction Nous vous remercions d’avoir acheté ce lecteur MP3 vidéo. Veuillez lire attentivement ce guide d’utilisation avant de faire fonctionner le lecteur et conservez-le en lieu sûr pour toute référence ultérieure. !" Le contenu de ce guide peut changer selon les nouvelles caractéristiques et fonctionnalités ajoutées par le fabricant. !" Les illustrations de l’écran d’affichage que contient ce guide ne sont utilisées qu’à titre indicatif et peuvent varier. 1.
2. Contenu de l’emballage 1. Lecteur MP3 2. Câble de données USB 3. Écouteurs avec câble audio 4. CD-ROM avec pilote de logiciel 5. Guide d’utilisation 6. Carte de garantie/assistance 3. Exigences minimums du système 1. PC compatible IBMMD avec UTC IntelMD PremiumMD II à 233 MHzou plus rapide. 2. Un port USB. 3. 64 Mo de RAM. 4. 30 Mo d’espace libre sur le disque dur 5. Lecteur de CD-ROM ou DVD-ROM. 6.
4. Description 1- Écran ACL 2- Touche du MENU 3- Pour exécuter, confirmer, jouer/pause de la lecture. Appuyez et tenez enfoncée la touche pour mettre le lecteur en/hors fonction. 4- Pour augmenter le volume, maintenez la touche enfoncée afin d’activer le haut-parleur intégré. Sert également à défiler le menu vers le haut. 5- Permet de passer à l’option suivante dans le menu principal.
5. Utilisation 5.1 Mise EN/HORS FONCTION Le lecteur MP3 possède une pile rechargeable au lithium. Avant son installation initiale, rechargez-la pendant quatre (4) heures. Pour recharger la pile, veuillez raccorder le lecteur MP3 au port USB de l’ordinateur à l’aide du câble inclus. !" Lorsqu’ils sont hors tension, les ordinateurs ne fournissent pas d’alimentation aux ports USB. Pour charger la pile, l’ordinateur doit être mis en fonction.
6. Menu principal Après avoir mis le lecteur en marche, vous pouvez voir l’écran du menu principal, ce qui vous permettra de choisir les différentes fonctions et options de l’appareil. En utilisant la touche ou , vous pouvez choisir la fonction/l’option désirée. Appuyez sur la touche de LECTURE “PLAY” [!"] pour confirmer la sélection. Pour revenir au menu principal pendant que vous êtes à l’intérieur de ces menus secondaires, maintenez enfoncée la touche M.
Enregistrer Choisissez cette option pour enregistrer des messages vocaux. “Record” : Explorateur Choisissez cette option pour enregistrer des messages vocaux. “Explorer” : Paramètres Choisissez cette option pour accéder aux options des paramètres du système. “Settings” : 6.1 Mode de musique Pour activer cette option, veuillez suivre les étapes ci-dessous. 1. Mettez le lecteur MP3 EN FONCTION; l’écran affichera le menu principal. 2.
Haut-parleur intégré : Maintenez enfoncée la touche [ maintenez enfoncée la touche [ Navigateur : ] afin d’activer le haut-parleur intégré; ] pour désactiver celui-ci. Appuyez sur la touche Menu [M] pour ouvrir le navigateur des dossiers. Utilisez la touche [ ] ou [ ] pour choisir la chanson que vous désirez jouer et appuyez sur la touche de LECTURE “PLAY” [!"] pour jouer la chanson sélectionnée. Appuyez de nouveau sur la touche Menu [M] pour monter d’un niveau de dossier.
Maintenez la touche de LECTURE enfoncée afin de mettre le lecteur hors fonction. RECUL “REW” et AV. Appuyez sur [ RAPIDE “FWD” [ ou ] pour choisir le film précédent ou suivant. Maintenez enfoncée la touche [ ] Volume ( ] ou [ ] ou [ ] pour reculer ou avancer rapidement au sein du film. et ): ] pour augmenter le volume et sur [ Appuyez sur la touche [ ] pour le diminuer.
3. Après l’avoir installé, choisissez et exécutez le programme AVI Converter. 4. Cliquez sur “ADD” (ajouter) pour ajouter le film que vous désirez convertir. 5. Vous verrez alors les réglages de conversion “Conversion Setting”.
6. Choisissez 320 x 240 au menu déroulant de la “RÉSOLUTION” . 7. Naviguez au sein des fichiers sources “SOURCE FILE” et choisissez celui que vous désirez. 8. Choisissez le dossier de destination au sein de la trajectoire des fichiers cibles “TARGET FILE PATH”. (Vous pouvez changer le nom du fichier cible dans “TARGET FILE NAME”, si vous le désirez.) 9. Vous pouvez également personnaliser la qualité et le rapport d’aspect.
6.3 Radio (Radio FM) Lorsque le mode de la radio FM est activé, vous pouvez écouter les stations de radio. Pour activer cette option, suivez les étapes ci-dessous. 1. Mettez le lecteur MP3 en marche; l’écran affichera le menu principal. 2. À l’aide de la touche ou , choisissez l’option du mode RADIO, puis appuyez sur la touche de LECTURE “PLAY” [!"]. 3. Le lecteur commencera à diffuser la dernière station de radio préréglée. 4.
et utilisez la touche ou pour choisir la position où sauvegarder la station de radio. Appuyez sur la ou touche M et utilisez la touche pour choisir “Yes” (oui), puis appuyez sur la touche [!"] pour confirmer. Vous pouvez stocker un maximum de 20 stations de radio dans la mémoire. 6.3.
6.5.1 Marquer le texte d’un signet Pendant que vous lisez le fichier de texte ou lorsque vous désirez cesser la lecture, vous pouvez sauvegarder la page actuelle à l’aide de la fonction de signet. Pour sauvegarder un signet : 1. Pendant que vous lisez, appuyez sur la touche 2. À l’aide de la touche ou et vous verrez un petit menu de signets. , choisissez la position du signet (total de 3). 3. Appuyez sur la touche de LECTURE “PLAY” [!"] pour sauvegarder le signet. Pour charger un signet : 1.
6.7 EXPLORATEUR Sous ce menu, vous pouvez explorer les fichiers sauvegardés dans la mémoire, y compris la musique, les vidéoclips, enregistrements, photos et fichiers de texte. Pour utiliser cette option, veuillez suivre les étapes ci-dessous. 1. Mettez le lecteur MP3 en marche; l’écran affichera le menu principal. 2. À l’aide de la touche ou choisissez l’option d’explorateur “Explorer” et appuyez sur la touche de LECTURE “PLAY” [!"]. 3.
6.8.
#" Mode du rétroéclairage “BLight Mode” Vous pouvez choisir l’un des deux modes de rétroéclairage : “NORMAL” et économie d’énergie “POWER SAVE”. 6.8.5 Régler la LECTURE AUTOMATIQUE Le menu secondaire du réglage de la lecture automatique “Auto Play” permet de régler l’un des paramètres ci-dessous : #" Texte “Text” : Vous pouvez régler la durée du défilement automatique lorsque vous lisez des fichiers de texte, de 1 à 5 secondes.
2. Lorsque le système d’exploitation est prêt, insérez le CD du pilote (inclus) dans le lecteur de disques. Trouvez l’emplacement “Driver/setup.exe” (pilote/installation.exe) et double-cliquez sur celui-ci pour lancer l’installation. 3. Le programme d’installation commencera. Suivez les instructions à l’écran et lorsque l’installation est terminée, fermez la session et redémarrez le PC. 4. Lorsque le système d’exploitation est prêt, raccordez le lecteur au port USB à l’aide du câble de données USB inclus.
2. Lorsque le système d’exploitation est prêt, raccordez le lecteur au port USB. Le système détectera le nouveau matériel et installera automatiquement le pilote du périphérique. 3. Vous pouvez maintenant naviguer à travers le contenu de la mémoire du lecteur en utilisant “Mon ordinateur” ou “Windows Explorer”. 7.3 Transfert des fichiers Lorsque le lecteur est raccordé à l’ordinateur, “Mon ordinateur” possède maintenant un nouveau “Disque amovible”. Ce disque amovible est le lecteur.
WindowsMD XP – Windows Explorer !" Windows MD offre différentes façons de copier les fichiers. Pour plus de renseignements, veuillez consulter la documentation de Windows MD ou l’assistance en ligne. REMARQUE Si vous éprouvez des difficultés, nos représentants se feront un plaisir de vous aider en répondant à toute question se rapportant à votre nouvel appareil. Nous pouvons vous guider à travers les raccords, si c’est votre première fois, ou vous expliquer certaines des fonctions.