
Manual


HIRED-HAND, INC. 1733 Co Rd Bremen, AL 35033 Phone 256-287-1000 Fax 256-287-2000
Manual Part No. 4801-0167
Removal Of Wire Guard, Shutter,
And Power Cord
1. If the fan has a funnel flow cone, remove the wire
guard from the cone. If the fan does not have a
cone, remove the wire guard from the fan
housing.
2. Remove the shutter from the back of the fan.
3. CAUTION: Make sure that the power cord is
unplugged from the outlet. Remove the power
cord from the existing motor. Retain the power
cord for use with the replacement motor.
Removal Of Prop And Existing Motor
1. Loosen the set screw on the prop and remove
prop.
Note: Retain the metal key for reinstallation of the
prop.
2. Remove the four 5/16” carriage bolts holding the
existing motor and remove motor from mount
bracket. Note: Retain the carriage bolts and nuts
for attachment of the Face Mount Adapter Plate.
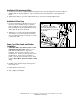
Installation Of Face Mount Adapter Plate
1. Arrange the Replacement Face Mount Adapter
Plate as shown in Figure 1.
2. Insert the four carriage bolts through the holes in
the Face Mount Adapter Plate and through the
slots in the rigid mount bracket as shown in
Figure 1.
3. Attach nuts loosely to the carriage bolts.
4. Slide the Face Mount Adapter Plate forward
until the carriage bolts are flush against the front
of the slots of the rigid mount Tighten the
carriage nuts firmly to secure the Face Mount
Adapter Plate in place.
36" FF Face Mount Adapter Plate
5/16”
Carriage
Bolts
Tools Required
3/8” Drive 1/2" Socket
3/8” Drive Ratchet
3/8” Drive 9/16 Socket
Flat Head Screwdriver
Installation kit (supplied)
Continued On Back
→→
Figure 1
Face Mount
Adapter
Plate
Figure 2
3/8” Bolts
Mount
Bracket
Prop Side
Back Side