Mini Wireless Presenter PLUS (PC Card Size) User’s Manual Be sure to carefully read this User’s Manual first for the proper use of the Mini Wireless Presenter PLUS and keep it for future reference.
Information in this document is subject to change without notice. No part of this document may be reproduced or transmitted in any form or by any means, electronic or mechanical, for any purpose, without the express written prior permission of the seller. The seller provides this document without warranty, or condition of any kind. The seller may make improvements or change in the product described in this documentation at any time.
Table of Contents Chapter 1 Introduction What’s the benefits 4 Equipment checklist 4 Requirements 4 Chapter 2 Product Features Parts descriptions (Fig. 1,2,3) 5 Take out the USB receiver (Fig. 4) 6 Put back the receive (Fig. 5) 6 Chapter 3 Getting Started Initial setup the Mini Wireless Presenter PLUS 7 Using the Mini Wireless Presenter PLUS 8 Presentation Mode (Fig. 6) Using the Mini Wireless Presenter PLUS 10 Multimedia Mode: (Fig.
Chapter 1 Introduction Thank you for choosing the Mini Wireless Presenter PLUS. — “Totally Control Your Presentation and PC Multimedia” What’s the benefits 3-in-1 Multi-function The Mini Wireless Presenter PLUS combines the features of Laser Pointer, ® PowerPoint controls and PC multimedia remote control into a compact PC Card-sized device. It enables you to remote control your PowerPoint presentation up to 100 feet (30 meters) indoors, and the laser pointer up to 130 feet (40 meters) from the target.
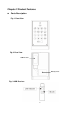
Chapter 2 Product Features Parts Description Fig. 1 Front View Fig. 2 Rear View USB Receiver Battery Cover Fig.
Take out the USB Receiver Pull up the USB receiver and take out the receiver Fig. 4 Put back the USB Receiver Insert the bottom of the USB receiver, label upwards, into the compartment first and press the USB receiver to the compartment. Fig.
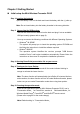
Chapter 3 Getting Started Initial setup the Mini Wireless Presenter PLUS Step 1: Inserting the batteries Open the battery cover on the back and insert the battery with the (+) side up. Note: Do not insert battery into the battery chamber in the wrong direction. Step 2: Connecting the USB receiver Take out the USB receiver attached on the back and plug it into an available USB port exactly (please refer to page 6).
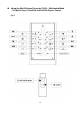
Using the Mini Wireless Presenter PLUS – Presentation Mode ~ Laser Pointer + PowerPoint Controls ~ Fig.
Keys in red Mode Function How to operate Press Mode button, the right-hand Mode indicator lights up and shows you the mode you are in, press Mode button for 1 second to change to next mode sequentially between Presentation, Media Player, PowerDVD and WinDVD. Change mode Note: Default setting in Presentation mode, please remember to click any key and check the mode indicator to confirm you are in the right mode you want.
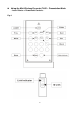
Using the Mini Wireless Presenter PLUS -- Multimedia Mode ~ For Media Player, PowerDVD and WinDVD Remote Control ~ Fig.
Keys in green Function How to operate Open the disc tray Click to open the disc tray. Play, pause or stop z z Click to start or pause playing. Press and hold1 second to stop playing. PowerDVD: Click ENTER, select where you want to start, and then press ENTER again z pressing WinDVD:Click ENTER starts from the location where you stopped playback.
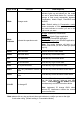
Chapter 4 Additional Information Specifications System Frequency range: 2400~2483MHz (16 multi channels and 65535 ID channels) Remote range: Approx. 100 feet (30 meters) indoors, 328 (100 meters) feet outdoors Operating voltage: Remote control 2.4V~3.3V, Laser 2.6V~3.3V Power: CR2032 battery * 1 Very low power consumption: Normal operation < 5mA Laser operation < 30mA Sleep < 10uA Output power: Under 1mW Physical Dimensions Size: 86(l) x 54(w) x 5(h) millimeters Weight: Approx.
多功能迷你無線簡報器 (2.
謝謝您選用本公司精心設計之『多功能迷你無線簡報器』。 此一便利之簡報/多媒體無線遙控裝置,結合雷射光筆以及 PowerPoint 常用之快捷功能,並 可遙控數種電腦多媒體播放軟體,加上本公司獨步全球的超薄型專利設計,您可以輕鬆的將 “Mini PLUS"收藏於您的筆記型電腦或其它裝置的 PC 卡插槽內,隨身攜帶,方便使用。 (注意:本產品具雷射功能,請勿將雷射光束直射眼睛並避免孩童把玩) (一)、本產品包含: 1. 無線簡報器*1 2. 無線接收器(USB)*1 (崁於簡報器背面) 3. CR2032 電池*1 4. 使用說明書*1 (二)、系統需求: 微軟作業系統 Windows® 98 SE, Me, 2000, XP (三)、開始使用及模式說明: 1. 請先打開無線簡報器背面之電池蓋,依電極指示方向置入電池。 2. 取出簡報器背面之 USB 無線接收器,將無線接收器插入電腦或其他簡報裝置之 USB 埠。 注意:取出無線接收器:請先拉起接收器前端的 USB 連接部,再抽出接收器。 置入無線接收器:請先將接收器底端插入置放槽,再壓入即可。 3. 打開簡報時所須之 PowerPoint 檔案。 4.
(四)、操作說明:(使用前,請務必依以下說明實際操作一次,以便熟悉所有功能) 1.
紅色字體 模式切換 功能 切換至所需模式 操作方法及注意事項 按下模式鍵,右側模式指示燈會顯示您目前所在的 模式,按住不放約一秒鐘後即切換至下一個模式, 重複此動作依序切換不同模式。 (簡報模式→Windows Media Player→PowerDVD →WinDVD) 注意:本系統預設為簡報模式,在您使用多媒體 遙控功能前,請務必記得執行模式切換,並確認本 裝置處於您所需要的模式下。 注意:按任意鍵,模式指示燈顯示您現在的模式。 無燈號:PowerPoint 簡報模式。 模式指示燈 顯示本裝置所處之模式狀態 綠色燈號:Media Player 模式(多媒體) 。 橘色燈號:PowerDVD 模式(多媒體) 。 綠色與橘色雙色燈號:WinDVD 模式(多媒體) 。 注意:您可參考裝置背面之燈號指示說明。 雷射 雷射光筆 按下此鍵即射出雷射。 注意:按住不放三秒鐘開啟雷射。 投影片 放映投影片 按下此鍵開始 PowerPoint 投影片放映。 離開 結束投影片 按下此鍵結束 PowerPoint 投影片放映。 下一頁 下一張投影片 按下此鍵至下一張投影片。 上一頁 上
3.
綠色字體 功能 操作方法及注意事項 打開光碟片托盤 按下此鍵打開光碟片。 播放、暫停/停止 按下此鍵播放,再按一次暫停(可重覆操作)。 持續按住一秒鐘停止。 z 停止後恢復播放 z PowerDVD:按確認 鍵,選擇從頭開始或是 鍵播放。 從停止處開始,再按一次確認 z WinDVD:按確認 z Windows Media Player:按播放 節開始播放。 z Mac DVD Pl。ayer:按播放 地方開始播放。 鍵從原先停止處開始播放。 鍵從第一章 鍵從原先停止的 按下此鍵播放螢幕放到最大,再按一次回復。 Full Screen 注意:Windows Media Player 模式必須在影片 全螢幕播放 播放中才能切換全螢幕顯示。 Menu 叫出目錄 按下此鍵叫出目錄。 向上移動(選擇標題/目錄) 按下此鍵標題/目錄向上移動一個選項。 向下移動(選擇標題/目錄) 按下此鍵標題/目錄向下移動一個選項。 向右移動(選擇標題/目錄) 按下此鍵標題/目錄向右移動一個選項。 向左移動(選擇標題/目錄) 按下此鍵標題/目錄向右移動一個選項。 確認
產品規格 使用頻率 遙控距離 工作電壓 2400~2483MHz 室內 30 公尺;開放空間 100 公尺 電源供應 2.4V~3.3V CR2032 電池*1 輸出功率 小於 1mW 重量 23 公克(含電池) 體積 86mm(長)*54mm(寬)*5mm(高) 環境 溫度: 操作時:0℃(32℉)~60℃(140℉) 非操作時:-10℃(14℉)~65℃(149℉) 濕度(非冷凝狀態): 操作時 10%~85% RH 非操作時 10%~95% RH 雷射 連續式半導體雷射(λ= 650 nm) 雷射最大輸出功率:0.
Doc No.