Innovation for life ES-G HOSPITALITY LED TELEVISION MODEL NO.
ii Important safety instructions Warnings Cautions Accessories Installing and removing the stand Installing the stand Attaching the TV to the desk Removing the stand Installing a wall-mount bracket TV components Front and side controls Back connections Remote control Using the remote control Installing remote control batteries Aiming the remote control Making connections Connecting the power Selecting a location Connecting an HDMI device Connecting a component video device Connecting an antenna,cable T
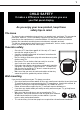
1 f CHILD SAFETY It makes a difference how and where you use your flat panel display As you enjoy your new product, keep these safety tips in mind The issue The home theater entertainment experience is a growing trend, and larger TVs are popular purchases. However, TVs are not always supported on the proper stands or installed according to the manufacturer’s recommendations. We and the consumer electronics industry are committed to making home entertainment enjoyable and safe.
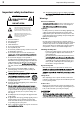
2 Important safety instructions Important safety instructions CAUTION RISK OF ELECTRIC SHOCK DO NOT OPEN This symbol indicates that dangerous voltage constituting a risk of electric shock is present within your TV. This label is located on the back of your TV. This symbol indicates that there are important operating and maintenance instructions in the literature accompanying your TV. 1 2 3 4 5 6 7 Read these instructions. Keep these instructions. Heed all warnings. Follow all instructions.
3 Installing and removing the stand Cautions Damage requiring service Unplug this TV from the power outl service personnel under the following conditions: When the power supply cord or plug is damaged or frayed. If liquid has been spilled or objects have fallen into your TV. If your TV has been exposed to rain or water. If your TV does not operate normally by following the operating instructions.
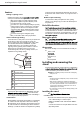
4 TV components Installing a wall-mount bracket If you want to attach the TV to a wall-mount bracket (not provided), you 2 Secure the stand column to the stand cover vertically with the 2 screws (M4,12mm) provided. Secure the stand column to the stand cover horizontally with the 2 screws (ST4,14mm) provided. Warning only.
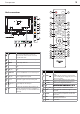
5 TV components 1 Back connections R L AV IN VIDEO DIGITAL HDMI 2 RJ12 AUDIO USB AUDIO OUT OUT L R PB PR COMPONENT IN 3 1 3 4 - 16 17 4 9 CH.LIST 10 5 CCD 6 MUTE 6 7 18 19 7 PICTURE 8 MENU SOUND DISPLAY 20 EXIT 21 5 22 ENTER 23 HDMI 1 9 2 LAST 2 VGA Y 15 8 PC AUDIO IN PC IN ANT/CABLE SERVICE TV RETURN GUIDE 6 24 INPUT 14 25 10 Item Name 1 USB Description ANT IN jack Connect an antenna or cable TV to this jack. 3 SERVICE Service only, don't use.
6 Using the remote control Item Name Description 10 When you are listening to music and enjoy pictures.You can switch between playing and pause through this button. Exit the current state. Fast backward. Fast forward. ASPECT 11 (Zoom button) Select screen mode. 12 TIME Not available. 13 AV/COMPONENT /VGA/HDMI Select VIDEO/ VGA/ COMPONENT/ HDMI source. 14 INPUT Press to open the INPUT SOURCE menu, then press or to select the video input source you want.
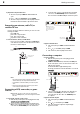
7 VIDEO L AV IN R Making connections Making connections DIGITAL HDMI 2 RJ12 AUDIO USB AUDIO OUT OUT HDMI device Before you make any connections: Check the plugs on the ends of cables to make sure that they are the correct type before you try plugging them into jacks on the TV. Make sure that all plugs are securely inserted into the jacks. Loose connections can result in image or color problems.
8 Making connections To play from the component video device: 1 Turn on the TV, then press INPUT. The INPUT SOURCE menu opens. 2 Press or to select Component, then press ENTER. 3 Turn on the component video device and start playback. Refer to the instructions that came with the component video device. 3 Connect the audio connectors of the AV cable (the red and white connectors) to the AV OUT AUDIO jacks of the external device, then connect them to the AV L and R jacks on the back of your TV.
9 Understanding the basics Connecting a home theater system PC IN PC AUDIO IN Connecting using a digital audio cable VGA DIGITAL HDMI 2 RJ12 AUDIO USB AUDIO OUT OUT VIDEO L AV IN R To connect using a digital coaxial cable: 1 Make sure that your TV’s power cord is unplugged and the home 2 Connect one end of a digital coaxial audio cable (not included) to the DIGITAL AUDIO OUT jack on the back of the TV. DIGITAL AUDIO OUT Understanding the basics 1 Plug the power cord into an AC power outlet.
10 Understanding the basics Displaying program information Preset Mode To display program information: conditions. Press INFO to show an information banner. The information banner shows current program information such as channel number, video input source, and resolution. Digital signal information—Displays channel number, station name, channel label (if preset), broadcast program name, signal type, audio information, resolution,and current program start and end times when watching a digital channel.
11 Understanding the basics DMP DMP Slide time V-Chip Lets you select certain programs to be blocked. Transparency Lets you adjust Menu transparency. Long Transitions None Rotate 0 Zoom 1X 3 Features Move: Enter: OK Exit: EXIT OSD Timeout Set display time of Menu. Installation Language English Channels >>> Time >>> Source Labels >>> Reset AV settings Start now Move: Enter: OK 6 Exit: Lets you select the photo slide time: Long, Medium or Shot.
12 Adjusting picture and sound Zoom2 —Enlarges the picture but may crop the top and bottom of picture. And no black bar on right and left. Panorama —Stretches the picture at the edges, but maintains a good aspect ratio at the center of the screen. Adjusting the picture To adjust the picture: In TV mode, you can adjust: Note: In analog TV mode, allows you to select all aspect modes. In digital TV mode, allows you to select Normal mode and fullscreen mode. Zoom and panorama modes are not available.
13 Changing channel settings Features TV Caption settings >>> Sleep time 0 U.S. TV ratings (age-based) These ratings are determined by the Federal Communications Commission (FCC). Power on >>> TV-Y All children. Power off >>> TV-Y7 Suitable for children 7 and older. V-Chip >>> TV-G General audiences. Change PIN >>> Parental guidance suggested. Transpaerncy 0 TV-PG OSD Timeout >>> TV-14 Parental guidance strongly suggested. OK TV-MA Mature audiences only.
14 Changing channel settings Change PIN–Change the password of the V-Chip function. Transpaerncy–Adjust the transparency of menu. OSD Timeout –The time it takes the OSD to disappear when no operations are performed. You can change it from Off, 5 seconds, 10seconds, and 30seconds. Adjusting the Installation To change the channel settings: In TV mode, you can adjust: 1 Press MENU. The Main menu opens. 2 Press or to highlight Installation, then press ENTER or . The installation menu opens.
15 Troubleshooting Troubleshooting Before calling for service, check the following information for possible solutions to problems you may experience. If none of these solutions Caution: Do not try to repair the TV yourself. Refer all servicing to Remote control Problem Solution Remote control does not work. Make sure that the TV power cord is plugged in. Make sure that there are no obstructions between the remote control and the remote control sensor on the front of the TV.
16 Specifications, Legal notices Maintenance Just like with any other household appliance, the performance and life-expectancy of your TV depends on how well you maintain it. Follow the procedures described here to clean the TV case and the LED screen. Cautions: disconnected from the power outlet before cleaning the TV. Never spray or pour any liquid directly onto the screen or the case. Cleaning Clean your TV with a soft, dry cloth.
17 Hotel Settings Adjusting hotel settings To adjust hotel settings: 1 Press MENU. The Main menu opens. 2 Press or to highlight SOUND, then press ENTER or , audio menu opens. Press or to highlight balance, use or to adjust to zero, then press the number buttons to enter the threedigit password 5 4 8. The Hotel Settings Menu opens. Sound TV Sound mode Standard Equalizer >>> Balance Move: 0 Enter: OK Exit: Balance EXIT LOGO —Allows installer to choose one of three options.
18 Hotel Settings FeatureLock —Locks Feature menu adjustment in menu. Installation Lock—Locks Installation menu adjustment in menu. DMP Lock —Locks DMP menu adjustment in menu. V-Chip—Locks V-Chip function in menu. Info Lock OFF : Programing name and description (if available) are displayed when info button on remote is touched. Programing info may also be available depending on provider. ON : No detail information on channel. Hotel mute— Allows installer to mute TV speaker. ON : TV is muted.