4. Carefully place your TV on 8 doff, cushioned, surface fo prevent damage fo the scream. Secure the stand to the TV with the 4 screws C (M5 » L12} provided. See Figure 4. Installing a Wall-Mount Bracket If you want to st tech the TV to a Wall-Mount bracket (not provided), you should first remove the stand if it is per-attached (see Step 1). i racket (16-2 5mm} 1. Make sure the TV is laid face-down on a clean, safe, 2.
When Installing the TV Against a Wall or Enclosed Area Make sure that your TV has adequate alr circulation. Allow enough space around the TV as shown below. Av old operating the TV at temperatures blow inadequate sir 41°F Install with stand install on the wall 4 inches {36am} & chu {idiom} i Leave af last fis much space around the set.
Viewing the Control Panel Home Ee Prows indicator Armrests sensor farm Description Power indicator Light up when the power is on. Receivables remelts signals rom the remote control. Hummer sensor Do not put anything near the sensor, ex iis function may be affected. BEN Display an on-screen menu to setup your TV's features. Neu Select among the different input signal sources. VOL Volvo Adjust the volume. Chancy Select the channel, Turn on the TV of put ths TV In standby mods.
Viewing the Remote Control Po war nonfood Direct channel selection Dash bunion Select a dial sub-channel Infer TV source Increase volume Decrease volume MUTE button Enter the VDU HD Movie MENU button Ald Navigate Up / Down / Left / Right of adjust OSD settings Rem io the previous menu Launch Netflix App Media content control function bunions Select sound mode Select picture mods Set the pleas mer Select Component / VGA / HDMI source BF NOTES # FOR ILLUSTRATION ONLY.
installing Batteries in the Remote Control = Change the batteries 1. Press the raiser bunion on the back of the remote control to remove the battery compartment cover. 2. Insert two AAA size satirizes. Make sure to match the and { } ends of the batteries with the and { } ends indicated in the battery compartment. 3. Replace the battery compartment cover. © Remove the battery compartment cover © insert the batteries fi NOTES . Disposals of your batteries In a designated disposal area.
Making Connections COMPONENT a © efficacy— fee ANTI CABLE of Bl lo HEADPHONE 5 Foist input [— DIGITAL £8 AUDIO DUT from HERBAL aN uss use VGA POLAROID HDMI HDMI = AUDIO Description CANTICLE Conn act an antenna or cable TV to this jack. HOM! {High-Definition Multimedia Interface}provides an uncompressed, Hos all digital audio/video Interface between this TV and any HDMI-device, such ss a set-top box, Blu-ray disc player, or AV receiver.
NOTES # Check the jacks for position and type before making any connections. Loose connections can result in image or color problems. Make sure that all connections are tight and secure. # Not aff AN devices have the stability fo connect to a TV, pleases refer to the user's manual of your AV device for compatibility and connections procedure. & Always unplug the power cord when connecting external equipment. » Connecting an antenna, cable or cable/sateliite box 1.
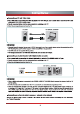
Connecting an A/V Device with Component (YP P} Cable 1. Use a component cable fo connect the maximal &/V device's component output jacks to the TV's YP, jacks. Use an audio cables fo connect the external AV device's component audio Jacks fo the TV's AUDIO {L/R} Jacks. 2. Plug the connected devices into the mains socket before switching on the TV. 3. Select the corresponding source from the TV.
+ Connecting a PC with VGA Cable 1. Use a VGA cable in connect the PC's VGA output jack fo the TV's VGA jack. Use an audio cable fo conned the PC's audio output jack to TV's POD VI AUDIO IN Jack, 2. Plug the connected devices into the mains socket before switching on the TV. 3. Select the corresponding source from the TV. TV JACK EXTERNAL DEVICES | Hee @ Primarily this unit is intended for use se an LCD TV.
Turning the TY on or off IMPORTANT: At first, you have to match the moisture control with TV. To tum your TV on or off {standby mode}: 1. Plug the power cord info an AC power outlet. 2. Press [POWER] button, your TV tums on. 3. Press [POWER] button again to tum off your TV. When you tum off your TV, R goes Into standby mode. { wane When your TV is in standby mods, it is still receiving power. To completely disconnect power, unplug the power cons.
Changing Channels / Volumes 1. Cross the +11} on the Ultramodern control to change the channel. 2. Press the [VOL AV] {or VOL +10) on the Tremolos control io adjust the volumes. 3. Press the numeric buttons on the remote control to display the corresponding channels. BE NOTE Changing the channels can ale be achieved by directly entering the channel number using the numeric keys on the remote control.