CAUTION A RISK OF ELECTRIC SHOCK DO NOT PORE CAUTION: TO REDUCE THE RISK OF ELECTRIC SHOCK, BO NOT REMOVE COVER (OR BACK). NO USER-SERVICEABLE PARTS INSIDE REFER SERVICING TO QUALIFIED SERVICE PERSONNEL. The lightning flash with arrowhead symbol, within an equilateral triangles is intended to als the serious the presence of insulated dangerous voltage within AH the product's enclosure that may be of sufficient magnitude to constitute a risk of electric shock.
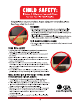
CHILD SAFETY: It Makes A Difference How ond Where ell ol el eg Ble Congratulations on your purchase! As you enjoy your new product, please keep these safety dips in mind: THE ISSUE @ The home theater entertainment experience is a growing trend and larger fiat pare! displays are popular purchases. However, flat panel dispirits are not always supported on the proper stands or installed according to the manufacturer's recommendations.
1. Read these instructions 2. Asp Lhasa Instructions. 3. Heed all warnings. 4. Follow all instructions. 8. Bo not use tis apparatus near water. &. Nisan only with dry cloth. 7. Do not block any ventilation openings. Install in accordance with the manufacturers instructions. 8. Do not install near any heat sources such es radiators, heat registers, stoves, or other apparatus {including amplifiers} that produce heat. 9. Do not defeat the safety purpose of the polarized or grounding-type plug.
HOW TO HANDLE THE LOD PANEL Do not press hard or jolt the LOD pane! It may cause the LCD panel grass to break and injury may scour. if the LCD panel ia broken, make absolutely sure that you do not touch the liquid in the panel. This may cause skin inflammation. if the liquid sis in your mouth, immediately gargle and consult with your doctor. Also, if the liquid tags in your eyes of touches your skin, consul with your doctor after rinsing for at stasis 15 minutes or longer In clean water.
Disclaimer: Hi sense USA companies A wired or wireless Internet connection is required for glycerin features and is not included with the television; please contact a local Internet Service Provider for assistance. Content suppliers may requires a subscription io activate or use their services which is not included with the television and Is sold separately.
Accessories list installing the Stand installing a Walt-mount Bracket Viewing the Control Pans! viewing the Remote Contra! installing Batteries nits the Re mete Control.
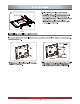
Accessories list 8 Users Manual Buick Setup Guide Warranty Can Remote Conk Callers x REAR ere Nia erm G (MS Se raw D (MER |2¢ Installing the Stand bore 1 The LCD display is very fragile, and must be protected at all times when removing the base stand. Be sure that no hard or sharp object, or anything that could scratch or damage the LCD display, comes into contact with it. DO NOT exert pressure on the fret of the TV at any time because the screen could crack.
Figure 4 Installing a wall-mount bracket 4. Uploads make sirs to place a soft cushioned material {such as a pillow or thick piece of foam) beneath the TV scrawny. Lay the TV down on a flat cushion surface with the back side facing up. Ta install the base stand, slide the base stand in the designated area until the screw holes are aligned, Secure the bass with the screws © (M5 x L12) tightly. See Figure 4.
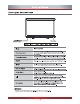
Viewing the Control Panel Po war indicator Remelts Sensor 3D emitter MENU INPUT OLY OVAL av ohA (| gn Description Receives ramie signals from the remote control. 5 Do not put anything near the sensor, as its function may be affected. During startup the light flashing alternately red and blues, 4 it is blue when turned on, and it is red in standby mods. Display an on-screen menu to setup your TV's features. Sleet among tha different input signal sources. Adjust the volumes.
Viewing the Remote Control Battery indicator, Inks when a button pressed Select input source 3D button Power offhand Dirac channel selection Dash button | it {use when entering a digital Go to ths previous channel sub-channel} Enter the NETFLIX instant streaming Enter Internet Apps and Digital Media Player Next chains! Enter the VDU HD Movie increase Volume Decrease Volume | — Previous channel Mute button Return to the previous menu Menu button A/F 4p Navigate Up/Down/Left/Right or adjust on-screen menu set
installing Batteries in the Remote Control 1. Slide the back cover to open the battery compartment of tha remotes contra! 2. Insert two AAA size bacterial. Make sure to mach the and { } ends of the batteries with the and ends indicated in the battery compartment. 3. Clogs the battery compartment cover. © Gent push and side © In wart the batteries © Gentry push and wide NOTE . Dispose af your baptisteries in a designated disposal area. Do noi throw the batteries into a fire. .
Making Connections AY poo COMPONENT ANT/CABLE POWER INPUT Boone HEADPHONE £h LAN oie PC: cur Hines | NER) SE vox i ea, HOM HDMI use moms & a. 2g AUDIO OUT 8 VGA PC/DV! HOM HDM! AUDIO {oom HOM Description HOM! (High-Definition Multimedia interface) provides an uncompressed, al digital audio/video interface between this TV and any HDMI-device, such as a set-top box, Blu-ray disc player, or A/V receiver.
Making Connections NOTE 1. Check the jacks for position und type bafflers making any connections. Loose connections can result in mags of color problems. Make sirs that all connections are tight and secure. 2. Not all &/V devices have the ability to connect to a TV, please refer to the user's manual of your A/V device for compatibility and connections procedure. 3. Always unplug the power cord when connecting external equipment. Connecting an antenna, cable or cable/satellite box 1.
Connecting an A/V Device with Component (Ypres) Cable 1. Use a component cabal to connect the external A/V device's component output jacks to the TV's Peppery jacks. Use an audio cabs to connect the supernal A/V device's compensate audit jacks fo the TV's AUDIO {L/R) jacks 2. Plug ths connected devices inch the mains socket before switching on the TV. 3. Select the corresponding sources from the TV.
Connecting a PC with VGA Cable 1. Use a VGA cable ib connect the PC's VGA output jack to the TV's VBA jack. Use an audio cable to connect the PC's audio output jack to TV's AUDIOVISUAL IN jack 2. Plug the connected devices into the mains socket before switching on the TV. 3. Balsamic the corresponding source from the TV. Audi Cable {not included) VGA Cable {not inc hated) Ei NOTE # Primarily this unit is intended for use as an LCD TV.
Turning the TV On for the First Time The Setup Wizard menu appears the first ime you turn on the TY. will assist you to specify the menu Language, time zone, picture mode. internet connection, tuner mode and channel installation. IMPORTANT: Bake sure that the antenna or cable is connected and a wired or wireless Internet connection is available. 1. Makes sure that you have: installed the remotes control battledress Connected an antenna or cable. Connected the prows cord. 2.
Selecting the input Source Tha first ime you turn en your TY, you must select the TV signal source. Your TV stores this Information, so you de not need to change the TV signal sucrose unless it changes. For example, you change from an outside antenna to cable TV. To slacks the video Input sours: 1. Tum on your TV, then pass [INPUT] button on tha remote or on tha TV. The Input Source menu opens. 2. Press [4 / ¥] button to highlight the Irrupt source, then press [ENTER] button. Changing Channels/ Volume 1.
Shortcuts instructions Aspect Select the sores aspect ratio from Normal, Wide, Zoom and Cinema. Normal: The original 4:3 aspect ratio {1.33:1 signal} is preserved, so black bars are added to the left and right of the image. Standard TV broadcasts are displayed with a 4:3 aspect ratio O_O OO Wis: When walking a standard broadcast or full frame movie in this made, the display image is stretched proportionately to fill the TV screen When watching a widescreen (1.
To Use the Menu 1 Crass the [MENU] bunion to open the main menu. 2 Press the [4/9] button to select a menu option, then press the [B/ENTER] {o enter the menu. 3 in the menu, you cam press the satiety an item, precise the [4/0 adjust the value, or press the to enter a sub menu. 4 Crass the [MENU] button to return to the previous menu of press the [EXIT] button to exit the menu. s--3f5ze NOTE The menus in the user's manual may vary slightly from the actual screen.
L-R Switch — flips the left and right frames in Side by-Side format. Depth of Field ~ Adjusts the range of distance (focus) that appears acceptably sharp in a 3D image. 30-to-20 Disables automatic identification of 3D format during playback; forces 2D playback using ably the Left or Right frame. Using the Audio Menu 0) Audi ll ne Equalizer Ll re FOR INT Ee Tl el You can adjust: Sound Mode — Select the Sound Mode: Standard, Speech, User or Music. Balances — Adjust the volume of the life and right speakers.
Charge! Skip You can cancel a channel stored in the Shanna! list. Doe When you press [CHA V] button, your TV skips the channel you canceled. You can sil tune to the channel using the number buttons on the remote control. Favorite List ~ Add or delete channels lo create a favorite list. You can press [FAV] bunion io display your Favorite List. MTS Select the default audio stream: Mono, Stereo or SAR. Audio Language — Select the audio language: English, Spanish or French.