R LCD COLOR TV USER MANUAL LCD2004US Part No.
Please read all the safety and operating instructions carefully before you begin. SAFETY CLASS This is an IEC safety class product and must be grounded for safety. CONTENTS Important safety instructions . . . . . . . . . . . . . . . . . . . . . . . . . . . . . . . . . . . . . . . . . . . . . . . . . . . . . . . . . . . . . . . . . . . . . . . . . . . . . . . . . . . . . . Brief product overview . . . . . . . . . . . . . . . . . . . . . . . . . . . . . . . . . . . . . . . . . . . . . . . . . . . . . . . . .
The lightning flash with arrowhead symbol within an equilateral triangle is intended to alert the user to the presence of uninsulated dangerous voltage within the product ' s enclosure that may be of sufficient magnitude to constitute a risk of electric shock. CAUTION CAUTION: TO REDUCE THE RISK OF ELECTRIC SHOCK, DO NOT REMOVE COVER (OR BACK) .NO USER SERVICEABLE PARTS INSIDE. REFER SERVICING TO QUALIFIED SERVICE PERSONNEL.
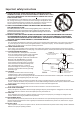
Important safety instructions 12. USE ONLY WITH CART, STAND, TRIPOD, BRACKET OR TABLE SPECIFIED BY THE MANUFACTURER, OR SOLD WITH THE APPARATUS. WHEN A CART IS USED, USE CAUTION WHEN MOVING THE CART/APPARATUS COMBINATION TO AVOID INJURY FROM TIP-OVER. Do not place this TV on a unstable cart, stand, tripod, bracket ,or table. The TV may fall, causing serious injury to someone, and serious damage to the appliance. An TV and cart combination should be moved with care.
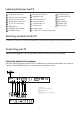
Brief product overview 1.Connection Connect the antenna lead or CATV cable or external equipment (such as Antenna, Cable TV, VCD, DVD, VCR, Set top box, etc.) to the corresponding terminals or interface on the TV rear (please refer to the owner s manual of the equipment to be connected as well) and confirm that the signal source is available and works. normally. ANT.IN 2.
3.Switching on/off 1) Connect the TV to power outlet. Switch on the power switch located on the back of the TV (See page 6, item 21 for location), if the power indicator is red, it means the TV is off now. You need to press the POWER switch on the TV or the POWER button on the remote control to turn on the TV, and the power indicator will light up in blue. 2) Press the power switch or the POWER button on the remote control again to turn off the TV. 4.
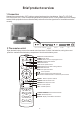
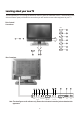
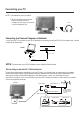
Learning about your new TV You can operate your TV by using the buttons on the front panel or the remote control. The terminals on the side and the rear panel provide all the connections you will need to connect other equipment to your TV. Side Controls / Connections MENU SOURCE VOL VOL 10 CH CH 1 7 22 Rear Connections 8 ANT.IN S-VIDEO VIDEO Y PB/ C B P R/ C R L R AUDIO IN 1 COMPONENT L R AUDIO IN 2 19 AV OUT 20 21 PC IN AC IN Note: The above figures are for reference only.
Learning about your new TV Channel up / cursor up Remote control sensor Headphone jack 9 CATV antenna input 20 AV audio input 1 L 21 AV audio input 1 R 22 S-Video input AV Video input Y PB/CB P R /C R input (Component) Channel down / cursor down Volume up / cursor right Volume down / cursor left TV / AV / PC input select MENU button POWER button (standby) POWER indicator AV audio input 2 L AV audio input 2 R AV outputs PC VGA input POWER Plug Power switch Selecting a location for the TV Place the TV on
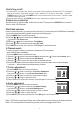
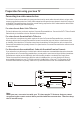
Connecting your TV NOTE: 1) Headphones are not included. 2) No sound will be heard from the main unit speakers when a headphone mini-plug is connected into the headphone jack. Headphone Connecting to a Personal Computer or Notebook You can use your TV as a monitor for your PC or Notebook by connecting through the PC IN (VGA) connection jack. Connect the devices as shown below.
Preparation for using your new TV Connecting to a cable converter box This television has an extended tuning range and can tune into most cable channels without using a cable company supplied converter box. Some cable companies offer premium pay channels in which the signal is scrambled. Descrambling these signals for normal viewing requires the use of a descrambler device which is generally provided by the cable company.
Using the remote control Preparing the remote control for use + + Installing the remote control batteries 1. Open the battery cover on the back of the remote control. + + 2. Insert two AAA size(1.5V) batteries (included). Match the + and - signs inside the batteries to the signs on the battery compartment. 3. Close the battery cover. 30 6m 30 Note: 1.Dispose of your batteries in a designated disposal area. Do not throw your batteries into fire. 2.
Shortcut keys operation Connecting POWER Note: Please pay attention to the power switch when you use ourTV product firstly. According to the instruction of sticker label on theleft speaker you will find it and switch TV on easily. ON/OFF Standby Press POWER on the remote control to turn off the LCD TV. The POWER indicator will turn red. Press POWER again to turn the LCD TV back on. The POWER indicator will turn blue. Selecting the signal source 1. Turn on the power of the connected video equipment.
Shortcut keys operation Adjusting volume Press VOL- or VOL+ on the remote control or VOL on the TV to decrease or increase the volume. Muting the sound Press the MUTE on the remote control to temporarily turn off the sound. To restore the sound, press MUTE again. The mute function is automatically turned off when any of the following buttons are pressed: POWER, VOL+. Changing channels To change the channel, you can 1.Press CH - or CH+ on the remote control or CH on the TV. 2.
Shortcut keys operation Selecting the picture mode You can select the picture mode instantly from among three preset modes and one user-set mode. Press the P.MODE button on the remote control repeatedly to select the desired picture mode. P.MODE Normal User Soft Bright Selecting the sound mode You can select a sound effect from among three preset modes and one user-set mode. Press the S.MODE button on the remote control repeatedly to select the desired sound effect. S.
Menu operation Using the Picture Parameters menu Adjust picture settings Picture Parameters Equalier 1) Press the MENU button to enter the main menu. Britghtness 50 Contrast 50 2) Press the [ or ] button to select the item Picture Parameters, and 50 Saturation 50 Sharpness [ ] press the button to enter Picture Parameters menu. Color Temp Normal Hue 50 3) Press the [ or ] button to select the item you want to adjust. 4) Press the [ or ] button to adjust the level.
Menu operation Using the Geometry menu Geometry 1) Press the MENU button to enter the main menu. ] button to enter geometry menu. 2) Press the [ or ] button to select the item Geometry, and press the [ [ or ] 3) Press the button to select the item you want to adjust. [ or ] 4) Press the button to change the value. 5) Press OK button to confirm your selection. Press OK again to exit from the menu.
Menu operation OSD Language: Press the [ or ] button to change the OSD Language. CC Mode: Press the [ or ] button to switch among the different Closed Captioning options CC1~4, T1~4 and Off. MTS : Press the [ or ] button to switch among Stereo, SAP and Mono audio modes. Reset Menu : Press the [ or ] button to switch between On and Off and if the item is switched to On,the Option menu will appear when you turn on the TV the next time.
Menu operation About TV PG Rating: The TV ratings are divided into two groups: age-based and content-based.
Using the Search menu TV Reception Mode You can set Tv source as aerial or cable antenna input. 1) Press the MENU button to enter the main menu. 2) Press the [ or ] button to select the item Search, and press ] button to enter Search menu. the [ 3) Press the [ or ] button to select Tuning Mode. 4) Press the [ or ] button to switch among Air, Cable. Equalier Search Program Tuning Mode Skip Auto search 1 Air Off Skip Allows you to skip a preset TV channel.
Appendix Cleaning and care WARNING: TV sets use high voltage. Do not try to remove the back cabinet yourself. There are no user serviceable parts inside. Note that opening the cabinet could void your warranty. Refer servicing to qualified service technicians. To clean the TV screen: 1) Unplug the TV to avoid possible shock hazard. 2) Use a damp cloth or clean cellulose sponge to clean the TV screen and trim. Do not allow water to spill into the cabinet or damage may occur.
Appendix Troubleshooting Before calling a service technician, please check the following table for a possible cause of the problem and some solutions. Problem Solution TV will not turn on Make sure the power cord is plugged in, then press POWER. The remote control batteries may be dead. Replace the batteries. No picture, no sound Check the antenna/cable connections. No sound, picture OK The sound may be muted. Press VOL+. The station may have broadcast difficulties. Try another channel.
Appendix Specifications LCD2004US Diagonal display size 20.1 INCHES TFT LCD Television system NTSC standard Channel coverage VHF: 2~13 UHF: 14-69 Cable TV: 2~13, A~W, W+1~W+84, A-5~A-1, 4A Power source 120VAC, 60Hz Power consumption 80W RF input: VIDEO input: Cable/ antenna RF VIDEO 1 S-VIDEO 1 1 VGA : Analog RGB 15pin (640X480/60Hz) 1 VIDEO output: AUDIO input: VIDEO 1 AV audio 1 Connection Interface 75W VHF/UHF input 75W 1.0Vp-p input Y: 75W 1.0Vp-p input C: 75W 0.