Part No: IES050148
WELCOME TO THE BRIGHT AND VIVID WORLD OF PLASMA DISPLAY TV Dear customer, Thank you for purchasing this Plasma Display TV. We wish you many years of viewing pleasure. The goal of this manual is to guide you through setting up and operating your TV as quickly as possible. Please read all the safety and operating instructions carefully before you begin. SAFETY CLASS This is an IEC safety class I product and must be grounded for safety. CONTENTS Important Safety Instructions . . . . . . . . . . . . . . . . .
Important Safety Instructions To prevent fire or shock hazard, do not expose this appliance to rain or moisture. FIRE AND SHOCK PRECAUTIONS Adequate ventilation must be provided to prevent heat build up inside unit. Keep the inside of unit free from foreign objects ,such as hairpins, nails, paper, etc. Do not build the set into a bookcase or other enclosures in which it would be poorly ventilated. Do not place it on carpet or a bed as low ventilation holes could become obstructed.
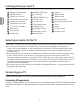
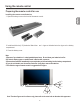
Learning about your new TV You can operate your TV by using the buttons on the front panel or the remote control. The terminals on the back panel provide all the connections you will need to connect other equipment to your TV. Front Controls Menu Menu TV/AV VOL CH TV/AV VOL CH Back Connections Note: The above figures are for reference only, please refer to the actual units to determine their appearance.
Learning about your new TV Remote Sensing Window POWER indicator YPBPR/YCBCR input PC VGA input Channel up / cursor up Channel down / cursor down Volume up / cursor right Volume down / cursor left TV / AV / PC input select Menu button AV Video input S-Video input RS232C DEBUG input PC audio input AV audio input CATV antenna input POWER PLUG Audio AMP output L Audio AMP output R Mounting base Speakers Speakers input Speakers base Base locating hole Wall mounting locating hole Scart1 Scart2 AV Video outpu
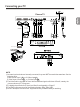
Connecting your TV Plasma TV Scart cable (not supplied) Scart Output Scart cable (not supplied) Scart Input NOTE: 1) As some input terminals are internally connected, they must NOT be used at the same time. See the following pairs: Video input of Scart 1 26 == AV Video input 9 , S-Video input of Scart 2 27 == S-Video input 10 , 2) The Video/Audio output pins of Scart1 deliver the same signals with those of Scart2, namely, the picture and sound of TV programs.
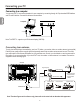
Connecting your TV Connecting to a computer You can use your TV as a monitor/speakers for your computer by connecting through its 15pin standard RGB interface and PC audio interface. Connect the devices as shown below. Computer To speaker To VGA RGB line Audio line Note: This PDP TV supports up to XGA format display(1024*768). Connecting to an antenna To enjoy the terrestrial signal transmitted by your local TV station, you need an indoor or outdoor antenna (not supplied).
Using the remote control Preparing the remote control for use Installing the remote control batteries 1. Open the battery cover on the back of the remote control. 2. Install two AAA size(1.5V) batteries. Match the + and - signs on the batteries to the signs on the battery compartment. 3. Close the battery cover. Note: 1.Dispose of your batteries in a designated disposal area. Do not throw your batteries into fire. 2.Do not mix battery types or combine used batteries with new ones. 3.
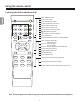
Using the remote control Learning about the remote control Zoom: Adjust zoom ratio Power: Power on/off Video: Switch to video mode S-Video: Switch to S-video mode YPbPr: Switch to YPbPr mode YCbCr: Switch to YCbCr mode PC: Switch to PC mode/auto-adjust / : Mono/Stereo operation Time: Display current time(Teletext) Text: Teletext mode Red/Green/Yellow/Cyan buttons: Fasttext(Teletext) Power 1 2 3 4 5 6 7 8 9 Recall 0 Display Menu: Call up the main menu Text P.
Using the TV features Understanding the TV features Multimedia - TV receiver, HDTV monitor and PC display, all in one. Wider viewing angle, 16:9 display - over 160 viewing angle, 16:9 ergonomical display panel Digital display device - truthfully reproducing the images, without distortion or blurring, irrespective of magnetic or geomagnetic effect. Auto tuning function with 200 channels storage Sleep/wake timer TELETEXT NICAM Dual SCART interface Multi-language OSD Basic Operations Power ON/OFF 1.
Using the TV features Select channels by numbers 1. To select a one-digit channel : Press the 1-9 button to select channel directly. 2. To select a two-digit channel : Press a button from 0-9 to select the first number, then press a button from 0-9 again to select the second number. For example, to select channel 28, press the 2 button first , 2-- will appear on the screen, and then press the 8 button, 28- will appear on the screen for 1 second. 3.
Using the TV features Using the CHANNEL Menu PROGRAM CHANNEL 1) Press the [Menu] button to enter the main Menu. 2) Press the [CH+/CH-] button to select the item CHANNEL, and press the [ Vol+ ] to enter CHANNEL Menu. 3) Press the [CH+/CH-] button to select PROGRAM. 4) Press the [ Vol+/Vol- ] button to select the present channel. PROGRAM TV SYSTEM B/G AUTO SEARCH SEARCH FINE TUNE SKIP OFF CHANNEL EDIT Select TV SYSTEM Set Previous 1) Press the [Menu] button to enter the main Menu.
Using the TV features CHANNEL EDIT 1) Press the [Menu] button to enter the main Menu. 2) Press the [CH+/CH-] button to select the item CHANNEL, and press the [ Vol+ ] to enter CHANNEL Menu. 3) Press the [CH+/CH-] button to select CHANNEL EDIT. 4) Press the [ Vol+] to enter CHANNEL EDIT Menu. 5) Set Program1 and Program2. 6) Press the [CH+/CH-] button to select EXCHANGE, and press the [ Vol+/Vol- ] to exchange Program1 and Program2.
Using the TV features Using the CLOCKSETUP Menu CLOCKSETUP Set sleep/wake timer 1) Press the [Menu] button to enter the main Menu. 2) Press the [CH+/CH-] button to select the item CLOCKSETUP, and press the [ Vol+ ] button to enter CLOCKSETUP Menu. 3) Press the [CH+/CH-] button to select the item you want to set. 4) Press the [ Vol+/Vol- ] button to set timer. NOTE: Only when you turn the timer on will the timer behind be valid.
Using the TV features C.C.B (change channel blackscreen) 1) Press the Menu button to enter the main Menu. 2) Press the [CH+/CH-] button to select the item FUNCTION, and press the [ Vol+ ] button to enter FUNCTION Menu. 3) Press the [CH+/CH-] button to select the item C.C.B. 4) Press the [ Vol+/Vol- ] button to switch between on and off. NOTE: When you enable C.C.B, the screen will keep black at the interval of changing channels. Otherwise, the screen will freeze at the interval.
Using the TV features HOLD Some TELETEXT information is contained on more than one page, the pages automatically changing after a given reading time. Press [S-VIDEO] button to stop the page changing. Press [S-VIDEO] button again to allow the page to change. REVEAL Some TELETEXT pages contain quiz or game questions with hidden answers. Press the [ / ] button to see the answers. Press the [ / ] button again to hide the answers.
Specifications RF system: Colour system: Channel coverage: , B/G, D/K, I, L/L PAL, SECAM, NTSC(only for AV) VHF Low channel (VL)= 48.25 to 160.00 MHz VHF high channel (VH)= 160.00 to 442.00 MHz UHF channel( U)= 442.00 to 863.
Appendix Scart connector See Signal Source Selection on page 8 for selecting SCART input.
Appendix -17-
Appendix Troubleshooting Before calling a service technician, please check the following table for a possible cause of the problem and some solutions. Symptoms Possible Solutions TV will not turn on Make sure the power cord is correctly plugged in, then press [Power]. The remote control batteries may be dead. Replace the batteries. No picture, no sound Check if the TV is turned off or turned into stand-by mode. Check the Antenna/Cable connections.
Appendix Desktop Quick Installation Guide: 1. If the TV is to be desktop mounted, a. Fasten two aluminum brackets to the plastic mounting base using six ST4*16C bolts as shown in fig.2. b. Insert the brackets into the aluminum holder at bottom of the TV. c. Place the TV upright, and then fasten the TV to the stand from backside using two M4*35 bolts. 2. If you want to fit the loudspeakers together with the TV, Fasten the aluminum connectors (already assembled on the speakers) to the TV as shown in fig.
Appendix PDP Wall-mounting Bracket Installation Guide Read carefully before installation! The installation guide should be retained for future reference. Caution: 1. To avoid mistakes or hazards, do NOT attempt to install the TV by yourself. Refer all installation to qualified servicing personnel. 2. Do NOT install the TV on a sloping wall that makes the TV screen slant over 25 degrees from the vertical or it may tumble or cause injury. 3.
Appendix -21-