PDP COLOUR TV USER'S MANUAL PDP4220EU Part No: IES050723
The presence of certain substances can have harmful effects on the environment. This apparatus profits from a specific treatment of recycling for the re-use of the matters which make it up. This apparatus must be thrown only to the places envisaged. Inform near your authority to know the places of electronic collection of waste. Your sale point must collect this apparatus against the purchase of a new one for its recycling.
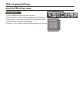
OSD Language Settings Using the OSD settings menu OSD language 1) Press the MENU button to enter the main menu. 2) Press the [VOL+ or VOL-] button to select the item OSD settings. CHANGE 3) Press the [CH+PASSWORD or CH-] button to select OSD language,and press the [VOL+]button to enter the OSD language 4) Press the [ VOL+] button to select the language what you want use.
The lightning flash with arrowhead symbol, within an equilateral triangle is intended to alert the user to the presence of uninsulated dangerous voltage within the product ' s enclosure that may be of sufficient magnitude to constitute a risk of electric shock. CAUTION CAUTION: TO REDUCE THE RISK OF ELECTRIC SHOCK, DO NOT REMOVE COVER(OR BACK).NO USERSERVICEABLE PARTS INSIDE. REFER SERVICING TO QUALIFIED SERVICE PERSONNEL.
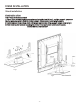
STAND IN STALLATION WARNING: TO PREVENT FIRE OR SHOCK HAZARD, DO NOT EXPOSE THIS APPLIANCE TO RAIN OR MOISTURE. Stand installation STAND INSTALLATION If the TV is to be desktop mounted 1.You will Take out stand from accessory box and put aside level flat roof , and then support groupware like fig.1 using six screw A (M5X12) stand groupware. Please ensure screw to be fix closely. 2.You will take out TV set and put aside soft flat roof,and then take off two screw B on back cover as fig.2. 3.
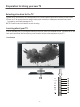
Preparation for Using your new TV Selecting a location for the TV 1)Place the TV on the floor or on a sturdy platform in a location where light does not directly hit the screen. 2)Place the TV far enough from the walls to allow proper ventilation. Inadequate ventilation may cause overheating, which may damage the TV. NOTE: Please contact local dealer for wall mounting. Learning about your TV You can operate your TV by using the buttons on the front panel or the remote control.
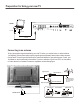
Preparation for Using your new TV 28 11 12 13 14 15 16 17 18 19 20 21 22 23 24 25 26 27 AUDIO 3 AUDIO 2 AUDIO 1 SCAR T1 CVBS/RGB ANT 75 SCAR T2 CVBS/YC PIP AUDIO PC AUDIO OUT IN AUDIO OUT VIDEO OUT AUDIO IN L R L R L R L R VIDEO IN S - VIDEO Remote Sensing Window Power indicator Menu button Source Volume up / cursor right Scart1 connector Volume down / cursor left Channel up / cursor up Channel down / cursor down S-VIDEO AUDIO INPUT Power button (standby) Power Switch (O
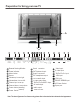
Preparation for Using your new TV Connecting your TV Caution: Do not plug the TV in until you have finished connecting all of your equipment. Connecting to A/V equipments To enjoy its multimedia features, you can connect your TV to A/V equipments such as VCR, DVD, STB, Satellite receiver, Camcorder, Audio amplifier etc., and select signal sources using your remote control. Connect the devices as shown below.
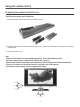
Preparation for Using your new TV RGB line PC/NB AUDIO 3 AUDIO 2 AUDIO 1 PC AUDIO IN To speaker AUDIO OUT VIDEO OUT AUDIO IN L R L R L R L R VIDEO IN S - VIDEO B R B R C To VGA Audio line Connecting to an antenna To enjoy the terrestrial signal transmitted by your local TV station, you need an indoor or outdoor antenna (not supplied). Perfect picture quality requires a good signal and generally means that an outdoor antenna must be used.
Using the remote control Preparing the remote control for use Installing the remote control batteries 1. Open the battery cover on the back of the remote control. 2. Install two AAA size(1.5V) batteries. Match the + and - signs on the batteries to the signs on the battery compartment. 3. Close the battery cover. Note: 1.Dispose of your batteries in a designated disposal area. Do not throw batteries into fire. 2.Do not mix battery types or combine used batteries with new ones. 3.
Using the remote control Learning about the remote control Power:Power on/off Channel number: Direct channel selection Teletext select Recall :Return to previous channel Display:Display current input P.Mode:Select picture mode Text Teletext CH+:Channel up VOL-:Volume down VOL+:Volume up CH-:Channel down Menu:Call up the main menu S.Mode:Select sound mode Still:Snapshooting Zoom:Ajust zoom ration Mute:Mute the sound S-VIDEO:Switch to S-VIDEO source : Sub.
Using the TV features Understanding the TV features Multimedia - TV receiver, Video monitor and PC display, all in one. Wider viewing angle, 16:9 display - 160¡ã viewing angle at typical value Digital display device - truthfully reproducing the images, without distortion or blurring, irrespective of magnetic or geomagnetic effect.
Using the TV features Select channels by [CH+/CH-] You can also use[CH+ / CH-] to select channels. [CH+] indicates channel number increase; [CH-] indicates channel number decrease. Select channels by numbers To select a channel : Press the channel numbers in series to select channel directly.
Using the TV features Using the TV settings menu Program 1) Press the [MENU] button to enter the main menu. 2) Press the [VOL+ or VOL-] button to select the item TV settings. 3) Press the [CH+ or CH-] button to select Program. 4) Press the [VOL+ or VOL-] button to select the present channel. Sound system Tv settings Program Sound system Auto search Manual search Fine tune You can set sound syetem. Skip 1) Press the [MENU] button to enter the main menu.
Using the TV features Program edit 1) Press the MENU button to enter the main menu. 2) Press the [VOL+ or VOL-] button to select the item TV settings. 3) Press the [CH+ or CH-] button to select program edit. 4) Press the [ VOL+] button to start program edit. 5)Program edit can carry out program1 and program2 to be interchanged by the button [SWAP],or copy program1 to program2 by the button [COPY].
Using the TV features Using the OSD settings menu OSD position OSD settings 1) Press the [MENU] button to enter the main menu. 2) Press the [VOL+ or VOL-] button to select the item OSD settings. 3) Press the [CH+ or CH-] button to select OSD position 4) Press the [VOL+ or VOL- ] button to adjust the OSD POSITION OSD position OSD timeout OSD language OSD lock OSD timeout Transparency 1) Press the [MENU] button to enter the main menu. 2) Press the [VOL+ or VOL-] button to select the item OSD settings.
Using the TV features Using the General settings menu Colour system You can set colour syetem. 1) Press the [MENU] button to enter the main menu. 2) Press the [VOL+ or VOL-] button to select the item General settings 3) Press the [CH+ or CH-] button to select colour system and press the [VOL+] button to enter colour system 4) Press the [VOL+ ] button to switch among Auto, Pal ,Secam.
Using the TV features Using the PC menu PC Parameters 1) Press the MENU button to enter the main menu. 2) Press the [VOL+ or VOL-] button to select the item PC Parameters. 3) Press the [CH+ or CH-] button to select the item you want to adjust. Auto LANGUAGE ENGLISH Clock NOTE: 1)The menu is useful only on VGA/DVI and HDTV mode. Phase It is useless in others mode. 2) The button [AUTO] is used to adjust position of picture Position automatic and it is effective only onVGA mode.
Using the TV features Teletext Operations Sub code Some Teletext pages contain sub page that require you to input the sub code. Press [ Zoom ] button until ***|**** is displayed, and enter last four-digit sub code for the sub page you need. Mix You can mix Teletext with TV pictures, which means transparent teletext. Press [ Swap ] to mix, and press [ Swap ] again to cancel the mixed effect. Size (top/bottom/full) Press the [ PC ] button to display the TOP HALF of the page.
Appendix The SCART interface Also known as Peritel, this standard provides a cheap multi-signal connector to domestic TV and other video equipment. Arrangement 1 is the original and allows for composite video input/output, RGB inputs and stereo audio input/output. Arrangement 2 allows for composite video input/output,and stereo audio input/output. Cation:The output of video and audio are always from turner of R F. Arrangement 3 allows for composite video input, S-Video inputs,and stereo audio input/output.
Appendix SCART arrangement 2 Pin Signal Signal level Impedance 1 Audio output B (right) 0.5V rms <1kohm 2 Audio input B (right) 0.5V rms >10kohm 3 Audio output A (left) 0.5V rms <1kohm 4 Ground (audio) - - 5 Ground - - 6 Audio input A (left) 0.
Appendix Troubleshooting Before calling a service technician, please check the following table for a possible cause of the problem and some solutions. Symptoms Possible Solutions TV will not turn on Make sure the power cord is plugged in, then press [Power]. The remote control batteries may be dead. Replace the batteries. No picture, no sound Check if you have set the off timer. Check the antenna/cable connections. Press [Display] to see if you have select the right signal source.
Specifications PDP4220EU LCD panel 42 inch PDP Television system Multi- system(PAL,SECAM) Channel coverage VHF-L: E2-S8 VHF-H: S9-S37 UHF: S38-E69 Analog RGB mode 640X480/60Hz,800X600/60Hz,1024X768/60Hz,1280X1024/60Hz Resolution 480I/60Hz,480P/60Hz,576P/50Hz,720P/50Hz,720P/60Hz, 1080I/50Hz,1080I/60Hz 852X480 Contrast 10000:1 Brightness 1500cd/m 2 Viewing angle 160 o(H)/160 o(V) Power source AC100V--240V, 50/60Hz Power consumption 280W Audio output 7W+7W 5W+5W Y P B/C B P R/C R mode RF
Appendix PDP Wall-mounting Bracket Installation Guide READ CAREFULLY BEFORE INSTALLATION! THE INSTALLATION GUIDE SHOULD BE RETAINED FOR FUTURE REFERENCE. Caution: 1. Do NOT attempt to install the TV by yourself to avoid mistakes or hazard. Refer all installation to qualified servicing personnel. 2. Do NOT install the TV on a wall aslope or a wall that makes the TV screen sloping over 25o off plumb line. Otherwise, it may cause tumble or injury. 3. Refer all installation to qualified servicing personnel. 4.
Appendix -22-