Hisense USE AND INSTALLATION INSTRUCTIONS INSTRUCCIONES DE USO E INSTALACION Model/Modelo: AP1019CW1G AP1219CR1W AP1419CR1G AP1419CW1G AP1319HR1G 。 For questions about features, operation/pert rmance, parts or service, call: 1-877-465-3566 .// Para preguntas sobre las caracter f sticas, func1 6 n/rendimiento, piezas o servicio llame al: 1-877-465-3566
TABLE OF CONTENTS IDENTIFICATION OF PARTS 2 AIR CONDITIONER SAFETY 4 INSTALLATION REQUIREMENTS 4 4 5 5 Tools and Parts Electrical Requirements Location Requirements INSTALLATION INSTRUCTIONS Unpack the Air Conditioner Window Vent Panel And Extensions Install The Portable Air Conditioner Installation In Vertical Sliding Windows Installation In Horizontal Sliding Windows PORTABLE AIR CONDITIONER USE Starting Your Portable Air Conditioner Using the Remote Control Normal Sounds PORTABLE AIR CONDITIONER
1 11 2 /Display 3 4 10 9 5 8 12 7 6 The figures in this manual are based on the external view of a standard model. They may differ from that of the air conditioner you have selected.
(AP14 Models) 1 11 2 /Display 3 4 10 9 5 8 12 7 6 The figures in this manual are based on the external view of a standard model. They may differ from that of the air conditioner you have selected.
Your safety and the safety of others is very important. We have provided many important safety messages in this manual and on your appliance. Always read and obey all safety messages. This is the safety alert symbol. This symbol alerts you to potential hazards that can kill or hurt you and others. All safety messages will follow the safety alert symbol and either the word "DANGER" or "WARNING". These words mean: A hazard that if not avoided will result in death or serious injury.
Electrical Requirements Wiring requirement WARNING 115 V (103.5 min. to 126.5 max.) 15 A time-delay fuse or circuit breaker Power Supply Cord A Electrical Shock Hazard B Plug into a grounded 3 prong outlet. Do not remove ground prong. RESET TEST Do not use an adapter. Do not use an extension cord. Failure to follow these instructions can result in death, fire, or electrical shock. A. Test button B. Reset button NOTE: Your air conditioner’s device may differ from the one shown.
WARNING The length of the exhaust hose is specially designed according to the specification of the product. Do not replace, or extend , or otherwise modify the hose. Horizontal Sliding Window Vertical Sliding Window NOTE: ■ For best performance, allow at least 20 in of air space on all sides of the unit for good air circulation. ■ Do not block the air outlet. ■ Provide easy access to the grounded 3 prong outlet.
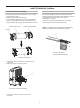
Window Vent Panel And Extensions The window installation kit allows you to install the air conditioner in most vertical-sliding windows 18'' to 50'' wide, or horizontal sliding windows from 18'' to 50'' high. Panel Length H I J K Panel I ( 9 1116") 18" 91116" 18" 18" 1.Please check your window size and choose the fit from the above table. 2.If your window size requires more than 2 panels, after adjusting the length, please secure the panels with rivets, E.
Install The Portable Air Conditioner Window Installation Install Exhaust Hose and Adapter 1. Roll the air conditioner to selected location. see “Location Requirements” in page 4. Your window installation kit has been designed to fit most standard vertical and horizontal window applications. Roll the air conditioner to selected location. see “Location Requirements” in page 4. 2.
Installation In Vertical Sliding Windows NOTE:The window installation kit can be used with vertical sliding windows between 18'' and 50'' wide. Foam seal M (Adhesive type-shorter) Foam seal L (Adhesive type) Cut the foam seal L(adhesive type) & M (adhesive type-shorter)to the proper length,and attcah it to the window sash and frame. Insert the vent panel assembly, including extension panels, if needed, into the window opening. Extend the extension panels to the window width.
Slot Screw Insert Insert the screw in the hole in the window exhaust adapter to prevent the window exhaust adapter from sliding out of the vent opening. Align the tabs on the window exhaust adapter with the slots in the vent panel. Insert the window exhaust adapter into the opening in the vent panel. Installation In Horizontal Sliding Windows NOTE: The window installation kit can be used with horizontal sliding windows between 18'' and 50'' wide.
5 Insert the window exhaust adapter into the opening in the vent panel. Slot Screw Insert Insert the screw in the hole in the window exhaust adapter to prevent the window exhaust adapter from sliding out of the vent opening. Align the tabs on the window exhaust adapter with the slots in the vent panel. Insert the window exhaust adapter into the opening in the vent panel. PORTABLE AIR CONDITIONER USE Operating your portable air conditioner properly helps you to obtain the best possible results.
WiFi Power On or Off speeds Heating is NOT available for cooling only models. WIFI control is available for connected models with this logo on control panel.
Temperature Change display between °F and °C To change the temperature display between °F and °C press both the Plus and Minus Adjust buttons at the same time. ION (Optional) ■ ■ ■ NOTE: In the Cooling mode, the temperature can be set between 61°F and 86°F (16°C and 30°C). In Fan Only mode, the temperature can not be set. The unit LED shows the target temperature for 5 seconds and then displays the room temperature. Insert the Batteries 1. Remove the battery cover along the arrowed direction. 2.
Remote control NOTE: Remote control may differ in appearance. 1 5 2 6 3 7 4 8 Button and Function FAN SWING Indication symbols ON/OFF UP MODE DOWN DIMMER or Sleep FAN SWING TIMER Timer On/Off NOTE: Press and hold the MODE button on the remote for 5 seconds to switch the temperature display from degrees Fahrenheit(°F) to degrees Celsius(°C).
DIMMER Setting the Air Conditioner to Turn On: 1.Plug in the air conditioner and use the remote to power it ON. 2.Use the remote to set the desired mode, temperature, fan speed, etc. 3.Use the remote to power OFF the air conditioner. 4.Press TIMER on the remote and use the UP, DOWN buttons to set the desired delay time until the air conditioner turns ON. The delay time can be set from 0 to 24 hours in one-hour increments. 5.Press TIMER again to confirm the delay time. The TIMER light on the unit will be on.
WARNING: Please connect the drain hose on heating mode, or the unit will stop running after the water the water reaches warning level. Draining the Air Conditioner(non-Heating models) 1. Uncover the primary drain port. 2. Attach the drain hose to the primary drain hose. Make sure the connector has no water leak. 3. Place the other end of drain hose into a outfall. Check to see that the hose lies flat and is in the drain.
4. Remove the flexible exhaust hose and store with the air conditioner in a clean, dry area. See " installation Instructions ". 5. Remove the window kit and store with the air conditioner in a clean, dry area. See " Installation Instructions ". 6. Remove the filter and clean. See Cleaning the Air Filter. 7. Clean the outside of the air conditioner. See "Cleaning the Outside ". 8. Reinstall the filter. Before using the air conditioner again: 1. Make sure the filter and drain cap are in place. 2.
■ If the unit displays error code E5, the water container is full. Drain the water, see "Draining the air conditioner". After draining, the unit can be operated again. ■ If the unit display error code E1/E2/E3/E4/E6/E7/E9/EA please contact customer service.
TABLA DE CONTENIDOS IDENTIFIC I I ACIÓN DE LAS PARTES 20 SEGURIDAD DEL AIRE ACONDICIONADO 22 REQUISITOS P PARA LA INSTALACIÓN L I 22 Herramientas y piezas Requisitos q isit s el eléctricos c ri o Requisitos eq isit s para p ra la l ubicación ubi aci 22 23 23 INSTRUCCIONES PARA LA INSTALACIÓN Dese es mpaqu q e el aire acond n icionado Panel de ventilación de la ventana y extensiones Instalació i n del aire acondiciona n do portátil ti Instalac a ión en ventanas s ccorredizas rr diz s vverticale l s
IDENTIFICACIÓN DE LAS PARTES Frente 1 11 2 Panel de control/Pantalla Salida del aire frío 3 Receptor de señal Mando a distancia Acople de manguera de salida de aire 4 Cable de alimentación Puerto de desagüe principal Entrada de aire del condensador Puerto de desagüe secundario Atrás Entrada de aire del evaporador 10 9 Asa de transporte Pinza de la manguera de desagüe (modelos de bomba de calor) Manguera de desagüe (modelos de bomba de calor) 5 8 12 7 13 6 Las imágenes en este manual están basa
IDENTIFICACIÓN DE LAS PARTES (AP 14 Modelos) Frente 1 11 2 Panel de control/Pantalla Salida del aire frío 3 Receptor de señal Mando a distancia Acople de manguera de salida de aire 4 Cable de alimentación Puerto de desagüe principal Entrada de aire del condensador Puerto de desagüe secundario Atrás Entrada de aire del evaporador 10 9 Asa de transporte Pinza de la manguera de desagüe (modelos de bomba de calor) Manguera de desagüe (modelos de bomba de calor) 5 8 12 7 6 Las imágenes en este man
SEGURIDAD DEL AIRE ACONDICIONADO Su seguridad y la seguridad de otros son muy importantes. Hemos proporcionado mensajes de seguridad importantes en este manual y en el electrodoméstico. Lea y siga siempre todos los mensajes de seguridad. Este es el símbolo de alerta de seguridad. Este símbolo lo alerta sobre un peligro potencial que puede matarlo o herirlo a usted y a otros. Todos los mensajes de seguridad estarán seguidos con el símbolo de alerta y la palabra "PELIGRO" o "ADVERTENCIA".
Requisitos eléctricos ADVERTENCIA Requisitos para el cableado 115 V (103.5 mín. a 126.5 máx.) Fusible de acción retardada de 15 A o disyuntor Cable de alimentación Peligro de descarga eléctrica A Conéctelo a un tomacorriente de 3 patas con conexión a tierra. B No utilice un cable de extensión. El incumplimiento de estas instrucciones puede resultar en la muerte, incendios o descargas eléctricas. Método de conexión a tierra recomendado Este aire acondicionado portátil debe estar conectado a tierra.
ADVERTENCIA La longitud de la manguera de escape está diseñada especialmente según la especificación del producto. No la reemplace ni extienda con una manguera particular ya que puede causar mal funcionamiento. Instalación en ventana corrediza vertical Instalación en ventana corrediza horizontal NOTAS: ■ Para un mejor rendimiento, deje al menos un espacio de 20 pulgadas en los laterales de la unidad para que el aire circule bien. ■ No bloquee la salida del aire.
Panel de ventilación de la ventana y extensiones El kit de instalación de la ventana le permite instalar el aire acondicionado en ventanas verticales de 18" a 50" de ancho o para ventanas horizontales de 18" a 50" de altura. Longitud del panel Longitud de la ventana H I J K 18" 91116" 18" 18" Ima gen Panel I (9 11/16) 1. Compruebe el tamaño de la ventana y escoja el ajuste de la tabla de arriba. 2.
Instalación del aire acondicionado portátil Instalación de la manguera de escape y del adaptador 1. Mueva el aire acondicionado a la ubicación seleccionada. Vea "Requisitos para la ubicación". 2.
Instalación en ventanas corredizas verticales NOTA: El kit de instalación de la ventana puede ser utilizado para ventanas deslizantes verticales entre 18" y 50" de ancho. Espuma aislante M (Adhesivo corto) Panel de Panel de extensión ventilación (si se requiere) Espuma aislante L (Adhesivo) Corte la espuma aislante L (adhesivo) y M (adhesivo corto) a la longitud correcta y añádala al marco y guillotina de la ventana.
Ranura Tornillo Insertar Alinee las solapas en el difusor con las ranuras en el panel de ventilación. Inserte el difusor en la abertura del panel de ventilación. Inserte el tornillo en el orificio del difusor para evitar que el difusor se deslice fuera de la abertura de ventilación. Instalación en ventanas corredizas horizontales NOTA: El kit de instalación de la ventana puede ser utilizado para ventanas deslizantes horizontales entre 18" y 50" de ancho.
5 Inserte el difusor en la abertura del panel de ventilación y deslícelo para fijarlo en el lugar. Ranura Tornillo Insertar Alinee las solapas en el difusor con las ranuras en el panel de ventilación. Inserte el difusor en la abertura del panel de ventilación. Inserte el tornillo en el orificio del difusor para evitar que el difusor se deslice fuera de la abertura de ventilación.
Inicio del aire acondicionado portátil Panel de control Wi Fi NOTA: los símbolos pueden ser diferentes de estos modelos pero las funciones son similares. NOTA: El modo Dry no debería utilizarse para enfriar la habitación. Encendido o Apagado Seco Modo Fan Only (sólo ventilador) Presione FAN para seleccionar alta, media o baja. Ventilador NOTA: Manténgalo de forma vertical por al menos 2 horas antes de utilizarlo para evitar que el compresor se dañe. Heat: calienta la habitación.
Cambie la pantalla entre ºF y ºC Temperatura Presione el botón MÁS para aumentar la temperatura. Presione el botón MÁS una vez para aumentar la temperatura de a 1ºF (1 ºC ). Para cambiar la temperatura que se muestra entre ºF y ºC, presione los botones MÁS y MENOS al mismo tiempo. Presione el botón MENOS para disminuir la temperatura. Presione el botón MENOS una vez para disminuir la temperatura de a 1ºF (1 ºC ). ION (Opcional) Presione el botón ION para iniciar o detener el generador de plasma.
Control remoto NOTA: El control remoto puede diferir en la apariencia. 1 5 2 6 3 7 4 8 Botón y función Símbolos indicativos Símbolos indicativos en el LCD: ºF/ºC [5 seg.] ARRIBA ENCENDIDO/ APAGADO MODO MODO DOWN Sleep [5 seg.
Configuración del aire acondicionado para encenderlo: 1.Conecte el aire acondicionado y utilice el control remoto para ENCENDERLO. 2.Utilice el control remoto para establecer el modo, la temperatura, velocidad del ventilador, etc. 3.Utilice el control remoto para APAGAR el aire acondicionado. DIMMER [Atenuador] Presione el botón DIMMER para apagar la pantalla del panel de control. Sleep [5 seg.] 4.
&8,'$'2 '(/ $,5( $&21',&,21$'2 3257È7,/ Drenaje del aire acondicionado (para modelos sin calefacción) ADVERTENCIA: Conecte la manguera de drenaje en el modo Heating, o la unidad dejará de funcionar después de que el agua alcance el nivel de advertencia. 1. Destape el puerto de drenaje principal. 2. Añada la manguera al puerto de drenaje principal. Asegúrese de que el conector no tenga fugas de agua. 3. Coloque el otro extremo de la manguera en la desembocadura.
7. Limpie el exterior del aire acondicionado. Refiérase a "Limpieza del exterior". 8. Vuelva a colocar el filtro. 1. Drene completamente el agua. Refiérase a "Desagüe del aire acondicionado". 2. Haga funcionar el aire acondicionado en el modo Fan Only durante 12 horas para secar el aire acondicionado. 3. Desconecte el aire acondicionado. 9. Quite las pilas y guarde el control remoto junto con el aire acondicionado en un área limpia y seca. Antes de volver a utilizar el aire acondicionado: 1.
■ ■ Si la unidad muestra el código de error E5, el contenedor de agua está lleno. Drene el agua, refiérase a "Desagüe del aire acondicionado". Luego, la unidad puede funcionar nuevamente. Si la unidad muestra el código de error E1/E2/E3/E4/E6/E7/EA Contacte al servicio al cliente. El aire acondicionado funciona pero no enfría. ■ ■ ■ El filtro está sucio u obstruido por restos. Limpia el filtro La salida del aire está bloqueada. Limpie la salida del aire. La temperatura establecida está muy alta.