2.1 AX2107G USER MANUAL Before using the sound bar, please read this manual thoroughly and retain it for future reference.
Contents Important Safety Instructions 3 Basic Operation 13 Safety 3 Standby/ON Warning 4 Select Modes 13 Adjust the Bass/Treble Level 13 Turn the Surround Sound ON/OFF 14 FCC Information What’s in the Box 5 13 Adjust the Volume 14 7 Adjust the Brightness 14 8 Set the Audio Delay 14 14 Identifying the Parts Main Unit 8 Wireless Subwoofer 8 Remote Control 9 Preparations Prepare the Remote Control Replace the Remote Control Battery Bluetooth Operation 10 14 9 Pair Bluetoo
Important Safety Instructions third prong is provided for your safety. If the C AUTION RISK OF ELECTRIC SHOCK DO NOT OPEN consult an electrician for replacement of the obsolete outlet. 10 Protect the power cord from being walked on or pinched particularly at plugs, convenience receptacles, and the point where they exit from the apparatus. AVI S RISQUE DE CHOC ÉLECTRIQUE NE PAS PUVRIR 11 the manufacturer.
Caution: - Use of controls or adjustments or performance of procedures other than those described herein, may result in hazardous radiation exposure or other unsafe operation. not expose this apparatus to rain or moisture. The apparatus must not be exposed to - - Battery usage CAUTION To prevent battery leakage which may result in bodily injury, property damage, or damage to the apparatus: - Install all batteries correctly, + and - as marked on the apparatus. - Do not mix old and new batteries.
Caution: FCC Radiation Exposure Statement This equipment complies with FCC radiation exposure limits set forth for an uncontrolled environment. This equipment should be installed and operated with a minimum distance of 20cm between the radiator and any part of your body, This transmitter must not be co-located or operating in conjunction with any other antenna or transmitter.
Supported input audio formats The audio formats supported by this system are as follows. Format Function HDMI TV ARC TV OPT TV COA LPCM 2ch ĵ ĵ ĵ ĵ LPCM 5.1ch 9 9 9 9 LPCM 7.1ch 9 9 9 9 Dolby Digital ĵ ĵ ĵ ĵ Dolby TrueHD ĵ ĵ 9 9 Dolby Digital Plus ĵ ĵ 9 9 Dolby Atmos - Dolby TrueHD ĵ ĵ 9 9 Dolby Atmos - Dolby Digital Plus ĵ ĵ 9 9 ĵ: Supported formats. 9 : Unsupported format.
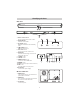
What’s in the Box Main Unit AC Power Cord x2 Remote Control / AAA Batteries x 2 HDMI Cable t 7 Wireless Subwoofer Quick Start Guide
Identifying the Parts Main Unit 1 Remote Control Sensor Receive signal from the remote control. 2 Display Window Show the current status. (ON/OFF) button 3 Switch the unit between ON and Standby mode. 4 (SOURCE) button Select the play function. 5 VOL+/VOL- buttons Increase/decrease the volume level. 6 Wall Mount Install the wall mounting screws into the wall mount of the unit. 7 COAXIAL Socket 8 OPTICAL Socket 9 HDMI OUT (ARC) Socket Connect to a TV via HDMI cable.
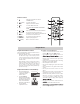
Remote Control 1 2 (SOURCE) 3 SURR 4 (BT) 6 12 Select the Bluetooth mode. Select MUSIC/MOVIE/NEWS/SPORT/NIGHT/ GAME 5 EQ 7 8 9 10 11 Switch the unit between ON and STANDBY mode. Select the play mode. Adjust the surround ON/OFF. / VOL+/VOLBASS+/TREBLE+/DIMMER+/(MUTE) Skip to previous/next track in BT/USB mode. Increase/decrease the volume level. Play/pause/resume playback in BT/USB mode. Increase/decrease the bass level. Increase/decrease the treble level. Adjust display brightness.
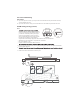
Placement and Mounting Placement A If your TV is placed on a table, you can place the unit on the table directly in front of the TV stand, centered with the TV screen. B If your TV is attached to a wall, you can mount the unit on the wall directly below the TV screen. Wall Mounting (if using option-B) Note: personnel only.
Connections Dolby Atmos® Method 1: ARC (Audio Return Channel) Dolby Atmos gives you amazing experience you have never before by overhead sound, and all the richness, clarity, and power of Dolby sound. The ARC (Audio Return Channel) function allows you to send audio from your ARC- compliant TV to your soundbar through a single HDMI connection. To enjoy the ARC function, please ensure your TV is both HDMI-CEC and ARC compliant and set up accordingly.
Connect Power Use the OPTICAL Socket - Remove the protective cap of the OPTICAL socket, then connect an OPTICAL cable (not included) to the TV’s OPTICAL OUT socket and the OPTICAL socket on the unit. Risk of product damage! - - Ensure that the power supply voltage corresponds to the voltage printed on the back or the underside of the unit. Before connecting the AC power cord, ensure you have completed all other connections.
Pair up With The Subwoofer Basic Operation Automatic pairing Plug the soundbar and the subwoofer into the mains sockets and then press on the unit or remote control to switch the unit to ON mode. The subwoofer and soundbar will automatically pair. t When the subwoofer is pairing with the main t When the subwoofer is paired with the main unit, the Pair Indicator will light up. Standby/ON socket, the main unit will be in Standby mode.
Turn the Surround Sound ON/OFF OPTICAL / COAXIAL /HDMI ARC Operation t Press the SURR button on the remote control to turn on the surround sound. Press this 1 Ensure that the unit is connected to the TV or audio device. Adjust the Volume 2 Press the button repeatedly on the unit or the SOURCE button on the remote control to select the OPTICAL,COAXIAL,ARC, HDMI IN mode. t Press the VOL+ / VOL- buttons on the unit or on the remote control to adjust the volume. t (MUTE) button on the remote control.
t If you want to reconnect your device to this player, place it within the operational range. t If the device is moved beyond the operational range, when it is brought back, please check if the device is still connected to the player. - Before you connect a Bluetooth device to this unit, ensure you know the device’s capabilities. t If the connection is lost, follow the instructions above to pair your device to the player again. - Compatibility with all Bluetooth devices is not guaranteed.
Troubleshooting To keep the warranty valid, never try to repair the system yourself. If you encounter problems when using this unit, check the following points before requesting service. No power t t t Ensure that the AC cord of the apparatus is properly connected . Ensure that there is power at the AC outlet. Press standby button to turn the unit on.
Model Name AX2107G Soundbar Power Supply AC100-240V~ 50/60Hz Power Consumption 60 W Standby Power < 0.5 W USB port for playback USB Compatibility 5V 0.5A Hi-Speed USB (2.0) / FAT32 32G (max) , MP3/WAV/WMA Dimension (WxHxD) 960 x 58 x 85 mm (37.8 x 2.3 x 3.3 inch) Net weight 4.85 lbs (2.2 kg) Audio input sensitivity -12dBFS Frequency Response 120Hz - 20KHz Bluetooth Version V 5.2 Frequency bands 2402 MHz ~ 2480 MHz 2.
AX2107G