Dehumidifier Use & Care Guide Deshumidificador Guí a de instrucciones For questions about features, operation/performance, parts or service, call: 1-877-465-3566 Para preguntas sobre caracterí sticas, funcionamiento, rendimiento, piezas o servicio, llame al: 1-877-465-3566
DEHUMIDIFIER CARE.............................................................10 Cleaning the Air Filter............................................................10 Cleaning the Dehumidifier.....................................................10 TROUBLE SHOOTING..............................................................11 ASSISTANCE OR SERVICE.....................................................12 Draining the Dehumidifier.....................................................8 Normal Sounds............
State of California Proposition 65 Warnings: WARNING: This product contains one or more chemicals known to the State of California to cause cancer. WARNING: This product contains one or more chemicals known to the State of California to cause birth defects or other reproductive harm.
Copies of the standards listed may be obtained from: Nation Fire Protection Association 1 Battery march Park Quincy, MA 02169-7471
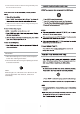
EMPTY BUCKET MANUAL SET 90% CLEAN FILTER EMPTY BUCKET MANUAL SET CLEAN FILTER EMPTY BUCKET MANUAL SET CLEAN FILTER to choose the fan speed. 4.Press Mode to choose the mode. 5.Press the The control panel of your model may differ from the one shown above.
condition occurs. Pressing the Mode button or pressing the Humidity can only be adjusted manually in Manual Set mode. Low -- Will reach the desired humidity setting slower with lower sound level. High -- Will reach the desired humidity setting faster. Auto -- Will provide the maximum humidity control by automatically adjusting the fan speed. Mode 1. Press the Mode to select the desired humidity setting. 2. NOTE: The humidity displayed is only for reference.
2. Press the Plus or Minus button to change the delay time, from 30 minutes to 24 hours. 2. 3. 3. Press the Plus or Minus button to change the delay time, s Mode or Power. from 30 minutes to 24 hours. or from C º to ºF. Clean Filter 1. When Clean Filter light is on, remove, clean and replace air filter. See "Cleaning the Air Filter". 2. Press Clean Filter after cleaning and replacing the air filter to reset the Clean Filter.
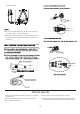
If the Empty bucket light comes on, the dehumidifier will not operate. Empty or adjust bucket. If you plan to run your dehumidifier continuously, you may want to choose direct draining by attaching a garden hose to the unit. 1. Flip up the connector cover as the picture shown below. Grasp the handle and bottom of the bucket to lift bucket. 2.Remove bucket. 3. Attach a garden hose to the drain hose connector on the inside of the dehumidifier. Hand tighten. . NOTES: The garden hose is sold seperately. A.
5.Reinstall bucket. ■ To use the bucket without the garden hose, remove the the garden hose. Then reinstall bucket. ■ The bucket must be installed and properly aligned for the the dehumidifier to operate with or without a garden hose connected. feet hose Normal Sounds When your dehumidifier is operating normally, you may hear sounds such as: ■ Compressor sounds, which may be loud, this is normal. ■ Air movement from the fan. 9 ■ Pump sounds, which may be loud. This is normal.
. see whether it needs cleaning. dehumidifier. grill. grill. grill level float. The bucket must be properly aligned for the water level float and the EMPTY BUCKET light to work. Exterior NOTE: Have an authorized service technician clean and service the interior coils of your product annually.
Does the bucket need to be emptied? Empty the bucket.
In the U.S.A. Call Customer Service toll free: 1-877-465-3566 For further assistance ■ Features and specifications on our appliances. ■ Installation information. ■ Use and maintenance procedures. If you need further assistance, you can write with any questions or concerns to: Hisense USA Corp. Customer Service 7310 McGinnis Ferry . Road Suwanee, GA 30024 ■ Repair parts sales. Please include a daytime phone number in your correspondence.
WARRANTY For one year from the date of purchase, when this product is operated and maintained according to the instructions attached to or fuinished with the product, Hisense USA Corp.(hereafter"Hisense") will repair or replace unit deemed defective in materials or workmanship at Hisense discretion based on the original receipt (or order confirmation for online customers). WHAT HISENSE USA WILL NOT COVER 1.
WARRANTY For one year from the date of purchase, when this product is operated and maintained according to the instructions attached to or fuinished with the product, Hisense USA Corp.(hereafter"Hisense") will repair or replace unit deemed defective in materials or workmanship at Hisense discretion based on the original receipt (or order confirmation for online customers). WHAT HISENSE USA WILL NOT COVER 1.
PELIGRO ADVERTENCIA Advertencias de la Proposición 65 del estado de California: ADVERTENCIA: Este producto contiene una o más sustancias químicas identificadas por el estado de California como causantes de c áncer. ADVERTENCIA: Este producto contiene una o más sustancias químicas identificadas por el estado de California ˜ en la función reproductora.
ADVERTENCIA Pueden obtenerse copias de las normas se aladas en: National Fire Protection Association 1 Battery march Park Quincy, MA 02169-7471 A. 12 A 18 ″ (30.5 A 45.
EMPTY BUCKET MANUAL SET La humedad relativa señalada esta entre 30% y 90%. La humedad relativa puede ajustarse entre 30% y 80% . CLEAN FILTER ADVERTENCIA EMPTY BUCKET MANUAL SET CLEAN FILTER EMPTY BUCKET MANUAL SET 1. Conéctelo a una salida a tierra de tres postes. 2. Oprima POWER para encender al deshumidificador. 3. Oprima FAN para seleccionar la velocidad del ventilador CLEAN FILTER 4. Presiones MODE para seleccionar el modo. 5. Oprima el botón +/- para seleccionar el nivel de humedad. 6.
1. Oprime FAN para seleccionar la velocidad. 2. Seleccione Bajo, Alto o Automático. se manualmente en el modo Manual Set. En los m MODO 1.Presione MODE para seleccionar la configuración de la humedad deseada. 2.Seleccione las configuraciones: Auto Dry (Autosecado), Continuous (Continuo) o Manual Set (Manual). Auto: El deshumidificador funciona solamente en éste modo. Auto Fan Speed se ajusta. automáticamente. La humedad deseada está ajustada en 50%. NOTA: La humedad mostrada es únicamente un ejemplo..
de calefacción presione MODE or POWER. Para ver el tiempo remanente. Para cambi iar entre y : Presione al mismo tiempo los botones de Má s y Menos para cambi ar de grados F ahrentheit a grados Centígrados. Limpie del Filtro 1.Cuando la luz del Limpie del Filtro está encendida remueva, limpie y cambie dl filtro de aire. Vea "Limpieza del Filtro de Aire". 2.Presione CLEAN FILTER después delimpiar y reemplazar dl filtro de aire. Esto restablece el monitor.
ADVERTENCIA IMPORTANTE: Si la luz E mpty buck et se enciende, el deshumidificador no funcionará. Vacíe el agua y reacomode la cubeta. Si planea usar su deshumidificador de manera continua, puede elegir un drenaje directo y conectar una manguera a la unidad. 1. Levante la tapa del conector como el cuadro que se muestra a continuación. Tome la manija y el fondo de la cubeta para levantarla. 2. Quita el cubo. 3. Conecte una manguera de jardín al conector del deshumidificador. Apriete a mano.
5 .V uelva a instalar el cubo. NOTAS: ■ Para usar la cubeta sin la manguera, quite la manguera. Luego reinstale la cubeta. ■ La cubeta debe ser instalada correctamente para que el deshumidificador funcione con o sin la manguera conectada. L os sonidos de bombeo puede ser muy fuertes. E sto es normal. Ruido en el compresor, puede ser un ruido alto, esto es normal.
Exterior NOTAS: Solicite a un técnico de servicio autorizado q ue anualmente limpie y dé mantenimiento a los serpentines del interior de su producto.
ADVERTENCIA e perfectamente en el deshumidificador. ¿Tiene que vaciarse la cubeta? Vacíe la cubeta. ¿Está el flotador en su lugar? Remueva el depósito.
23
24
4004815-01