HM626R Tablet POS User Guide
Warning This device has been tested and found to comply with the limits for a Class B digital device, pursuant to Part 15 of the FCC Rules. These limits are designed to provide reasonable protection against harmful interference in a residential installation. This device generates, uses and can radiate radio frequency energy and, if not installed and used in accordance with the instructions, may cause harmful interference to radio communications.
Safety Precautions Do not subject the device to severe impact or drop it from heights. Do not use the device in extreme hot or cold, dusty or damp conditions. Do not expose it to direct sunlight. Avoid using the device near strong magnetic fields. Normal functioning of the product may be disturbed by ESD. If so, simply reset and restart the device following the instruction manual.
There is danger of explosion if the battery is replaced incorrectly. Replace only with the same or equivalent type. The battery (battery or batteries or battery pack) should not be exposed to excessive heat such as sunlight, fire or the like. Please follow responsible procedures for battery disposal. If the power adaptor disconnected from the device, the device will remain operable as long as the battery has sufficient charge.
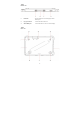
Features & Functionality Tablet Front view 1. Power indicator Indicates the battery-charge status. 2. Front camera Capture a front view picture or record videos. 3. Tounch screen Support with multi-touch .
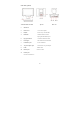
Tablet Top view 1. Combo audio jack Connect to headsets. 2. Built-in microphone Capture voice which can provide sound input to 3. Scanner 1 D barcode scanner or 2 D scanner(optional). make calls using web-based apps, audio recording. Tablet Left-side view 1. AC power apdapter jack Connects to the AC power adapter. 2. USB 2.0 port Connects to USB devices. 3. Micro USB port Connects to USB devices. 4. Nano card slot Accommodate Nano card. 5.
Tablet Bottom view 1. Dock latch Attaches the table to the dock keeping the tablet fixed in place. 2. Pogo pin connector Connects the tablet to the dock . 3. Micro HDMI port Connects the tablet to a TV or an external display .
1. Magnetic card reader Swipes Magnetic cards. 2. Non-contact card reader Contactless integrated circuit card (optional). 3. Scan button Press the button to scan. 4. Rear camera Captures pictures or videos. 5. Ports cover Built-in ports. 6. Speaker Provides audio output. 7. Lock latch Lock the tablet on the smart dock. Notes: Stander models do not support RFID ,please refer to the actual product. Charging Dock (Standard) Attach the tablet to the dock Top view Rear view 1.
Smart dock (optional) Attach the tablet to the dock Top view 1. Smart dock 2. Printer cover Cover when no printer. 3. Keyhole Inserts a key to lock the tablet. 4. Dock latch Attach the tablet to the dock keeping the tablet fixed in place 5. Pogo pin connector Connects the tablet to the dock. 6. Lock-tongue Lock the tablet on the Smart dock. 7. Cash Drawer port Access CashDrawer. 8. AC power adapter jack Connects to the AC power adapter. 9. COM RS232 COM. 10. Ethernet port 11.
Basic Connections Charging the tablet Notes: If using the tablet for the first time, or after a long period of idle time, charge the battery for more than half an hour before turning it on, to ensure system stability. The tablet has a built-in rechargeable battery. Charge the device when the battery level is low. 1. 2. 3. Plug the power adapter into the DC-In socket. Open the port cover on the left.
1. 2. 3. 4. Open the port cover on the left. Pick up a micro SD card. Align the micro SD card so that the pins are pointed toward the card slot. Push the micro SD card into the card slot until it locks into place. Removing a micro SD card 1. 2. 3. 4. 5. Touch the Tray button in the notification area in the lower-right corner of the screen. Touch Safely Remove Hardware . Touch Eject XXXX SD Card. A message appears confirming that the micro SD card can be safely removed.
Connecting the Base Connector 1. 2. 3. Place the base connector on an even plane like the top of a desk Connect the tablet to the base connector, aligning the Pogo pin jack and the positioning slots. To separate the tablet from the base connector, hold the base connector with one hand, then grab the top edge of the tablet and drag it apart.
Basic Operation Turning On the Tablet Note: This device has been equipped with Android 7.1 system at the factory, so user need not perform Android setup again before using for the first time. Press and hold the Power button to turn on your tablet. The lock screen appears. Now the tablet is ready for use. Turning Off the Tablet 1. 2. Press and hold the Power button for at least 4 seconds. Touch Power off/Restart to turn off/restart the tablet.
Use finger slid down the touch screen to call the wifi menu Turning On/Off Wi-Fi 1. Touch Wi-Fi on to view the available wireless networks. 2. Touch Wi-Fi off to turn off Wi-Fi connection. Connecting to a wireless network. 1. 2. Select a wireless network ,clik the network name from the list. Input the password if necessary, then touch Connect to start connecting to the Internet. Connecting to Bluetooth devices 1. 2. Turn on Bluetooth , searching for available Bluetooth devices automatically .
26
Locking the screen orientation For optimal viewing experience, the screen orientation changes automatically to portrait or landscape format depending on how you hold the tablet. You can disable automatic screen rotation and lock the screen in portrait or landscape mode. Note: Some apps may not support automatic screen rotation and are designed to work only in one orientation. 1. 2. Change the screen to the desired orientation.
Gestures Your tablet has a multi-touch display. You can touch the screen to operate the tablet. Finger Gesture Touch Tap gently on the display with your fingertip. You can do Select items on the screen, including options, entries, images, and icons. Start apps. Touch buttons on the screen. Input text using the on-screen keyboard. Touch and Hold Touch and hold your finger on the display. Display detailed information about an item. Open the context menu of an item to perform further actions. Drag 1.
Printer 1. Printer paper roll ① Thermal paper roll requirements: Thermal paper thickness: 0.055mm~0.085mm Paper roll width: 57.5±0.5mm Outer diameter of paper roll: ф50mm (maximum) Inner diameter of paper roll: ф10mm (minimum) ② Recommended thermal paper roll model: PD160R (Oji Paper) Note: Please use recommended paper rolls or paper rolls of equivalent quality.
③Precautions for daily maintenance Make sure that the power supply is turned off during routine maintenance of the printing unit; Do not touch the surface of the print head with your hands and metal objects, and do not use tweezers or other tools to scratch the print head, printing rubber roller and sensor surface; Do not use organic solvents such as gasoline and acetone; After the cleaning solution is completely evaporated, turn on the power to continue printing; The maintenance period is recommended
Maintenance Cleaning Your Tablet Caution: Before you clean your tablet, disconnect all the cables and turn off the tablet. Clean your tablet with a soft cloth dampened with water. Do not use liquid or aerosol cleaners, which may contain flammable substances. 1. Turn off your tablet. For more information on turning off your tablet, 2. Disconnect any attached devices, headphones, and speakers from the tablet and from their electrical outlets. 3.
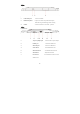
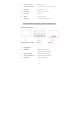
Major Specifications Note: The following specifications may contain technical inaccuracies or typographical errors. We reserve the right to improve and/ or change specifications at any time without prior notice. Item Descriptions CPU Memory Storage Camera Display Display resolution Battery pack RK3288 2GB standard , up to 4 GB 16GB standard, up to 64 GB Front camera :2.0 MP;Rear camera:5.0 MP Touch screen :Multi-touch screen Resolution :1280*800 Pixels, 10.