Hisense 。 Refrigerat rUse&Cαre Guide 。 M del: HRB171N6A*E/HRB171N6B*E 国国 For questions abou↑features, operation/performance, pa付s or seNice, call: 1-877"'165-3566
17 21 22
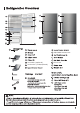
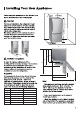
Adjustable bottom feet Ice maker ( optional ) Ice bucket ( inside/optional ) Roll wheel
69 2/8 " (17 56m m) e c d b a f g a b c d e f g model-arc model-flat 56 3/8"(1430mm) 56 2/8"(1427mm) 43 3/8"(1101mm) 43 6/8"(1111mm) 29 2/8"(740mm) 29 5/8"(750mm) 27 1/8"(689mm) 27 " (686mm) 31 1/8"(790mm) 31 1/8"(790mm) 34 2/8"(870mm) 52 " (1321mm) 34 3/8"(873mm) 52 1/8" (1323mm)
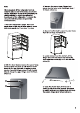
Installing the water lines In order for the ice maker to operate properly, a water line is required. You may need to purchase a water purifying system to do that. The water connection must be made by a qualified plumber. If the refrigerator is installed in an area with low water pressure (below 30psi/207KPa), you can install a booster pump to compensate for the low pressure. -the maximum inlet water pressure is 101.5psi/700kPa; -the minimum inlet water pressure is 30psi/207kPa.
(1)Connect Water Line to Household Water Following are two methods of connecting to your household water supply. Use the instructions specific to your installation. IMPORTANT: Turn off main water supply. Turn on nearest faucet long enough to clear the line of water. You will need the following tools(not supplied). Quarter-turn Shutoff Valve Ferrule (Sleeve) 1/4" compression nut 1/4" Water Line Household Supply Line Phillips screwdriver Flat-blade screwdriver 1/2" or adjustable wrench 3.
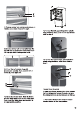
4. Insert the free end of the 1/4" water line into the brass fitting attached to the water inlet on the back of the refrigerator. 5. Slide the 1/4" compression nut over the ferrule (sleeve) and screw the 1/4" compression nut onto the brass ftting. 1/4" compression nut 1/4" water line Household Supply Line 1/4" shutoff valve with saddle clamp Ferrule (sleeve) Ferrule (sleeve) 1/4" compression nut G Brass fitting 1/4" water line H Water inlet 5.
Models with ice maker Models without ice maker Controlling the temperature We recommend that when you start your refrigerator for the first time, the temperature for the refrigerator is set to 39°F(4°C) and the freezer is set to 0°F(-18°C). If you want to change the temperature, follow the instructions below. Caution! When you set a temperature, you set an average temperature for the whole refrigerator cabinet.
temperature setting will revert back to the previous setting. 8. POWER 5. Energy saving Press the “MODE” button to turn on the energy saving function, the “Energy saving” icon will be illuminated. When the energy saving function is on, the temperature of fridge is automatically switched to 43°F (6°C) and the temperature of freezer is automatically switched to 1°F(-17°C). When energy saving function is on you can switch it off by pressing the “MODE” or “TEMP.
3. Automatic icemaker Icemaker makes Ice automatically. Note: When the ice maker dumps ice into the ice box, any sounds are part of normal operation. If ice is not dispensed for a long period of time, it may clump in the Ice box. If this occurs, please remove all the ice and empty the box. In case of prolonged absence and the ice maker is not used, close the water valve to prevent leaks. It is recommended that the first several ice charges be discarded to ensure highest quality of Ice.
About the ice maker PROBLEM The ice maker is not producing ice, enough ice, or cubes are hollow. POSSIBLE CAUSE(S) Ice maker is not turned on SOLUTION Press and hold FREEZER for 3 seconds to turn On/Off the ice maker. See “Using the Controls.” Kink in the water line Wait 24 hours after installation for ice production to begin. Straighten the water supply line. Inadequate water pressure Contact a licensed, qualified plumber.