Refrigerator Use & Care Guide Model: HRF266N6CSE For questions about features, operation/performance, parts or service, call: 1-877-465-3566
Table of Contents Brief introduction ..................................................................................................................... 1 Important safety instructions .................................................................................................. 2 Installing your new appliance ................................................................................................ 4 Description of the appliance .................................................................
Brief Introduction Thank you for your choosing Hisense. We are sure you will find your new refrigerator a pleasure to use. Before you use the appliance, we recommend that you carefully read through these instructions , which provide details about installing and using the product. Please ensure that everyone using this appliance is familiar with its operation and safety features. It is important that you install the appliance correctly and pay careful attention to the safety instructions.
Important Safety Instructions General safety and daily use It is important to use your appliance safely. We recommend that you follow the guidelines below. Store any food in accordance with the storage instructions from the manufacturer. Don't try to repair the appliance yourself. It is dangerous to alter the specifications or modify this product in any way. Any damage to the power cord may cause a short circuit, fire or electric shock.
If the fitted plug is not suitable for your socket outlets, it should be cut off and carefully disposed of. To avoid a possible shock hazard, do not insert the discarded plug into a socket. If in doubt contact a qualified, registered electrician. Do not use extension cords or multiple sockets which could cause overloading of wiring circuits and could cause a fire. Always plug your appliance into its own individual electrical socket which has a voltage rating that matched the rating plate.
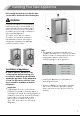
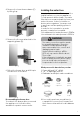
Installing Your New Appliance Before using the appliance for the first time, you should be informed of the following tips. 2" WARNING For proper installation, this refrigerator must be placed on a level surface of hard material that is the same height as the rest of the flooring. This surface should be strong enough to support a fully loaded refrigerator. The rollers, which are not casters, should be only used for forward or backward movement.
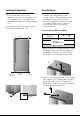
Leveling of appliance Door Removal For sufficient leveling and air circulating in the lower rear section of the appliance, the bottom feet may need to be adjusted. You can adjust them manually by hand or by using a suitable tool. To allow the doors to self-close, tilt the top backwards by 0.4" - 0.6". In case your home access door is too narrow for the refrigerator to pass through, remove the refrigerator doors and drawers.
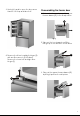
3. Use both hands to open the door more than 90°. Lift it up and take it off. Disassembling the freezer door 1. Pull out the freezer door and the upper freezer drawer (G) to the final position. G 2. Take out the ice storage box (H) by lifting it up in the direction of the arrow. 4. Remove the 4 hex head bolts hinges (E) with an Allen wrench (5/32",4mm). Remove the lower left and right door hinges (F). F H 3. Take out the upper freezer drawer (G) by lifting it up from the rail system.
4. Remove the lower freezer drawer (C) by lifting it up. C 5. Remove the 4 screws attached to the supporting frame (D). D D 6. Pull out the freezer door and lift it upin the direction of the arrow. Re-assembling the freezer door To reattach the drawer after you moved the appliance to its final location, assemble the parts in reverse order. Installing the water lines A water dispenser with a filter is one of the helpful features on your new appliance.
Connecting to the water supply line 1. First, shut off the main water supply. 2. Using a power drill and a 1/4’’ drill bit drill into the cold-water line and connect the saddle-type shutoff valve. Cold water line Pipe clamp 4. Flush the tubing. Turn the main water supply on and flush out the tubing until the water is clear. Then, shut the water off at the water valve after about a quart of water has flushed through the tubing. 5.
6. Turn the water on and check for leakage. CAUTION! Check to see if leaks occur at the water line connections Note: Use only the new tubing supplied with the refrigerator. Old tubing should not be used. After connected to the water supply line, please open the water valve to flush the filter for 5 minutes before use. The initial dark discoloration of water is normal.
Description of the Appliance 1 2 3 4 5 6 7 8 9 10 11 12 13 14 15 16 17 18 19 20 21 22 23 24 Door bins Vertical baffle part Water dispenser (inside) Fruit and vegetables crisper Full width pantry Freezer LED light Ice maker (inside) Ice bucket (inside) Lower freezer drawer Adjustable bottom feet Top cover Control panel Vertical baffle guide block Water filter Refrigerator LED light (inside) Air channel Glass shelf Criper Cover Upper freezer drawer Lower drawer partition (inside) Roll wheel Refrigerator door
Display Controls Your product has one control panel which is installed on the top cover. Use your appliance according to the following control guidelines. When the appliance is powered on for the first time, the backlighting of the icons on the display panel start working. If no buttons have been touched or the doors are closed, the backlighting will turn off after 60 seconds. The control panel consists of two areas about temperature, and one area about different modes.
Super Freeze Super Freeze If you want to decrease the time needed to freeze products in the freezer, please touch this button, the Super Freeze icon “ ” will be illuminated, the freezer temperature setting displays -12°F. Super Freeze can quickly lower the temperature and freeze your food faster than usual. This can retain more of the vitamins and nutrients in fresh food and keep your food longer. The Super Freeze mode allows you to freeze items inside with maximum speed.
Demo mode (Freezer/ Fridge Temperature Indicator moving) Demo mode is for store display, and it prevents the refrigerator from generating cool air. In this of Cooling off Mode, the refrigerator may seem like it is working but it will not make cool air. The indicators on the control panel will show double “0F”. To cancel this mode, press and hold “Ice On/Off” and “Energy Saving” keys at the same time for 3 seconds until the buzzer beep three times and the display panel will light for 3 second.
3. Insert the new filter into the filter holder. K K 2. Pull the water filter (K) from the filter holder (L). 4. Push the filter, and then turn it clockwise until it locks. L Note: To change the water filter easily, shut off the water supply valve. Sometimes, it is hard to disassemble the water filter because impurities in the water cause it to stick. If you are having difficulties, grip the water filter firmly and pull it out. When you pull the water filter, a little water can leak from the opening.
Note: Be sure to flush the dispenser thoroughly, otherwise water may drip from the dispenser. This means that there is still air in the line. Do not dispense the entire 2.5 gallon amount continuously. Depress and release the dispenser pad for cycles of 30 seconds ON and 60 seconds OFF. Reverse osmosis water supply: The pressure of the water supply coming out of a reverse osmosis system going to the water inlet valve of the refrigerator needs to be between 30 and 100psi (207 and 700kPa).
To re-install the glass shelves, tilt the front of the shelf up and guide the shelf hooks into the slots at a desired height (1). Then lower the front of the shelf so that the hooks can drop into the slots (2). 1 Using the freezer compartment The freezer compartment is provided with an upper drawer, a lower drawer and an ice box. To remove all of them, refer to page 8 for disassembly instruction. Press ICE On/Off to turn the ice maker On and Off.
Cleaning and Care For hygienic reasons the appliance (including exterior and interior accessories) should be cleaned at least every two months. WARNING! To avoid electrical shock, the appliance must not be connected to the main power supply during cleaning. Before cleaning, switch the appliance off and remove the plug from the main socket. Interior cleaning You should clean the appliance interior regularly. It will be easier to clean when food stocks are low.
WARNING! Do not use sharp objects to remove frost from the freezer compartment. Only after the interior is completely dry should the appliance be switched back on and plugged back into the main socket. Door seals cleaning Take care to keep door seals clean. Sticky food and drinks can cause seals to stick to the cabinet and tear when you open the door. Wash seal with a mild detergent and warm water. Rinse and dry it thoroughly after cleaning.
Helpful Hints and Tips Energy Saving Tips We recommend that you follow the tips below to save energy. Try to avoid keeping the door open for long periods in order to conserve energy. Ensure the appliance is away from any sources of heat (direct sunlight, electric oven or cooker etc.) Don’t set the temperature colder than necessary. Don’t store warm food or evaporating liquid in the appliance. Place the appliance in a well ventilated, humidity freeroom. Please refer to Installing your New Appliance chapter.
Iced products (ice cubes, popsicles): if consumed immediately after removal from the freezer compartment, will probably cause frost burns to the skin. It is recommended to label and date each frozen package in order to keep track of the storage time. Hints for the storage of frozen food Ensure that frozen food has been stored correctly by the food retailer Once defrosted, food will deteriorate rapidly and should not be re-frozen. Do not exceed the storage period indicated by the food manufacturer.
Troubleshooting If you experience a problem with your appliance or are concerned that the appliance is not functioing correctly, you can carry out some easy checks before calling for service, please see below. WARNING 1.Don’t try to repair the appliance yourself. If the problem persists after you have made the checks mentioned below, contact a qualified electrician, authorized service technician or the shop where you purchased the product. 2.A child entrapment warning statement is included below.
The motor runs continuously It is normal to frequently hear the sound of the motor, it will need to run more when in following circumstances: • Temperature setting is set colder than necessary. • Large quantity of warm food has recently been stored within the appliance. • The temperature outside the appliance is high. • Doors are kept open too long or too often. • After first installing the appliance or if it has been switched off for a long time.
Ice is not making • Did you wait for 12 hours after installation of the water supply line before making ice? If it is not sufficiently cool, it may take longer to make ice, such as when first installed. • Is the water line connected and the water valve open? • Did you manually stop the ice making function? Make sure you do not set the “Ice Off” mode. • Is there any ice blocked within the ice maker bucket? • Is the water pressure less than 30psi? Install a booster pump to compensate for the low pressure.
Disposal of the Appliance DANGER It is prohibited to dispose of this appliance as household waste. Packaging materials Packaging materials with the recycle symbol are recyclable. Dispose of the packaging into a suitable waste collection container to recycle it. Before disposal of the appliance 1. Pull out the main plug from the main socket. 2. Cut off the power cord and discard with the main plug. WARNING Refrigerators contain refrigerant and gases in the insulation.
Copyright Statement © 2019 Hisense Company Ltd. All Rights Reserved. All material in this User Manual is the property of Hisense Company Ltd. and its subsidiaries, and is protected under US, CANADA, MEXICO and International copyright and/or other intellectual property laws. Reproduction or transmission of the materials, in whole or in part, in any manner, electronic, print, or otherwise, without the prior written consent of Hisense Company Ltd. is a violation of Hisense Company Ltd.