5.1.2CH Soundbar with Wireless Subwoofer Model: U5120G USER MANUAL Before using the soundbar, please read this manual thoroughlyand retain it for future reference.
Contents Important Safety Instructions Safety Warning 3 3 4 What’s in the Box 7 Identifying the Parts 8 Main Unit Wireless Subwoofer Remote Control 8 8 9 Preparations Prepare the Remote Control Replace the Remote Control Battery Placement and Mounting Wall Mounting (if using option-B) Connections Dolby Atmos® DTS: X Use the HDMI Socket Use the OPTICAL Socket Use the COAXIAL Socket Connect Power Pair up with the subwoofer Use the Hisense EzPlay Function Basic Operation Standby/ON Auto-Standby / Aut
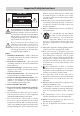
Important Safety Instructions C AUTION RISK OF ELECTRIC SHOCK DO NOT OPEN AVIS RISQUE DE CHOC ELECTRIQUE NE PAS OUVRIR The lightning flash with arrowhead symbol, within an equilateral triangle, is intended to alert the user to the presence of uninsulated “dangerous voltage” within the product’s enclosure that may be of sufficient magnitude as to constitute a risk of electric shock to persons.
Caution: - Use of controls or adjustments or performance of procedures other than those described herein, may result in hazardous radiation exposure or other unsafe operation. - To reduce the risk of fire or electric shock, do not expose this apparatus to rain or moisture. The apparatus must not be exposed to dripping or splashing and objects filled with liquids, such as vases, must not be placed on apparatus.
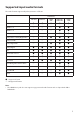
Supported input audio formats The audio formats supported by this system are as follows. Format Function OPTICAL COAXIAL HDMI ARC HDMI IN 1 HDMI IN 2 HDMI eARC LPCM 2ch ● ● ● ● ● LPCM 5.1ch -- -- -- ● ● LPCM 7.1ch -- -- -- ● ● Dolby Atmos - Dolby TrueHD -- -- -- ● ● Dolby Atmos - Dolby Digital Plus -- -- ● ● ● Dolby TrueHD -- -- -- ● ● Dolby Digital Plus -- -- ● ● ● Dolby Digital ● ● ● ● ● DTS ● ● ● ● ● DTS-ES Discrete 6.
Supported HDMI video formats The video formats supported by this system are as follows. Resolution 4K 4096 x 2160p3) 3840 x 2160p 4K 4096 x 2106p3) 3840 x 2106p Frame rate 3D Color space - RGB 4:4:4 YCbCr 4:4:4 8 bits - YCbCr 4:2:2 8/10/12 bits - YCbCr 4:2:0 10/12 bits 23.98/24/25/ 29.97/30 Hz - RGB 4:4:4 YCbCr 4:4:4 10/12 bits 50/59.94/60 Hz - YCbCr 4:2:0 8 bits - RGB 4:4:4 YCbCr 4:4:4 8 bits - YCbCr 4:2:2 8/10/12 bits 50/59.94/60 Hz 23.98/24/25/ 29.97/30 Hz 25/29.
What’s in the Box Main Unit AC power Cord x2 Remote Control / AAA Batteries x 2 HDMI Cable Wireless Subwoofer User Manual / Quick Start Guide / Wall Mounting Screws (x2) / Brackets (x2) / Bracket Screw (x4) / Wall Anchors (x4) * Power cord quantity and plug type vary by regions. • Images, illustrations and drawings shown on this User Manual are for reference only. Actual product may vary in appearance. • Design and specifications are subject to change without notice.
Identifying the Parts Main Unit 1 6 7 1 2 3 4 5 6 8 9 10 11 3 4 5 13 12 (ON/OFF) button Switch the unit between ON and Standby mode. (SOURCE) button Select the play function. VOL+/VOL- buttons Increase/decrease the volume level. Display Window Show the current status. Remote Control Sensor Receive signal from the remote control. Screws Remove the screws then install the wall mounting screws into the back of the unit.
Remote Control 1 2 3 4 5 6 7 8 9 10 11 12 (SOURCE) SURR (BT) Switch the unit between ON and STANDBY mode. Select the play function. Adjust the surround ON/OFF. Select the Bluetooth mode. Press and hold the (BT) button to activate the pairing function in Bluetooth mode or disconnect the existing paired Bluetooth device. 1 4 3 7 5 6 7 EQ Select a preset sound effect. / Skip to previous/next track in BT / USB mode. VOL+/VOL- Increase/decrease the volume level.
Placement and Mounting Placement A If your TV is placed on a table, you can place the unit on the table directly in front of the TV stand, centered with the TV screen. B If your TV is attached to a wall, you can mount the unit on the wall directly below the TV screen. A B Wall Mounting (if using option-B) WARNING Note: - - Installation must be carried out by qualified personnel only.
Connections Dolby Atmos® Dolby Atmos® gives you immersive listening e x p e r i e n c e b y d e l i ve r i n g s o u n d i n t h re e dimensional space, and all the richness, clarity, and power of Dolby sound. For more information, please visit dolby.com/technologies/dolby-atmos HDMI eARC/ARC DTS: X DTS: X The border sound is no longer constrained by fixed-position speaker placement or specific channel signals.
HDMI IN 1 HDMI IN 2 HDMI ARC Use the OPTICAL Socket - HDMI OUT TV eARC/ARC HDMI OUT Connect an OPTICAL cable (not included) to HDMI IN 1 HDMI IN 2 the TV’s OPTICAL OUT socket and the OPTICAL HDMI IN socket on the unit. Blu-ray Player / DVD Player / Recorder / Set-top Box...
device) around your location. Remove these conflicts or strong interferences and repeat the above procedures. Basic Operation • The subwoofer should be within 6m (18 feet) of the soundbar in an open area. Standby/ON • If the main unit is not connected with the subwoofer and it is in On mode, the POWER Indicator will flash. Follow step 1 ~ 4 above to pair the subwoofer to the main unit.
• The selected mode will show on the display. Display • Set the audio delay, provided only for the current playback mode. (As provided in the HDMI ARC audio delay mode, the delay mode is valid only for the HDMI ARC). - By default, the audio delay is set to 00. Mode ARC HDMI IN 1 HDMI IN 2 OPTICAL COAXIAL Bluetooth Connected Connection USB Adjust the Bass/Treble Level • • Press the BASS +/- buttons on the remote control to adjust bass level (bass +5 / bass -5).
OPTICAL / COAXIAL / HDMI / ARC Operation 1 Ensure that the unit is connected to the TV or audio device. 2 Press the (SOURCE) repeatedly on the unit or on the remote control to select the OPTICAL, COAXIAL, HDMI 1, HDMI 2, HDMI ARC mode. 3 Operate your audio device directly for playback features. 4 Press the VOL +/– button to adjust the volume to your desired level.
• • • • • If no other Bluetooth device pairs with this player within two minutes, the player will recover its previous connection. The player will also be disconnected when your device is moved beyond the operational range. If you want to reconnect your device to this player, place it within the operational range. If the device is moved beyond the operational range, when it is brought back, please check if the device is still connected to the player.
Troubleshooting To keep the warranty valid, never try to repair the system yourself. If you encounter problems when using this unit, check the following points before requesting service. No power • • • Ensure that the AC cord of the apparatus is properly connected . Ensure that there is power at the AC outlet. Press standby button to turn the unit on. Remote control does not work • • • • • Before you press any playback control button, first select the correct source.
Specifications Model Name U5120G Soundbar Power Supply AC100-240V~ 50/60Hz Power Consumption 80 W / < 0.5 W (StandBy) USB port for playback USB Compatibility USB Playback support / file formats 5V 500mA Hi-Speed USB (2.
WARNING: This product can expose you to chemicals including Lead, which is known to the State of California to cause cancer. For more information go to: www.P65Warnings.ca.gov. EN FCC INFORMATION (for US customers) NOTE: • This equipment has been tested and found to comply with the limits for a Class B digital device, pursuant to Part 15 of the FCC Rules. These limits are designed to provide reasonable protection against harmful interference in a residential installation.
U5120G