Beverage Dispenser USER MANUAL MODEL RC07N1CBD1
Contents 1. Important Safety Guide....................... 2 2. Specifications...................................... 5 3. Product Description............................ 6 4. Installation and Use Recommendations...............................8 5. Notes before Use...............................11 6. Product Use.......................................17 7.Troubleshooting and Maintenance....18 8.Disposal of Used Products.................19 1.Important Safety Guide 1.
1.2 Safety for children and infirm persons This appliance is not intended for use by persons (including children) with reduced physical, sensory or mental capabilities, or a lack of experience and Unpack the appliance and check for any external or internal damage. Should any damage be evident, do not plug in the appliance. Keep all packing materials and contact Hisense.
If the 3-prong plug is not suitable for Do not plug into a loose or damaged your outlet, the grounding prong should outlet to avoid risk of electric shock or NOT be removed under any circumstances. fire. If no 3-prong outlet is available, please contact a qualified, registered electrician. Do not use extension cords with this appliance. Always plug your appliance into its own Switch off the appliance and disconnect it from electrical power before cleaning or moving it.
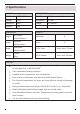
2.Specifications ELECTRICAL REFRIGERATION Model RC07N1CBD1 Unit Size ¼ HP Hermetically Sealed Voltage 115V Refrigerant R-134a - Frequency 60Hz Charge 3.5 ounces Current 3.0A DIMENSIONS 60.2inches Height 153centimeters 24inches Width 61centimeters 24.4inches Depth 62centimeters 133lbs Weight 60kg CAPACITY Selections 4 Levels 4 12 Oz. Cans 18 per level, 72 total 20 Oz. Bottles 9 per level, 36 total FEATURES User-customizable front poster image(available at www.Fathead.
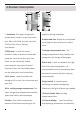
3.Product Description 1. Vend Rack: The upper refrigeration compartment contains a four-level vend rack. After fully filled, the rack can hold 72 short 12oz cans or 36 long appliance during installation. 6.Adjus table feet: Height can be adjusted by turning the feet to extend or retract them. cans/bottles. 2.Child Lock : In order to ensure 7.
12.Poster Frame cover: A flap cover on selection button. Common beverage cards top of upper door, which can be opened are included with Chill for users' use and by users to install the poster frame. replacement. 13.Poster window : The front display door window. 18.Delivery chute: The small opening for dispensing beverages. The delivery 14.Poster frame : The supporting frame, chute flap should be in place as shown in which holds the poster image. the figure to keep cool air inside the 15.
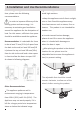
4.Installation and Use Recommendations Before using the appliance for the first time, please note the following recommendations. In order to improve efficiency of the Install the appliance in a dry place to avoid high moisture. Keep the appliance out of direct sunlight, rain or frost. Stand the appliance away cooling system and save energy, it is from heat sources such as stoves, fires or necessary to maintain good ventilation heaters.
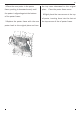
4.2 Changing Front Poster and Beverage selection cards PUSH 4.2.1 Changing the Beverage Selection Cards 1.Turn selection button upward from the bottom to show the beverage selection card, located on the back of each selection button. 2.Hold the poster frame handle at the middle top of the poster frame, and pull the poster frame upward and out. 2.Hold the left side of beverage selection card, and remove the old card. Slide the new card into place. 3.Place the poster frame on a horizontal surface.
4.Place the new poster in the poster frame, pushing it downward evenly until the poster is aligned against the bottom of the poster frame. 5.Replace the poster frame with the new poster back to the original place and turn the top cover downward to the original place. Close the poster frame cover. 6.Slightly bend the two corners at the top of poster, inserting them into the slots at the top corners of the of poster frame.
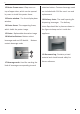
5. Notes before Use 5.1 Steps for installing and starting the appliance 8.Beverage selection: Select your beverage and enjoy! 1.Install the appliance on a level, smooth 5.2 Explanations on Operation of Display Panel floor. 2.Connection of power: Insert the plug into a standard 3-prong wall outlet. 3.Temperature adjustment: Find the display panel at the left upper corner inside the vend rack compartment.
Celsius. 5.3 Pre-cooling Storage Compartment The pre-cooling storage compartment can be used to cool and store beverages in unopened cases, or individual beverages. Two racks are included in the pre-cooling storage compartment. The storage compartment door is equipped with two bins for storage of canned or bottled beverages, or can also be used for Locks. Each vend level can be individually locked.
A: Corresponds to beverages at the top level (d) vend rack level (a) Note: After the selection button is pressed, B: the motor of the corresponding vend rack Corresponds to beverages at vend rack level (b) level will be started. It is normal to hear C: the vend motor running during the Corresponds to beverages at vend rack level (c) D: dispensing process. Corresponds at the bottom vend rack 5.
5.7 Vend rack loading guidelines Note: Most dispensing problems are from The vend rack can accommodate72(12 oz incorrect beverage loading. Please follow bottles) in all. Long 16 oz cans or 36 loading instructions. bottles. Requirements for container sizes Warning signals will not occur when the compatible with Chill are as follows: front vend door is open. Example NO Name 1 2 Short can Figure Size Qty Height Diameter H D H≤5.1in (13.
5.8 Guide to Beverage Loading Please load and operate the appliance according to the guidelines in this manual. 1 3 2 9 8 7 6 5 4 Incorrect beverage loading may result in When loading short 12 oz cans, ensure inconsistent operation. 1. Open the Front Vend Door and identify the four vend rack levels, which correspond to the beverage selection buttons, as described in diagram 4.5.
Note: When filling up the top vend rack Please do not mix different sizes or level, if the containers have a relatively shapes of containers on same vend rack large external diameter, you are advised level, for best dispensing performance. not to place any container at position number 6 to improve dispensing performance. 3.Repeat the above steps to fill up other vend rack levels with beverages 4.Close the front vend door when stocking is complete.
6. Maintaining this Product It’s recommended to clean, or wipe the appliance regularly at least every two months. Caution! The appliance should not be connected to electrical power during cleaning due to potential danger of electrical shock! Before cleaning, unplug the appliance by removing the plug from the wall outlet. Exterior cleaning -Wipe the digital control panel and temperature display with a clean, soft cloth.
7. Troubleshooting and Maintenance If you experience a problem with your appliance or are concerned that the appliance is not functioning correctly, here are some easy checks before calling for service, below. Symptom Warning! Don't try to repair the appliance yourself. If the problem persists after you have checked the potential resolutions below, contact a qualified electrician, or authorized Hisense warranty servicer.
8.. Disposal of Used Products It is prohibited, according to local regulations, to dispose of this appliance as household waste. Packaging materials Packaging materials with the recycle symbol are recyclable. Dispose of the packaging into a suitable waste collection container to recycle it. Before disposal of the appliance 1. Cut off the power cord, and discard the 3-pronged plug,separately. Warning! This appliance contains refrigerant and gases in the insulation.
Warranty for “CHILL by Hisense ” ONE‐YEAR LIMITED MANUFACTURER’S IN-HOME SERVICE WARRANTY This Warranty, provided by Hisense U.S.A. Corporation (hereinafter “Hisense”) covers the “CHILL by Hisense ” product (hereinafter “Product”) in Canada, the United States of America, Puerto Rico, Guam and the U.S.
DISCLAIMER OF IMPLIED WARRANTIES: LIMITATION OF REMEDIES Exclusions and Limitations: This Warranty covers manufacturing defects in materials and workmanship encountered in the normal, noncommercial use of the Product, and does not cover consumer instruction, delivery, installation, set-up, adjustments, cosmetic damage or damage due to acts of nature, accident, misuse, abuse, negligence, commercial use or modification of or to any part of the Product.
Write down the following information about your appliance to better help you obtain assistance or service if you should ever need it. You will need to know your complete model and serial number. You can find this information on the model and serial number label located on the Product.
USER GUIDE SUPPORT PAGE ASSISTANCE OR SERVICE Before calling for assistance or service, please check the troubleshooting section of your user manual. It may save you the cost of a service call. If you still need help, fol low the instructions below. When calling, please know the purchase date and the complete model and serial number of your appliance. This information will help us to better respond to your request.
For further assistance If you need further assistance, you can write w ith any questions or concerns to: Hisense USA Corp. Customer Service PO Box 3289 Suwanee, GA 30024 USA Hisense Canada Co., Ltd Customer Service 405 Britannia Rd E., Suite 11 Mississauga, Ontario L4Z 3E6, Canada Please include a daytime phone number in your correspondence. PRODUCT REGISTRATION To better safeguard your product, please log on to www.hisense-usa.com/support/productReg.asp to register your product.