
Installation Guide


• Fill the molds 1 inch at a time. Keep filling, bouncing and tapping
mold in between to spread the concrete inside the mold and to
drive out all the air bubbles
• Place the molds in a dry place out of direct sun for 24 to 48 hours.
• Once concrete is set unmold the castings. Turn mold over onto 2 x 4
lumber.
• Loosen sides of mold
• Lift out of mold on each end to remove casting
• The concrete will continue to set up for 10 more days, so be gentle
with handling until it is fully cured.
• Clean the mold immediately after use and store them out of the
sun.
• You may have some air bubbles in the surface or sides of your railing
which you may fill easily by mixing up a small batch of one part ce-
ment and one part sand and water to moisten. Use a damp
sponge to fill and swipe excess to create a smooth finish.
Additional Items Needed:
• 137 lbs. concrete or Portland ce-
ment and sand mix (details at right)
for straight and curved rail sets, cor-
ner rail 69 lbs
• mixing tool, I.e. shovel or garden
hoe
• Wheel barrow or mixing tray
• Lubricant or a mold release
• Two 2” x 4” x 24” of lumber
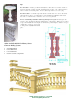
Casting Railings
General preparations
For 2 Piece Straight, Curved or Corner Railing
• Prepare the molds using a lubricant or a mold release. This will
help in removing the casting from the mold later and will extend
the life of the mold itself. We recommend the use of any con-
crete release agent, cooking spray or WD40 lubricant (use spar-
ingly).
• The Mix is two parts sand and one part cement or pre mixed
concrete. Use white Portland Cement and white sand for white
railing
• Mix a small amount of water at a time until you achieve a consis-
tency that is well mixed, and is thick, not runny.
Artistic Home & Garden Co, Camas WA 98607
Email: info@historystones.com